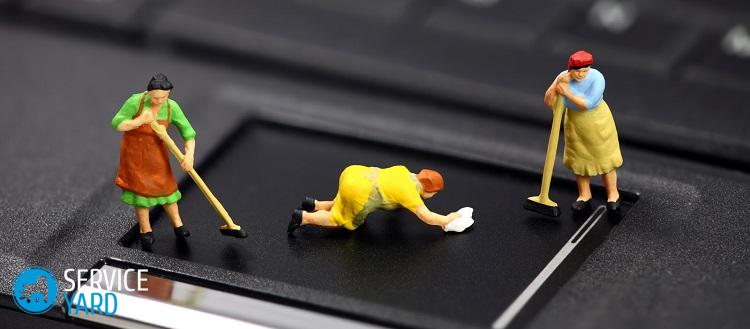
How to clean your computer?
For many, the computer has become an indispensable assistant and friend, and users spend a considerable amount of time behind it both at work and at home. Like any equipment, the computer needs regular cleaning: there are always fingerprints on the monitor, this is at best, on the keyboard there are crumbs, hair, dust and greasy spots. And if the system unit is buzzing like a falling plane, then all this in aggregate simply requires restoring order and cleanliness, otherwise, sooner or later, dust and dirt will lead to irreparable consequences. In this article, we will introduce you how to clean your computer so as not to damage the parts.
to contents ↑Why clean your computer?
Dust is the main enemy of a computer, unless, of course, viruses are counted. The accumulating dust clogs the fans, radiators, as a result, the movement of air masses inside the housing is hindered and as a result:
- Slow motion of all processes.
- Overheating of the video card, processor, parts of the motherboard.
If you do not regularly clean your computer from dust, then at best, it will start to stop and freeze, and then - in the near future, the processor, video card will burn out and the equipment will completely stop working.
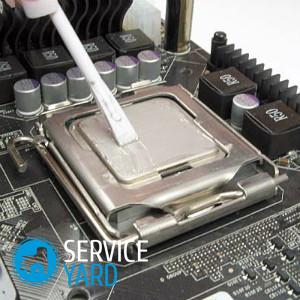
to contents ↑Important! Dust cleaning should also be carried out for laptop users. In this case, do not forget to replace the thermal grease, which affects the heat transfer between the surface of the processor and the heat sink. Our review is dedicated to this topic - “Thermal grease for a laptop - which is better?”.
How to clean your computer from dust?
To prevent this from happening, you must look after the computer and take good care of it. Set a cleaning schedule for the equipment and adhere strictly to it, do not wait until the computer starts to terribly slow down, shut down and restart itself.
Clean your computer in three steps:
- Cleaning the monitor and other items.
- Keyboard and mouse cleaning.
- Cleaning and restoring order in the system unit.
Important! Do not forget that the clutter of the system with various unnecessary programs also affects computer performance. You need to get rid of them. Follow the link and find out what is the best utility to clean your computer.
Instruments
For cleaning work, you will need the following tools:
- Flat brush with a long pile.
- Old toothbrush
- Household vacuum cleaner with a small brush.
- Spray can with compressed air. It will help remove dust in hard to reach places.
- Soft lint-free napkin.
- Cross blade screwdriver.
- Plastic clamps (5-8 pcs.). With the help of clamps, it is convenient to collect wires in bundles so that they do not impede the passage of air.
Once all the tools are assembled, start in order.
Monitor and other components
Cleaning the monitor and accessories: printer, router, speakers is not particularly necessary, brush off dust from them and wipe the screen with a special cloth. Such devices do not need to be cleaned, unless they are seriously stained with something.
Important! It is strictly forbidden to wipe the monitor with alcohol, as many screens have a special anti-reflective coating, and it can be damaged by an aggressive agent.
If greasy spots appear on the monitor, use a lint-free cloth or cloth to wipe the glasses to wipe the screen. Dampen the cloth with warm water and wipe the monitor thoroughly, then wipe it dry.
Important! Often all family members have access to a home computer. What if you want to hide some information from households? In this case, you will be interested in information about how to create a transparent folder on the desktop.
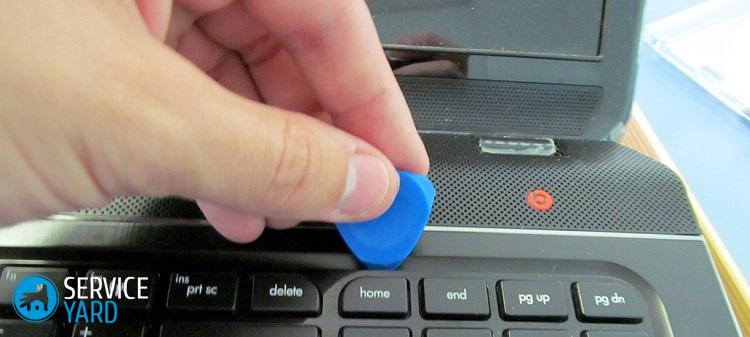
Keyboard
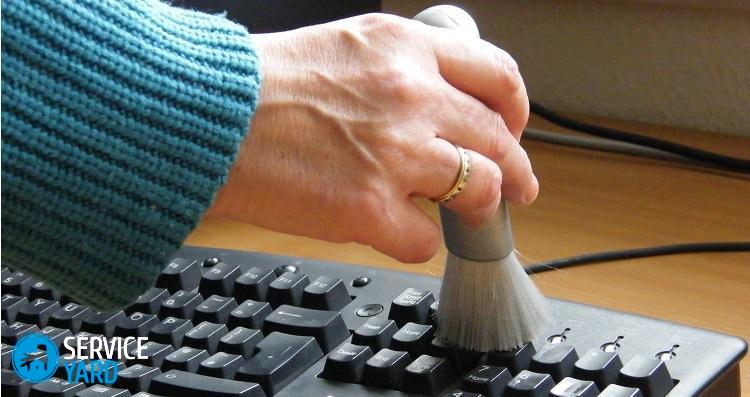
For many users, the keyboard is a piggy bank of various crumbs. To get rid of debris and properly clean your computer, proceed as follows:
- Turn the keyboard over and pat it well with your palm. To prevent the crumbs from clogging in the same holes, change the angle of the keyboard.
- Vacuum the keyboard or blow air. The distance to the keys can be any, since they still will not come off. But if you clean the laptop keyboard and decide to vacuum it, it is better to withstand a distance of up to 15 cm.
- If the keys are filled with a drink, then a complete analysis of the keyboard is indispensable. On many keyboards, the keys can be removed, but first sketch their location or take a picture so that later you do not have to collect the mosaic “by typing”. Wash the keys as follows:
- Wrap the removed keys in a plastic bag.
- In the bathroom, close the drain hole so that during washing, nothing will leak.
- Pour a little water into the bag and pour the washing powder.
- Thoroughly wash all the plastic, the flat bag from side to side.
- Rinse the keys carefully under running water.
- Put all the ingredients on a towel.
- Dry the keys with a hairdryer.
- Wipe the keyboard frame thoroughly with a damp cloth.
Important! If the keys on your keyboard are not removable, then clean them, together with the case, with a lint-free cloth or special alcohol wipes.
Mouse
Large debris gets into the mouse much less often. But sometimes villi, hair or thread can interfere with the optical beam to work qualitatively. In this case, disassemble the mouse, but be sure to remember the disassembly process to fold it in the future. Inside, collect the collected debris, clean the wheel of hairs, wipe the buttons and optics.
Important! If the mouse is mechanical, then wipe it with cotton wool with alcohol or just a cloth. And be sure to clean the wheel of fat with a cotton pad and alcohol.
If necessary, wash the mouse pad with soapy water, rinse and dry.
to contents ↑Important! Fans of working on a laptop lying on a bed or sofa, we recommend using special laptop stands.
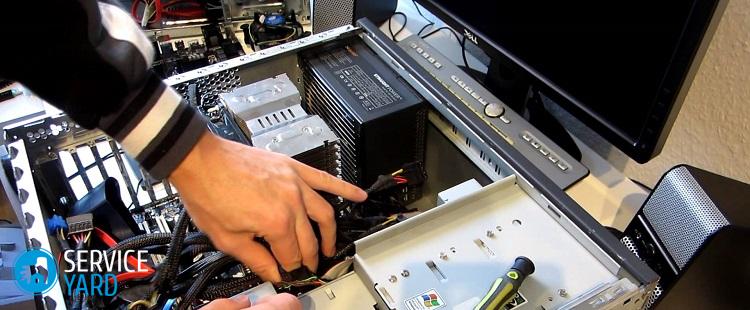
Cleaning the system unit from dust
The most difficult and responsible event is cleaning the system unit. Therefore, if you have never done this, then carry out the cleaning together with a specialist.
The whole process of cleaning the system unit can be divided into the following steps.
Preparatory:
- Disconnect the system unit from the network.
- Disconnect all wires and cables. If you find it difficult to remember which wire is connected to, then sketch or photograph the system unit with the wires turned on before disconnecting them. You can apply the same numbers with a felt-tip pen on each connector and wiring that goes to this connector or attach cardboard tags to indicate the numbers.
- Pull out the system unit in the middle of the room - it will be more convenient for you to clean your computer, because access to the system unit from all sides will be easy.
- Turn the device on its side with the side that does not open.

Dismantling the system unit and removing dust from its components:
- Remove the side cover of the system unit by unscrewing the screws on the back of the computer with a Phillips screwdriver.
- Having grabbed the special recesses on the cover with your fingers, slightly slide it back and set it aside. Fold the bolts into a plastic box.
- Carefully inspect all nodes inside the computer. All parts must firmly “sit” in place. If you find elements that are not attached to the board or to the box of the system unit, then remove such parts, otherwise they may be sucked by a vacuum cleaner.
Important! Pay particular attention to the condition of the finned radiators and fans installed inside. Slightly push the fan impeller and if it makes two to three turns by inertia, then the fan bearings are in order. If the impeller does not move, then you are late for cleaning - the fan clogged with dust, stopped, and the bearings jammed. In this case, you can not do without replacing the fan.
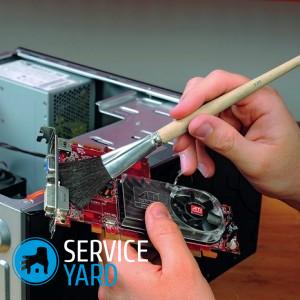
- Turn on the vacuum cleaner and go for a narrow nozzle along the entire area of the system unit, removing the main accumulation of dust. The distance from the nozzle to the boards should be 5-10 millimeters. Where there are no boards, you can walk end-to-end with the nozzle. Choose the minimum power of the vacuum cleaner, especially if this is the first time you are conducting such a process.
- Use a brush when working with a vacuum cleaner. Move the brush on the circuit board and knock down the dust so that the vacuum cleaner sucks it.
- Using a can of compressed air, remove dust from the fins of the processor cooling radiator.
- The video card also has a fan that can be cleaned with a can of compressed air. Insert the can into the plastic tube (included), remove any accumulated dust. Take extreme care not to damage small parts of the board.
Important! When working with spray can, try to keep it upright, and the tube should be at a small distance from the work surface.
- Thoroughly vacuum the power supply to clean the computer properly. Take a wet cloth around the perimeter. Work carefully without touching the wires and boards.
- If there is a need (when the computer is working, the cooler of the power supply unit makes an increased noise), disassemble the power supply unit, clean it with a vacuum cleaner and lubricate the cooler with machine oil.
Important! In addition to the basic recommendations on how to properly clean your computer, take note of a few useful tips that will facilitate the whole process and allow you to make it safe:
- Before vacuuming coolers, stop their rotation or disconnect from the board.
- After cleaning, grease the fan. Carefully remove it, peel off the small sticker on the base and drip the engine oil.
- For prevention, clean the monitor as soon as it becomes dirty, the mouse and keyboard every three months, and the system unit once every six months.
- You can not touch the boards with a damp cloth: firstly, they are very sensitive to water, and secondly, the boards are able to catch on the fabric and bend or break out. Wet cloth can be walked only on the back of the system unit - in those places where the connectors are.
- It is most convenient to clean the fans with a regular hard toothbrush.
System unit assembly:
- After cleaning, fix all the elements in their places.
- Close the system unit cover.
- Flip it to the correct position.
- Walk the outside with a damp cloth and remove any dirt.
- Let the system unit dry for 20 minutes.
- Connect all the wires on the back of the system unit.
- Connect the power cord to the system unit and plug it into the network.
to contents ↑Important! Power surges in the electric network have a very strong influence on technology, and especially on computers. So that you do not have to purchase expensive burned parts for equipment, it is better to immediately purchase uninterruptible power supply for computer.
Stock footage
Silent operation of the computer indicates that you did everything correctly, cleaned the equipment from dust and now you can safely work without fear that at the most inopportune moment, the equipment will “slow down” or fail. Health to you and your technique!
 (No ratings yet)