

How to sew a dress dudes with their own hands?
Dandies appeared on the streets of European cities in the early 50s of the last century. The world has just begun to recover from the horrors of war, poverty and hunger. People again wanted to rejoice, have fun, relax and, of course, dress beautifully. Bright colors and light fabrics perfectly matched the overall elated mood. And then a new youth style came into fashion. In the Soviet Union, his adherents were called dudes. How to sew a dress dudes with their own hands? We will discuss this now.
to contents ↑Fabric or finished dress?
It’s not particularly difficult to sew a dress or a suit for women in the style of dudes with our own hands - our grandmothers were perfectly able to do this with their primitive “Singer” and “Podolsky”. True, there is a small nuance - in those days when this style was extremely popular, it was almost impossible to purchase a fashion item in a store. But many people were able to do everything they wanted with their own hands, so there was no question of sewing or buying. In modern stores you can find clothes for every taste. Including one that matches the style that prevailed in European fashion in the middle of the last century. But you need to know what exactly to look for.
to contents ↑The main features of the style
This direction has several characteristic features that you need to have an idea about in order to sew a duffel dress with your own hands:
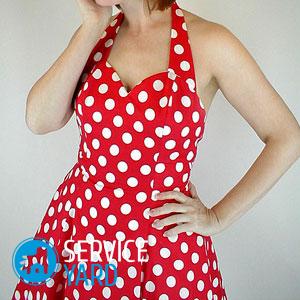
- a fluffy skirt, often multi-layered;
- bright colors - plain or with a large pattern;
- light tissue;
- petticoats or extra layers;
- wide waistline.
There are other signs - they indicate what you can wear such a dress with. Will look good;
- high-heeled pumps;
- large, but not lurid jewelry;
- voluminous hairstyle.
to contents ↑Important! The petticoats do not have to be the same color as the outer layer, they can be in tone or contrasting.
Is a classic obligatory?
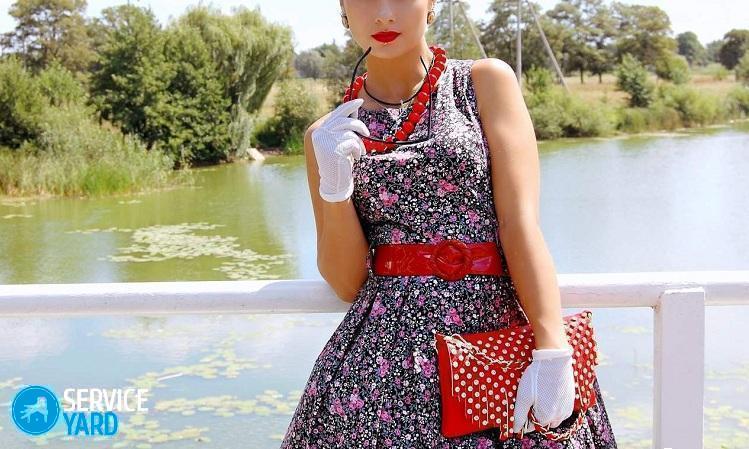
When choosing a fabric, special attention should be paid to the colors and patterns. The material may be plain, but this is not necessary. In those years, the following colors were in fashion:
- flowers
- peas;
- strip.
Important! If you are going to do something like a reconstruction of a dude’s outfit, it is these patterns that you must choose.
But in the yard is the twenty-first century, fabric manufacturers offer other interesting options for girls, so it’s quite possible to afford to add modern notes to your outfit:
- apply print materials;
- sew a dress made of fabric with geometric patterns;
- take metallized materials in gold or silver;
- use acidic shades - such colors were not yet invented in those years, but if there were such clothes, dudes would certainly wear them.
Do I need a pattern?
Any thing, of course, is better to sew on patterns. But if you think how to sew a dress in the style of dudes, a pattern is not required.
to contents ↑Important! For a skirt, it is not needed at all, and as for the bodice, then very interesting options are possible. For example, to make a combined dress from a new skirt and an existing blouse with short sleeves or without them at all.
Choose material
Before you sew a duffel dress for graduation or any other holiday, you must, of course, choose the material. Fabrics are lightweight but well-shaped:
- batiste;
- chiffon;
- silk;
- chintz;
- poplin;
- satin;
- thin linen;
- tulle;
- guipure;
- kapron.
to contents ↑Important! The latest material may be in doubt. Indeed, a dress entirely from it is not worth sewing - it does not allow air to pass through well. But to make the top layer of the skirt is quite possible. But the knitwear for the lower part is not very suitable - it drapes too well. But from it you can make, for example, the top.
Fabric calculation
The amount of material depends largely on how many layers your skirt will have and whether they will all be from the same material.
For an adult single-layer skirt with a fabric width of 150 cm, the calculation is as follows:
- Measure the length of the skirt.
- Multiply it by 2.
- Add 2 bodice lengths and 1 sleeve length to the result.
- Add another 15 centimeters to various little things - allowances, processing with an inlay or rudder, etc.
- If 2-3 layers of the same fabric are expected, the length of the skirt is not multiplied by 2, but by 4 or 6.
to contents ↑Important! The lower layers can be made of mesh or tulle - the calculation of the amount is the same as for the main fabric, but without a bodice.
Dress top
Fashionistas from the middle of the last century preferred several types of sleeves:
- simple straight line;
- wing
- flashlight.
If there is a blouse that is suitable in color and style, you only have to redo it a bit. It all depends on how she fastens:
- If the clasp is on the back, it must be removed and a long, hidden zipper should be sewn in instead.
- The front closure can be left, but pick up beautiful large buttons.
- In addition, the blouse will have to be sutured along the side seams so that the volume of its lower part exactly matches the waist circumference.
- You may need to shorten it so that the bottom edge is only a couple of centimeters below the waistline.
Why else do you need an old blouse?
The fitted bodice pattern can be taken in the magazine or on the Internet, as well as ordered in the studio. But an option that is very popular with modern needlewomen is also suitable - to open an obsolete blouse and simply circle it. It is necessary that the blouse fit exactly in size. And don't forget to flog and cut the tucks! However, if you are thinking about how to sew a children's dress in the style of dudes, tucks are not needed.
As for the skirt, the most popular option is the sun or half-sun. One and the other lie directly on the fabric.
to contents ↑Start to cut
Cutting is better to start with a skirt-sun or half-sun. The method depends on the cut width:
- longer skirt length;
- less than the length of the skirt.
Important! In the first case, the skirt-sun can be seamless, but it will be necessary to make a cut for the zipper - side or back (the second option is more convenient). Half sun is always done with a seam.
Wide cut
The skirt is covered in one piece. You need to know only two measures:
- waist circumference
- product length.
We sew a skirt for a dress of a duffel with our own hands:
- Fold the fabric four times.
- Calculate the notch radius by dividing the waist circumference by 6.28.
- From the closed corner, set the result on both sides and connect the resulting points with an arc.
- Set the product length aside from these points, and connect the new marks with an arc.
- On the hem add 2 cm allowance for the edge treatment, along the notch - 1 cm on the seam.
- Without straightening the fabric, cut the workpiece.
The half-sun skirt is slightly different. The fabric does not fold four times, but twice. In this case, it is better to use a compass:
- From one of the corners along the fold line, set aside the radius of the notch — it is calculated exactly the same as for the sun, plus 1 cm for the allowance.
- With the compass foot on the mark, draw a semicircle.
- From the intersection points of the semicircle with the bend and the edge, set the length of the product.
- Draw an arc between these points.
- Make a 2 cm allowance for the hem.
Important! For a dress in the style of dudes, a sun skirt is preferable, since it is more magnificent.
If the cut is narrow
Sewing a fluffy skirt from a narrow cut is not the most rational option.Not every material is suitable, but only plain or one where it is easy to fit the pattern. But the fabric needs much more than when the cut is wide:
- Lay out the material in one layer.
- Decide what angle you will draw the notch from.
- Place a large piece of paper under the cut so that its edge protrudes beyond the edge from the side opposite the recess.
- Pin the sheet with tailor pins.
- From one of the corners, set aside the radius of the notch on both sides.
- Connect the points with an arc.
- On the edge from the edge of the notch, set aside the length of the skirt plus the hem allowance.
- Extend the cut line beyond the edge.
- Set aside the length of the product from the end of the arc - the mark will be on paper.
- Connect the marks with an arc.
- Circle the edge on paper - you have a segment that you need to cut out from a separate piece and sew to the main panel. Do not forget to fit the picture.
- Cut 3 more main parts and 3 segments.
to contents ↑Important! If the fabric is plain, the extra seams on the hem can be masked by embroidery, applique, prints.
Do-it-yourself petticoat for a duffel dress
A petticoat is a must for a dress in this style. True, it is not necessary to sew it separately, it can also be part of the skirt.
Important! The first option is suitable for fabric, since this part is almost always starch, the second - for tulle and mesh.
You can stitch it:
- from the same fabric;
- from any thin, but hard material, suitable in color;
- from a grid or tulle.
The manufacturing principle is the same. It is easiest to work with tulle - it holds its shape perfectly, it does not need to be hemmed, but it can be cut in all directions. In addition, the petticoats do not have to starch:
- Take the blank of the sun skirt folded 4 times (as cut).
- Fold the tulle 4 times.
- Place the blank so that its folds coincide with the folds of tulle.
- Attach the skirt blank to the tulle with tailor pins or a basting seam.
- Circle the part and cut.
You can, of course, decompose the tulle and the workpiece in one layer, but this will take up much more space. There is no need for this - the material is cut perfectly, even if it is folded into ten layers or more. So you can simultaneously cut two or three petticoats.
to contents ↑Important! Fatin does not need to be hemmed, so no allowance for hem is needed.
Collect dress
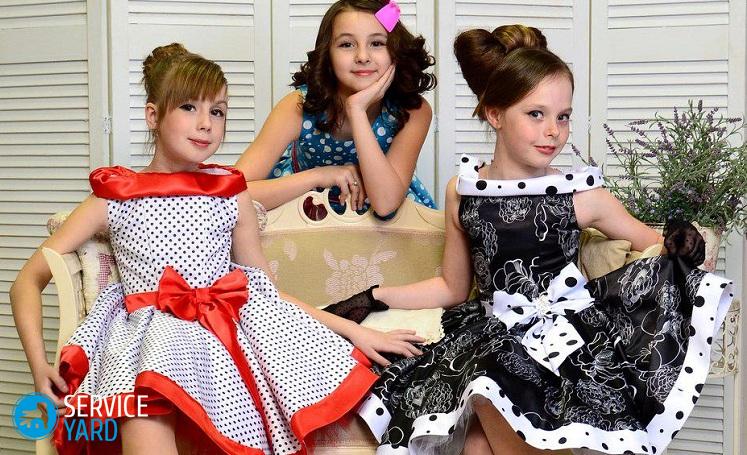
Dress dudes for girls with their own hands differs from an adult only in size and lack of tucks. The sequence of work does not depend on this, but on the design of the bodice and on whether you sew a layered skirt or with a separate petticoat.
In addition to the main fabric and lining material, you also need:
- corsage tape;
- secret lightning.
Dress with a layered skirt
You can start with the skirt:
- Fold all the layers together, aligning the notches.
- Designate a place for the zipper and make a cut - while most of the zipper should not be on the skirt, but on the bodice.
- Sweep parts around the edge of the notch.
- Sew the base and inner layers.
- You have to fold the hem. This can be done immediately or after the entire product is assembled.
Important! The first option is suitable for a short skirt-sun, which was cut in one piece - it is almost impossible to cut so that the edge is uneven. The edge of a skirt made from several pieces is best handled last.
Putting up the bodice
The assembly order of the bodice is the same as for any dress.
Important! It is easier to work with parts when they are already overcast, especially if the fabric is very shed. Therefore, do not postpone overlock processing for later, but rather do it right away. There is no need to overcast the bottom.
Getting started:
- Sweep and stitch tucks, if any.
- Sweep the shoulder and side seams.
- Try on what happened, if necessary - trim the seams.
- Stitch the shoulder and side seams.
- Flatten the allowances.
- Work on the bottom of the sleeve: make a drawstring, if it is a flashlight, and hem a simple straight line or wing.
- Stitch the sleeve, iron out the allowances.
- Sew the top of the sleeve with a basting seam, with small stitches (or with a large stitch on the machine).
- Pull the top slightly.
- Sweep the sleeve and try on your product - the landing is adjusted by assemblies on the okat.
- If everything is in order, stitch the sleeves.
- Cut the neckline with a trim trim.
Final assembly
You have very little left, but this stage requires accuracy:
- Iron the zipper allowances on the seamy side of the bodice and skirt.
- Bast the bottom of the bodice to the notch of the skirt, aligning the edges of the cuts with a zipper.
- Try it on and then stitch the details.
- Sweep the stocks of both parts together, iron on the side of the skirt.
- Sweep and sew a zipper.
- Fold the edge of the base layer, and trim the tulle from the edge.
Separate petticoat
The dress is cut with removable layers in the same way as in the previous case. The assembly order differs only in that only a part of the main fabric is sewn to the bodice. For a separate petticoat you need:
- color matching fabric;
- elastic tape in tone;
- material for bottom processing;
- sewing supplies.
Important! For such wardrobe items, materials that are well starchy, but do not become too harsh, are most suitable. Cotton or linen is preferred.
As for bottom processing, there are several options. The hem can be:
- just hem;
- process with overlock;
- sheathe lace or braid.
If the petticoat with a seam, sweep and grind the seam, and then the order will be as follows:
- Process and iron allowances.
- Take an elastic tape along the upper edge - the piece should be slightly smaller than the waist, and during the stitching the elastic should be slightly stretched.
- Handle the bottom.
to contents ↑Important! If there is not enough wide elastic band, you can make a drawstring and insert a regular linen elastic into it.
Belt
A wide belt is a spectacular and very characteristic detail of a dude's dress. If your creation will be worn by a little girl, you can add a dress with a wide satin ribbon, tying it with a bow.
Important! Bows are also a part of this trend, so there will be no eclecticism.
But you can also make a belt on the clasp. You will need:
- a strip of fabric with a width of 10-12 cm and a length equal to the circumference of the waist, plus 10 cm;
- corsage tape or dense fabric;
- hooks or buttons.
Manufacturing technology will seem to you very simple after you have already sewed a dress. The only thing to keep in mind is the ratio of the size of the strip of fabric to the corsage tape. The tape should already be strips about 2.5 times.
We carry out the work:
- Fold the strip in half, lengthwise, face out.
- Iron the fold.
- Fold the strip with the front side inward.
- Sew it along the edge, leaving one short side open.
- Iron allowances, including those on the open side.
- The corners of the allowances are obliquely cut very close to the seam.
- Turn the workpiece out.
- Insert the corsage tape.
- Close up the open edge.
- If desired, sew a belt around the perimeter with a decorative stitch.
- Mark the places for the hooks and loops and sew them.
A little bit about belts
It is not necessary to make the belt tied or hooked. Other options are possible:
- traditional - with a buckle;
- on buttons;
- on the lacing.
to contents ↑Important! You can add modern notes to your outfit - make, for example, a belt using the macrame technique or weaving with beads.
Stock footage
As you can see, it is very possible to make a bright, effective outfit in the style of the 50s of the last century with your own hands. Of course, you have to work hard, but the fact that in such a dress you will attract attention and look very interesting is a fact!
- How to choose a vacuum cleaner taking into account the characteristics of the house and coatings?
- What to look for when choosing a water delivery
- How to quickly create comfort at home - tips for housewives
- How to choose the perfect TV - useful tips
- What to look for when choosing blinds
- What should be running shoes?
- What useful things can you buy in a hardware store
- Iphone 11 pro max review
- Than iPhone is better than Android smartphones
 (No ratings yet)