

How to sew a shirt?
The idea to start sewing men's clothes sometimes frightens even experienced needlewomen who have already got their hands on the manufacture of women's and children's products. And the seams are not like that, and the trims and collars are handled differently - abandoning the usual tricks can be difficult. But if you want to please your loved one - why not try it? Moreover, in reality everything is not so complicated. In addition, some women are trying to have men's-style items in their wardrobe, so new tricks will not be superfluous. How to sew a shirt will be discussed in our article.
to contents ↑Types of Shirts
Before sewing a women's shirt, for beginners it will be very useful to deal with men's sewing. Men's shirts are divided into two types:
- summer;
- shirts under the tie.
The summer shirt has an open collar, and with a shirt it is made on the counter - this is a more complicated option. Better to start with summer. It also has the advantage that it is possible to sew such a product from a bright and even colorful fabric so that the errors that are inevitable in the first stage do not spoil the general appearance. In addition, the summer shirt can also be assembled with a regular seam, with open sections processed overlock. But if you want to make a branded product, you need to immediately master the seam.
to contents ↑We try a seam
This variant of joining parts is also called a linen seam, since it is used for the manufacture of duvet covers, pillowcases and other similar products. To sew a shirt, you need to be confident enough to own this, in fact, a fairly ordinary technology.
The main version of the seam is performed in several stages:
- Cut 2 identical patches.
- Determine which side the allowance will be ironed on - this part should be overlaid on top.
- Fold the blanks so that the cut of the lower part protrudes 2-5 mm.
- Bend the bottom stock allowance to the top.
- Sweep and stitch shreds.
- Spread the workpiece in one layer face up.
- Iron the allowance on the side of the part that was on top.
- Iron the seam on the front side.
- Stitch the stock at a distance of 1 mm from the bend - it is better to use a seam with a stitch.
- Iron the seam on both sides.
to contents ↑Important! All the details of a classic men's shirt are stacked in this way. But nothing prevents us from using this method of joining when sewing summer shirts - both male and female.
Training
Knowing the main seam, you can quickly find a way to sew a men's shirt - a master class will take not so much time. The question immediately arises, where to get the pattern:
- It is best to order it in the studio, because there everything will be done strictly by standards. She will come in handy again and again if you are going to sheathe your lover further.
- But not everyone has such an opportunity, but building a pattern on their own is a rather painstaking task (although in old sewing editions the process is described in detail).
- The most popular options are to translate from a fashion magazine or download on the Internet, fortunately, many fashion houses have their own sites and regularly upload patterns along with manufacturing instructions.
- The traditional home option, when an unnecessary, but suitable in size product is opened, is not very suitable here - there is too much fuss with seam seams. But, if there is no other way, then you can use this one.The main thing is not to cut off the seams, but to carefully tear them apart. It is better to iron over allowances, rather than cut them off, so that if necessary, the pattern can be corrected.
Choose fabric
Shirts are most often sewn from shirts. The summer version can also be from ordinary chintz or satin. Adhesive calico is usually used to strengthen the collar. In all cases, you need to consider that this product is often washed, so the fabric should not sit down.
To avoid troubles, the material must be decoded:
- Wet the cut in warm water.
- Gently wring it out, but do not twist
- Dry a little to keep it moist.
- Spread it on a horizontal surface with the wrong side up.
- Dry with an iron.
- Follow the same procedure with calico.
to contents ↑Important! The fabric should not be folded in half - thus it is very easy to iron the fold, and then it will be very difficult to smooth it.
Cut
If you took a pattern from the magazine, it indicates how the details should be cut:
- along the shared thread;
- along the transverse;
- oblique.
The drawings usually put arrows, which must be translated into patterns. If for some reason there are no arrows, follow a few common principles:
- The main details - a shelf, a back, a sleeve - are cut along the lobar.
- The yoke, riser and cuffs are located transversely.
- Plain fabric when cutting is folded along, the edges are combined.
Important! In magazines and on specialized sites, halves of drawings of racks, flirts and cuffs are usually given. This is not very convenient. It is much better to cut them all out of paper, and then transfer them to the fabric. But if the cut is large enough, you can cut into halves, combining the middle sections with the fold of the fabric.
Transfer the patterns to the fabric (if you have a shabby plain fabric, it is better to use a special aqua marker for this purpose, which is easily washed off) and make allowances of 1.5 cm across all sections. Small parts are cut with an allowance of 1 cm. These fragments include:
- collar;
- rack;
- pockets
- cuffs;
- sleeving cuts;
- slats.
to contents ↑Important! If the fabric is striped, the cut must be folded so that the edges of the strips coincide, not the edges.
We strengthen the details
Assembling the product will be much easier if you prepare all the parts in advance. Start by reinforcing the collar. Glue calico can have different stiffness - it is soft for summer shirts, harder for office shirts, and if you need a collar for a tie, the hardest calico is glued in two layers.
The collar for office shirts requires special attention, because the layers in it are different. One gasket has an allowance, the other does not. Therefore, we do this:
- We glue the part with the allowance on the upper collar.
- Glue the second layer over the first, there is no allowance for this workpiece. The gasket is ironed so that it does not come off after a few washes.
In principle, the second layer does not need to be glued to the entire part. Only corners can be strengthened in this way if the calico is thick enough.
to contents ↑Important! There is another way - special plastic bones inserted into the wings.
Strap
The straps on the shirts are of two types:
- double;
- man’s.
Double bar
Its width is 2-4 cm, depending on the style. Along the edge, no allowance is left.
Option 1:
- Iron the bar twice on the wrong side of the shelf.
- Sew it at a distance of 1 mm from the fold.
Option 2:
- As in the first case, iron the bar twice on the wrong side.
- Mark the places for buttons and loops.
- When the product is ready and the buttons are sewn into place, the bar itself will be fixed.
Men's strap
It differs from double in that it is done only on the left shelf - where the loops are located. On the other hand, there is the usual double, buttons are sewn onto it. Width is 3-4 cm, plus 1 cm for processing:
- Iron the bar twice on the wrong side of the shelf.
- Make a stitch at a distance of 0.5 cm from the fold.
- Unscrew the bar so that the cut is in the fold.
- Iron.
- Lay the second line at a distance of 0.5 cm from the fold.
Assembly of the main parts
The time has come to tackle the shelf. In a classic male pattern, it consists of two parts - the actual shelf and barrel. Choose a seam with which you will grind parts to sew a shirt:
- Sew the barrel to the shelf part - you need to do this from the side of the barrel.
- Sew the yoke to the shelf and back - when folding the parts (as in the description of the seam), the yoke will be from the bottom.
Double yoke
In classic men's shirts, the yoke is often doubled. However, no allowances are visible. What's the matter?
- Tilt the parts of the shelf and back to one of the parts of the coquette.
- Roll the shelves and the back of the steering wheel and roll up on a yoke.
- Place the second part of the coquette face down on the whole structure.
- Stitch both parts of the coquette, capturing and the main workpiece.
- Cut allowances so that no more than 5 mm is left.
- Pull out the main parts through the neck.
- Iron the seams.
The most important task has been completed, it remains only to postpone the yoke along the seams, as well as to sew the neck sections.
One of the main technological differences in the manufacture of men's and women's shirts is the order in which details are sewn together:
- When sewing a women's shirt, the shoulder and side seams are first connected, and only then the sleeve is sewn.
- In men's clothing - the opposite is true, the sleeve must be put in the armhole before the side seams and even the seam of the sleeve itself are made. To do this, you need a certain number of pins - it is more convenient to inject the part, rather than to bite it.
Here is the standard order:
- Fasten the sleeve in the armhole - do not forget about the marks on the okay.
- Sew in the part - this should be done from the side of the sleeve.
- If the seam is normal, the allowance is ironed onto the armhole, and then a line is laid along the armhole.
- Sew in one line the side seams of the shelf and back and the seam of the sleeve itself.
Important! If you used a regular seam, seam allowances together and then iron them on the back side.
Sleeves
Sleeve straps
The appearance of the product largely depends on how well the various small parts are processed. In particular, the straps of the sleeves. There are several options, but the most popular is the following:
- Mark a cut 12-14 cm long - it should be at the back.
- Cut a bar that should be 16-18 cm long and 7 cm wide.
- Stitch it along the cut from the side where the distance from the seam to the cut is greater.
- Make a cut so that up to the edge of the line there is about a half centimeter or even a little less.
- At the end of the cut, cut a triangle towards the end of the stitch.
- Iron the allowance that runs along the bar.
- Tuck the free edge of the cut twice 0.5 cm to the wrong side and sew.
- Iron the triangle up.
- Iron the bar itself into the cut, and then fold it in half and iron it too, so that the fold covers the seam with which the part is sharpened.
Important! As for the top edge of the bar, it folds into a corner and adjusts to the sleeve.
Cuffs
Glue the outer part of the cuff with calico to almost finish sewing the men's shirt (there should be an allowance on the gasket):
- Iron the bottom cut to the wrong side.
- Stitch the oversize.
- Fold together the two parts of the cuff with the sides facing each other.
- Sew them.
- Cut allowances to 0.5 cm, in the corners - obliquely.
- Turn out a cuff.
- Iron it.
- Lay folds along the bottom of the sleeve - the folds should be located on the side of the cut.
- Place the cuff so that the reinforced part is on the front side.
- Stitch.
- Iron the allowances towards the cuff.
- Mask the seam from the front side, bending the reinforced part of the cuff so that it covers the stitch.
- Stitch the cuff to the edge, and then stitch.
Collar
One of the main details of the men's shirt - and women's, however, too. You have already prepared it. Then proceed as follows:
- Cut the lower part (on which there is no calico) along the upper and side cuts.
- Mark the middle of both parts of the collar.
- Align the details.
- Fold them with their faces to each other, chop or sweep, combining all the slices.
- Stitch the details from the bottom, making transverse stitches in the corners.
- Cut the allowances in the corners to a distance of 1 mm from the seam.
- Cut straight allowances so that 0.5 cm remains to the seam.
- Iron the oversize onto the lower collar.
- Turn out a detail.
- Straighten the corners.
- Iron so that the edge of the upper collar comes into contact with the lower one.
- Sew the bottom sections
- Fold the collar in half.
- Check the corners and trim the bottom cut.
- Stitch the collar, paying particular attention to the corners (it is better to lay an auxiliary thread there).
Rack
In any case, the stand should be slightly stiffer than the collar. At the same time, that part that will come in contact with the neck is glued together with allowances, and the outer one is strictly according to the pattern:
- Iron allowances on the inside of the neck side allowances on the wrong side.
- Sew a line along the bottom edge, grabbing and cutting the allowance.
- Place a collar on the outer pillar so that its glued side is on top.
- Align parts and grind on top of racks, and cut allowances.
- Turn out a rack.
- Iron.
- On the bend of the outer strut, outline the grind line.
- Sweep and stitch the collar, iron allowance towards the rack.
- Take a stand so that the hem lies on the stitch.
- As with all small parts, lay a line along the edge.
Bottom
Well, almost everything is ready, it remains to process the bottom:
- Fold the seam allowance to the wrong side by 0.7 cm.
- Press down.
- Fold the allowance again the same distance.
- Sew it at a distance of 0.1 cm from the fold.
It remains to make loops and sew buttons.
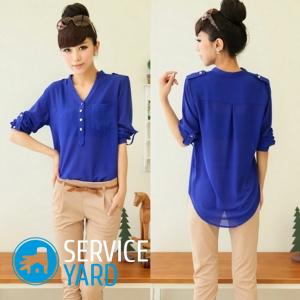
to contents ↑Women's shirt
Once you try to sew a men's shirt, you will very easily find the answer to the question of how to sew a women's shirt. Yes, almost the same, only the clasp is made on the other side, that is, the strap with loops will be on the right shelf. In this case, you can safely use ordinary seams. There are many options for processing the bottom - it can, for example, be made curly. As for the small parts, they need to be strengthened in the same way so that they better keep their shape. All paired parts are strengthened:
- rack;
- collar;
- cuffs.
As for the sequence in which it is most convenient to sew a women's shirt with your own hands, it will be as follows:
- Treat all planks the same way as for a men's shirt.
- Sweep the product for the first fitting, if necessary - lay a fold along the back, while assembling the yoke is not necessary, you can limit yourself to one detail.
- Sew the yoke and connect it to the shelf and back.
- Attach the sleeves.
- Treat the collar as described.
- Stitch the collar.
- Work on the bottom, sew on the buttons and make loops.
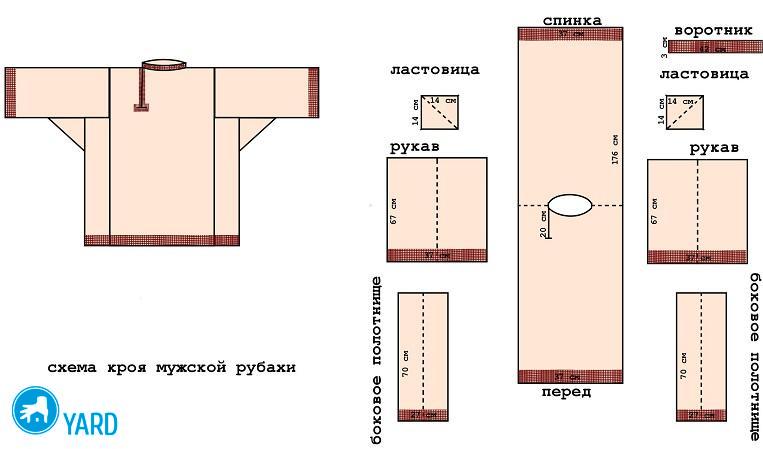
Without pattern
Is it possible to sew a long-sleeved shirt with my own hands without a pattern quickly? There is nothing impossible! Only this will not be a classic shirt - rather, something in a folk style, because before they sewed shirts without any patterns. It will turn out all-cut, and as a collar you can make a low stand. Although nothing prevents to connect different types of cuts - for example, to make a shelf, back and sleeves in the form of rectangles, but to sew on classic cuffs and a classic collar. Of course, this will be a women's shirt, with a very interesting style.
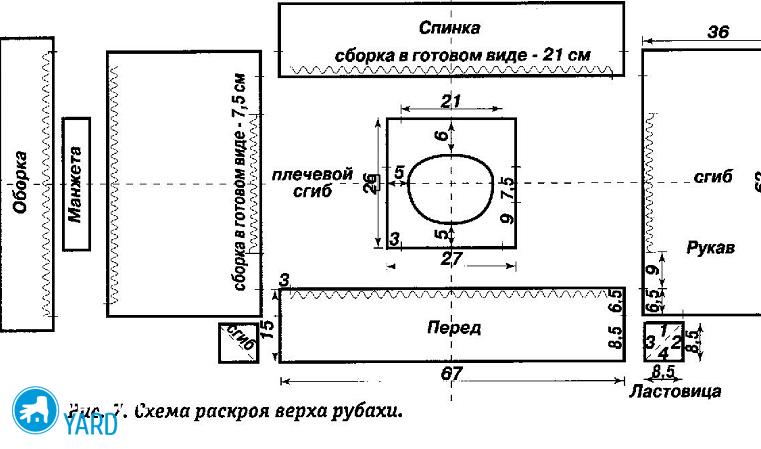
The pattern is a few rectangles - 2 shelves, 1 back, 2 sleeves. When stitching the collar, the neck is flipped and laid in assemblies, the bottom of the sleeves, too.
to contents ↑Important! Such a shirt can also be made with a solid shelf by making an incision in the front or back.
Stock footage
Thus, to sew even a classic shirt is not so difficult, the main thing is to follow the technology and carry out all operations patiently and accurately.As for unconventional models, the modern fashion is so democratic that any novice needlewoman can come up with something interesting, including representatives of the stronger sex.
- How to choose a vacuum cleaner taking into account the characteristics of the house and coatings?
- What to look for when choosing a water delivery
- How to quickly create comfort at home - tips for housewives
- How to choose the perfect TV - useful tips
- What to look for when choosing blinds
- What should be running shoes?
- What useful things can you buy in a hardware store
- Iphone 11 pro max review
- Than iPhone is better than Android smartphones
 (No ratings yet)