

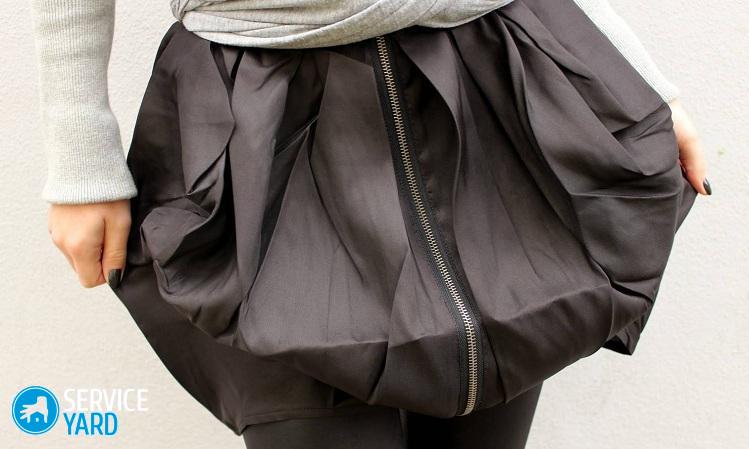
How to sew a balloon skirt?

Girls who love a fluffy cut should turn their attention to a balloon skirt. Her sophisticated and extraordinary forms have won today all the world's catwalks. She earned her popularity by the fact that she can beautifully emphasize the waist and female bends. Unfortunately, not everyone can afford to have such a stylish thing, since the ready-made option is quite expensive and not everyone can afford it. But there are no problems that cannot be solved. This thing can be made independently, and we will tell and teach you how to sew a balloon skirt with your own hands.
to contents ↑Who needs this style?
The balloon skirt first appeared on the world catwalk in 1964. Its creator was Pierre Cardin. Its essence lies in the fact that it repeats the shape of the bud of a flower, only turned upside down. This style is absolutely perfect for tall girls with a slim figure. But owners of magnificent forms can wear it. The most important thing is to choose the right fabric and model:
- Owners of the “triangle” shape should pay attention to the midi length model. This way you can hide your wide hips.
- The “inverted triangle” should do the opposite. Your main task is to emphasize and visually round your hips.
to contents ↑Important! Unfortunately, full-bodied girls with short stature should refuse such a skirt style, as it will only emphasize your fullness.
We take into account the features of the style
Despite its simplicity and versatility, the balloon skirt is very whimsical and requires a detailed selection of things and accessories. Therefore, before you start sewing this product, you should consider some facts:
- Due to the fact that the skirt-cylinder is fixed at the waist with a tape or braid, the most advantageous option is to sew a short product.
Important! A short balloon skirt should be worn by girls with beautiful legs, since this option emphasizes these zones.
- The skirt can be pulled up at the sides and in the middle, smooth or creased. Here it all depends on your type of figure and taste preferences.
Important! When choosing fabrics, pay attention to denim, gabardine, silk, satin and knitwear. It is they who will best hold the shape of the future product you need.
- This is a fairly universal thing, as it can be used both in the office style and for a party.
Important! The balloon skirt did not bypass the wedding fashion. There are already many outfits where she is included in the bride's outfit.
- The balloon skirt can look good in absolutely any color. But the most popular are brown, blue or black.
to contents ↑Important! For the spring-summer period, lighter shades, such as sand, powder, blue or white, are suitable.
What can you combine with?
When choosing a top, remember that a balloon skirt is the main focus of your look.
Important! This style of skirt fits perfectly into styles such as Retro, Boho, Vintage and Romance.
We select the right outfit:
- Since the cut of this model is quite loose, the top must be tight-fitting. An excellent duet will be the combination of a cylinder skirt with jackets, t-shirts and blouses.
Important! Avoid oversized styles, as they can give your figure a spherical shape.
- An excellent accessory to a balloon skirt is a strap.It will perfectly complement it and create the effect of an even thinner waist.
Important! The strap must be in the color of the skirt.
- For a party and a festive event, stiletto shoes are a great option. As for the daily look, this style will complement sandals or ballet shoes. For the autumn-winter period, boots should be worn under this skirt. In addition to creating a chic look, you will also visually make your legs longer.
- If you are a casual style fan, T-shirts of the most diverse models will be an excellent combination option.
Workshop on the manufacture of balloon skirts
In order to sew a balloon skirt with your own hands, you will need the following materials:
- Fabric (footage is completely dependent on your size and desired length);
- Threads in color;
- Sewing machine;
- Needles;
- Remnant or tailor's marker;
- Secret lightning;
- Tailor pins.
So, when everything is ready, you can go directly to sewing.
Method number 1
This style will consist of two skirts - the upper and the lining:
- Make all necessary measurements.
- The upper part must be carved according to the pattern of the sun.
Important! When patterning, the hem should be made necessarily 30 centimeters longer than the length of the future finished product.
- By the same principle, we cut out the lower part, only 10 centimeters shorter than the main length of the product.
- Stitch the side seams of the skirts.
- Next, connect the upper and lower parts. To do this, gently pick up the hem of the upper skirt and apply it evenly to the bottom, fix it.
- If everything was done correctly, then sew both parts along the hem using a sewing machine.
- Place the lower skirt on the upper one along the waist line and sew.
Important! While stitching the workpiece, you can turn the lower part slightly. This way you get the screw twist effect.
- Decorate the top of the skirt with a yoke and sew on a zipper.
That's all, the skirt is ready!
Method number 2
This is a more complicated option for sewing a balloon skirt with pockets on the yoke. You will need for this model:
- Duchess fabric (according to your parameters and the length of the future product);
- Lining fabric;
- Non-woven;
- Threads in color;
- Lightning.
The sequence of actions is as follows:
- To get started from duchess you need to find the necessary elements:
- Front yoke with a fold - 2 pieces;
- A cloth with a fold (it can be cut out according to the pattern of the sun or a half sun) - 2 pieces;
- Back yoke with a fold - 2 pieces;
- Burlap pocket - the same should be made of lining fabric.
- Make a side right seam so that the side cuts for the pockets remain free. Collect the upper sections on the panels.
- The burlap pockets should be pinned to the entry allowances with the front side as follows: the burlap pocket from the duchess pockets is at the back, the burlap pocket from the lining fabric is at the front. Stitch them along the marked lines of future seams, above the entrance to your pocket. Next, the burlap pockets should be ironed and ground. The upper sections must be noticed.
- On the yoke, make a side right seam. Stitch the top yoke to the top cut of the skirt.
- Sew a zipper along the left sections. Make the left side seam from the bottom to the end of the already sewn zipper.
- Next, you should draw the bottom cut of the skirt. For this:
- The inner yoke should be placed on the workpiece to the front side and pin it to the upper cut.
- Unscrew the yoke at the secret fastener and pin it to the top cut of the workpiece.
- Unscrew the allowances on the front side and pin them on top of the coquette so that they are on the upper cut of the future product.
- Sew a line along the top cut, and unscrew the allowances on the wrong side.
- Turn the inner yoke up and stitch on the seam allowances. Turn it on the wrong side and spread it over the seam of the stitching, mark it.
- Lay the seam on the front side of the workpiece so that it runs exactly along the seam of the seam.
- Sew the yoke to the braid.
- Iron and sew seam allowances.
Remaking an old skirt
Why sew a new skirt if you can remake the old? Thus, you will save not only time, but also your budget.
To do this, you will need:
- An old skirt (preferably with some kind of ornament, for example, a cage);
- Flap mesh or chiffon;
- Flap of dense and stiff fabric.
The algorithm of actions is as follows:
- Cut the old skirt so that it is slightly shorter in front.
- Sew another “bell” from the fabric flap, which will be the top of the product. It should be slightly shorter than the bottom and two times wider than it.
- From the hard fabric, cut out two wide stripes, which in a circle will be equal to the upper layer of the skirt and waist.
- Lay tucks on one side.
- Stitch the upper and lower layers of the future skirt along the waistline.
- Sew a strip of stiff fabric to the bottom and top of the product.
How to sew a balloon dress?
This style of dresses is suitable for girls with narrow hips, since due to its hourglass shape it makes the figure mouth-watering and sexy. In order to sew it yourself, you will need:
- Silk fabric;
- Tailor pins;
- Rubber.
When everything is ready, you can proceed directly to the pattern of a balloon dress with your own hands and sewing it:
- Take a piece of fabric and fold it in half. Secure with pins.
- Measure the length of your future dress.
- On each side, add 4.5 centimeters per elastic to the total length.
Important! For greater breathability, 5 centimeters can be measured.
- Excess need to be cut off. As a result, you will get the basic workpiece base.
- Iron the fabric well.
- Stitch the workpiece on both sides and insert the elastic.
- In the end you should make armholes for the hands. Measure the volume of the hand, measure on the fabric and cut out the necessary part. Stitch it to the base.
- Work on all the edges of the finished dress.
to contents ↑Important! A great addition to this style will be a leather belt and large accessories. As for shoes, it will suit absolutely anyone, starting from ordinary ballet shoes and ending with evening high-heeled shoes.
Stock footage
A balloon skirt is a fairly simple, but at the same time versatile style that suits both daily wear and cocktail parties. Therefore, in order not to spend fabulous money on the purchase of this thing, using the recommendations of our specialists, you can sew a skirt that is perfect for your figure. And having such a thing in the basic wardrobe, you will always remain in the center of male attention!
- How to choose a vacuum cleaner taking into account the characteristics of the house and coatings?
- What to look for when choosing a water delivery
- How to quickly create comfort at home - tips for housewives
- How to choose the perfect TV - useful tips
- What to look for when choosing blinds
- What should be running shoes?
- What useful things can you buy in a hardware store
- Iphone 11 pro max review
- Than iPhone is better than Android smartphones
 (No ratings yet)