

How to sew a skirt-trousers with your own hands?
Have you decided to learn how to sew and are thinking where to start? Then a skirt-pants is what you need. With a minimum of effort, you get a luxurious little thing that can be worn in any situation and with any blouses, sweaters or T-shirts. For some models, a pattern is not needed at all. How to sew a skirt pants? Read about it in our article.
to contents ↑What is a skirt pants?
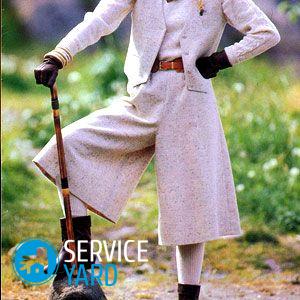
Even women who fiercely hate traditional women's clothing are sometimes forced to wear a skirt or dress. They complain that it’s uncomfortable, that they feel uncomfortable because they are used to trousers. A skirt-trousers combines the convenience of trousers and the elegance of a skirt. In fact, these are the same favorite pants, only wider and with additional elements more characteristic of skirts. Such an item can be part of both an everyday wardrobe and a summer one. If you take expensive thin fabric, then you will get a great evening outfit in which you can go to a diplomatic reception and to the theater.
to contents ↑Skirt-trousers - DIY pattern
There are three ways to sew a skirt pants:
- on the pattern of the skirt;
- on the pattern of trousers;
- without a pattern at all.
Skirt pattern
In order to make the patterns of skirts, trousers, you need a basic pattern of the skirt. Building it yourself is quite difficult, although in many sewing books you will find detailed instructions on how to do this. Especially many options are given in older editions. But there are many models on the Internet on specialized sites. If you really want to learn how to sew well and create your own models, it is best to use this option.
But nothing prevents you from doing it easier. You need a pattern of the most ordinary straight skirt, without any folds and assemblies, and there is no studio nearby where you can order it? Well, you have to get out of the situation differently. If your wardrobe has an old straight skirt that you don’t wear and don’t know where to put it, use it as a basis for a pattern. To do this, do the following:
- Open the belt.
- Spread all the seams (allowances can not be cut, but simply ironed well on the wrong side).
- Do not forget to tear tucks.
- If the front or back consists of one part, fold it in half along the length, aligning the sides.
- Iron the fold.
- Place parts on a Whatman paper or cardboard, pin and circle (no allowances).
Old straight trousers are also suitable - only in this case we need classic, not jeans and not harem pants.
to contents ↑Important! If you took as a basis a pattern of a skirt of medium length or short, circle the details so that there is still space on the sheet from the lower cut.
Take measurements
Even if you already have a ready-made pattern for a skirt or trousers, you will have to model it, but for this you need measurements:
- waist circumference
- hip girth;
- hips height;
- seat height;
- length of the product;
- leg length on the outside (stride length);
- leg length on the inside (step width).
Waist and hips
Waist circumference is measured on the narrowest part of your figure, hip circumference - on the protruding bones and buttocks.
Seat and Hip Height
The height of the seat is not a measure, but the difference between the measures. To get it, you need to measure:
- leg length on the outside from the waist to the floor;
- leg length on the inside from the groin to the floor.
Subtract the second from the first measurement - we get the seat height.The height of the hips is measured on the outside of the thigh from the waist to the hips.
We simulate a pattern
Having received the contours of the parts on paper, check them with your measurements. There are a few more considerations to consider:
- Those with wide hips should slightly increase their stride width.
- When modeling, pay particular attention to seat height. If it is insufficient, you will be uncomfortable walking. Otherwise, when this distance has turned out more than necessary, the pants will sag.
The further order will be as follows:
- Continue the midline.
- Lay on it the length of the product from the waist to the floor.
- If you already have a waistline, set the height of your hips down.
- Draw a thigh line through this point.
- From the waist line in the middle of the front, set aside the height of the seat, adding 1.5 cm to it.
- Draw a line through this point parallel to the waist and hips.
- Continue this line so that it goes beyond the middle of the front.
- Set aside a segment equal to ⅛ of the circumference of the hips on it (on the back of this line it will be necessary to extend another 2 cm).
- Connect this point to the intersection of the hips with the middle of the front in a smooth line.
- From the same point, draw down a line parallel to the middle of the front, over the entire length of the product.
- Connect this new point to the bottom of the bottom line.
- Continue the waistline from the middle by 3 cm and put a point.
- From this point, build a gap under the zipper - a strip of 18-20 cm long.
- Cut out the part.
to contents ↑Important! The pattern of the back part is modeled in the same way - all constructions of the stepping part come from the midline. The seat height will be the same as for the front. No clearance needed; pocket line too.
Fabric calculation
The material for a trouser skirt is best taken not very thick and one that holds its shape well. The calculation is simple:
- if the width of the cut is greater than the circumference of the hips, you will need one length of the product, plus 10-15 cm for additional parts and processing of seams;
- if the cut width is less than the widest measure, 2 lengths will be needed;
- for burlap pockets, if any, more lining fabric is needed - no more than 20 cm.
to contents ↑Important! If a fabric with a large pattern, it will need more, because it will need to be customized.
Cut
To carve a skirt, trousers, you will need not only fabric and pattern, but also tailor pins or several heavy objects, if the patterns are made of tracing paper or graph paper:
- Fold the cut in half along the length line, if the fabric is not very wide - align the edges.
- Overlay the front and back patterns.
- Circle them with allowance of 1.5 cm for all seams and 4 cm for the hem of the bottom.
- Cut out the details.
- Cut out a belt - a strip, the length of which is equal to the circumference of the waist, plus 6 cm to the fastener.
You should get five details:
- 2 - front end;
- 2 - back;
- 1 - belt.
Skirt pants - how to sew?
As always, you need to start sewing with darts. Sweep them all, sew up, iron them. Farther:
- Sweep and stitch side seams.
- Iron allowances, if necessary - sew overlock or overcast manually with a buttonhole stitch.
- Sweep the step seams.
- Try on what you did - pay special attention to how comfortable it is for you to walk.
- If necessary, adjust the seat height.
- Sew step seams.
- Iron allowances in different directions and process.
- Sew the back seam.
- Sweep the middle seam before starting the zipper.
- Sweep and sew a zipper.
Belt
The belt can be with or without loops. If you plan to sew in loops, cut them out - 4 strips 6 cm long and 4 cm wide. On the belt outline the places to sew them on. They should be located symmetrically.
Farther:
- Fold the loops in half, facing outward, iron the fold.
- The allowances on the long sides are folded inward and ironed.
- Stitch each strip around the perimeter.
- As for the belt, fold the workpiece in half with the wrong side inward, iron the bend.
- Turn the part so that the front side is inside, stitch the side seams.
- Iron allowances on the long sides inward.
- Take and sew the loops on the fold of the belt (they are sewn to the front side, the stitching point is swept).
- Insert the top of the skirt-trousers and the free ends of the loops in the section of the belt, stitch.
Shutdown
Now all you have to do is cut up the legs. It is done like this:
- Fold each trouser leg to the wrong side by 0.5 and 3.5 cm.
- Sew the hem with a hidden seam or stitch, depending on the style.
Elastic skirt
This model is sewn of light flowing fabric of medium width. There will be only two parts - right and left. They are symmetrical and fit exactly the same. Pattern is not needed, but will need, in addition to material and sewing accessories, an even wider elastic band. Take the following measurements:
- product length (from waist to floor);
- side seam length;
- length of a step seam.
- calculate seat height
We sew a skirt pants with our own hands:
- For this model, it is better to take a fabric 100-110 cm wide. It will take 2 lengths. Cutting is done directly on the material.
- Fold the cut in half with the inside out, align the edges.
- Determine where you will have a waistline - at a distance of 1.5 cm from the cut.
- From the waist line, measure the height of the seat with an allowance towards the bottom, put a point.
- Set aside the length of the product from the same point with an allowance for hemming the bottom.
- Draw a line perpendicular to the edge through this point.
- Cut off the workpiece.
- Mark the second part the same way.
Assembly
This model has fewer seams than the previous one. You need to sew two legs, and then connect them together. For this:
- Sew step seams from the bottom to the groin.
- Since you still have edges, you do not need to process allowances.
- Turn one leg up on the front side.
- Insert it into the second, combining free sections from the waist to the groin in two parts.
- Sew the front and back seams (it is advisable not to break the stitch).
- Iron allowances.
Belt
For the belt you need an elastic tape 4-6 cm wide. Cut a piece equal to the waist circumference without allowance or even a little shorter (the tape stretches, and if you leave the allowance, it simply won’t hold the pants). Farther:
- Sew the elastic into the ring.
- Bring it to the upper cut of the trouser skirt - the tape needs to be slightly stretched, and to make it more convenient, you can mark the alignment points on the belt and on the cut of the trouser skirt.
- Stitch the belt with a zigzag stitch.
- Chop the bottom by bending the legs by 0.5 and 3 cm.
to contents ↑Important! If the fabric is thin and does not crumble, you can simply overcast the trouser legs.
Stock footage
As you can see, there is absolutely nothing complicated in sewing a skirt-trousers with your own hands, no. You can even make several different models to diversify your wardrobe without compromising on your convenience. Good luck with your creative experiments!
- How to choose a vacuum cleaner taking into account the characteristics of the house and coatings?
- What to look for when choosing a water delivery
- How to quickly create comfort at home - tips for housewives
- How to choose the perfect TV - useful tips
- What to look for when choosing blinds
- What should be running shoes?
- What useful things can you buy in a hardware store
- Iphone 11 pro max review
- Than iPhone is better than Android smartphones
 (No ratings yet)