

Sew a jersey blouse
Knitwear made a real revolution in the fashion industry. Designers very quickly appreciated the merits of this material, and on the pages of magazines appeared models for which complex patterns, and sometimes even patterns, were not needed. Moreover, any beginner needlewoman can try to create something unique if she has the necessary tools. About how to sew a blouse from knitwear, read our article.
to contents ↑Knitwear Features
Do-it-yourself blouse from knitwear begins with the study of the characteristics of the material. Knitwear has many advantages over other fabrics:
- softness;
- ability to drape well;
- ability to hide work defects;
- ease;
- a large assortment.
The list of advantages is very attractive. However, to know the shortcomings of this material is much more important, but they are:
- with improper care or storage, the fabric stretches;
- poorly finished edge blooms;
- arrows may appear from hooks;
- Cotton knitwear sheds quite a lot.
It follows that it is not always useful to hang knitwear on shoulders, wash in a delicate mode, and dry in a flattened form on a horizontal surface.
to contents ↑What do you need?
Based on the characteristics of the material, we can conclude that when cutting and sewing, you need to avoid small parts, complex processing and the like. The fewer the seams, the better. So it’s very useful to choose the simplest style. For work you will need:
- sewing machine with overlock;
- tailor's scissors;
- long ruler;
- square;
- crayon, soap or aquamarker;
- needles and threads.
to contents ↑Important! In general, things from knitwear, fleece and some other modern materials are more convenient to sew with the help of a carpet - a device that simultaneously grinds and overcasts.
Pattern
Yes, but where is the pattern in this list? But she is not. For a blouse, it will not be needed - as well as for other products from similar materials. Before you sew a sweater with your own hands, a blouse or a dress, decide how you will cut it:
- directly to the fabric;
- on an old knitwear.
On fabric
It depends on the style. You can cut directly on the fabric:
- “bat” sleeve blouse;
- tunic
- pleated blouse on shoulders.
On an old t-shirt
On the old knitwear you can find a variety of things. Two options are possible:
- tear a t-shirt, smooth out the allowances and cut out every detail;
- circle the whole t-shirt.
If you are going to sew a product of a complex style and you have something suitable, you can draw patterns on it - the first option will do, with all the yokes, tucks. But the fact is that knitwear allows you to get the right shape due to draperies, so that without additional difficulties it is quite possible to do. Therefore, nothing prevents just to circle a T-shirt.
to contents ↑How to cut knitwear?
Do-it-yourself blouse from knitwear, like any other product, begins with cutting. And here it is necessary to take into account some subtleties:
- Knitwear has a certain knitting direction, so all the details need to be cut along, with the exception of those that process the neck or armholes.
- The fabric is laid out in one layer.
- If there is a need to fold the cut in two layers - it is better to sweep it around the perimeter and in several more places.Of course, this will slightly increase the operating time, and there is no full guarantee that the material will not disperse.
- Patterns, if any, must be secured with some heavy objects, not pins.
- If you tailor the pattern, the pattern should already be with allowances.
- Cut the fabric with only very sharp scissors.
Adjust the machine
Before you sew a blouse out of knitwear with your own hands, you need to adjust the machine well:
- Set the stitch length to 2 mm.
- Try a line on a shred.
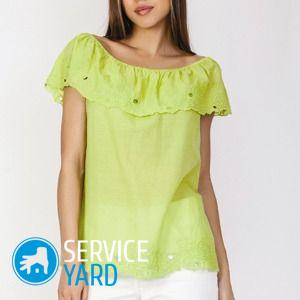
The simplest blouse
If you need a very simple do-it-yourself blouse from knitwear - patterns will not be needed. But you need:
- long ruler;
- tailor's square;
- aquamarker;
- scissors;
- fabric and sewing supplies.
As for the measurements, then only one is needed - the length of the product.
Important! Such a blouse can be with or without a belt - the belt can be made of the same fabric or leather.
Fabric calculation
To find out how much material is needed, in this case is extremely easy. You need to multiply the length of the product by 2. The blouse turns out to be quite wide, the size is regulated by the folds on the shoulders.
Important! There is a special option for expectant mothers - a drawstring from the wrong side under the chest, into which the cord is inserted and displayed from front to outside.
Cut
In principle, this model can be cut into two layers - of course, with all the precautions, that is, by making sure that the fabric does not slip and the layers do not diverge. Folding should be across:
- Find the middle of the fold.
- Make a mark.
- Left and right, set aside equal distances of 10-15 cm.
- Make a cut.
- From the fold at the edges, set aside the approximate height of the armhole - for example, 20 cm (the main thing is to observe symmetry).
You already have a blank that you can only collect.
Assembly
Such a blouse is sewn very quickly, but first you need to lay the folds, and this is best done with an assistant:
- Lay a bast on the shoulders - you can use very large stitches, or you can simply draw lines.
- Put on your future blouse.
- Lay a few folds on the shoulders, again observing symmetry, that is, they should be directed on both sides either to the neck or to the armholes.
- Sew stitches along the shoulder seams, stitching pleats.
- Sew the side seams (you can from the marks to the bottom, but you can leave cuts at the bottom).
- Sew sleeves, neck and bottom.
The blouse is ready!
to contents ↑Important! It will look good with trousers and a straight skirt, and if desired, you can supplement it with a belt.
Drawstring blouse
This product is laid exactly the same as the previous one, only you need to plan a place for the drawstring in advance. She passes under the breast:
- Make a cut for the neck.
- Seal and stitch the folds.
- Sew side seams.
- Take a drawstring (you can take a long braid or ribbon).
- Mark the holes for the holes in the middle of the front.
- Carefully cut and tear holes.
- Sew a drawstring.
- Work the armholes, neck and bottom.
- Insert the cord.
- On the edges, attach the restraints, like sportswear, or just beads.
Elastic blouse
A slender girl can afford a spacious short blouse with a wide elastic band. Such a stylish little thing will look with trousers, and with any skirt - both straight and flared. The fabric will need very little - the length of the product minus the width of the belt.
Such a blouse is hidden in the same way as the two previous ones, that is, marking is done directly on the fabric, and the folds are laid on the model. The beginning of the assembly is exactly the same - exactly until the moment when it will be necessary to process the bottom:
- Sew the elastic into the ring.
- In several places, notice the bottom cut of the blouse - this must be done so that the fabric is evenly spaced.
- Stitch the elastic to the cut, not forgetting that the elastic tape should be slightly stretched.
One-piece blouse
Models with a bat sleeve are truly universal. They fit chubby and thin, the sleeve can be of any length.If it is long, then it should be narrowed to the wrist, if short - it can be left wide. Both that, and another can be on a cuff.
Diverse and styles. Such a blouse can be with a cut-out boat or with a smell, with a zipper or buttons. In short, you can’t count the options, and you can always come up with something new.
Pattern
Since you have to deal with knitwear, it is better to draw the pattern first on paper, and in full size, and not in halves, as is usually done. Of course, there are exceptions - if, for example, you need a blouse with a smell or zipper, the shelf is covered in two parts. In this case, you will still need some measurements:
- chest girth;
- hip girth;
- the length of the sleeve;
- wrist girth;
- girth of the neck.
As always, we divide the horizontal measures in half - except for the girth of the wrist, since the cuffs in any case are entirely and directly on the fabric. And then we do this:
- We lay out a sheet of graph paper (it is more convenient to cut on marked paper, although, of course, you can draw patterns on the remains of wallpaper, and even on a dense plastic film).
- We draw a long horizontal line (it is better to put a sheet or a roll across).
- Divide it in half.
- We postpone an arbitrary distance from this point - 10-15 cm in both directions.
- From her, also on both sides, is the half-circumference of the hips, divided in half.
- From the middle down we draw a perpendicular, from the points denoting the half circumference of the hips - too.
- We put off the length of the product on all these lines and connect the marks - we get a bottom line and side slices.
- On the side cuts, lay down the height of the armhole.
- From the main horizontal along the edges down, we lay off the semi-girths of the wrists.
- We connect these points with the marks of the height of the armhole in straight lines.
- We round the corners.
The pattern is ready, it remains to add allowances of 0.5-1 cm on each side. The pattern is the same for the shelf and back, although if desired, you can make different depths of the cut - in front it can be slightly larger.
Important! If you need a blouse with a zipper, only half of the detail is hidden.
We sew a blouse
In this case, it is more convenient to cut in one layer:
- Circle and cut the parts.
- Stitch the shoulder and side seams (this is where it comes in handy carpet!).
- Work the neck and bottom.
Sleeves
The hardest part of this model is the cuffs. Each represents a strip. The width of the workpiece is 2 times the width of the future cuff, plus, of course, allowances. If you want to make them on buttons or buttons, you need to add 3-4 cm to the length. Knitted cuffs are sewn exactly the same as any others:
- Fold the strip in half with the front side out.
- If material permits, iron the fold.
- Insert long allowances inside, if possible, iron.
- Turn out a detail.
- Stitch short cuts (you can immediately overcast).
- Again, twist, put between the long sides the edge of the sleeve, bast and sew.
Cuffs with buttons or buttons are made a little differently. Short cuts in this case do not need to be cut, allowances must also be put in, then put the edge of the sleeve between the allowances and stitch. The cuff is trimmed around the perimeter.
to contents ↑Important! The neck is best processed in the simplest way, that is, just an overlock. But if desired, from a knitwear, you can also sew a knitted blouse with a collar, including a stand.
Stock footage
There are a lot of styles of knitted blouses. In almost every fashion magazine you will find several, of varying complexity. This wonderful material allows each needlewoman to show her design abilities, so you can safely get to work!
- How to choose a vacuum cleaner taking into account the characteristics of the house and coatings?
- What to look for when choosing a water delivery
- How to quickly create comfort at home - tips for housewives
- How to choose the perfect TV - useful tips
- What to look for when choosing blinds
- What should be running shoes?
- What useful things can you buy in a hardware store
- Iphone 11 pro max review
- Than iPhone is better than Android smartphones
 (No ratings yet)