

One-piece blouse pattern
A blouse with one-piece sleeves perfectly complements a business suit. You can wear it with jeans and a summer skirt. In a word, it is truly universal - despite the fact that it’s possible to sew it even for those who first sat down at a sewing machine. How is a blouse pattern with a one-piece sleeve built? Read about it in our article.
to contents ↑Do you always need a pattern?
Before you start looking for suitable patterns in order to sew a blouse with a one-piece sleeve, try to answer the question: do you need a pattern at all? Not always. Many models can also be sewn by making constructions directly on the material. Such blouses do not have any tucks, quite often there are only two seams - in a word, the design is such that it’s easier to imagine.
The question immediately arises from what to sew. There are enough options, but you need a fabric that drapes well:
- knitwear;
- crepe de chine;
- silk;
- polyester;
- chiffon.
Important! If you are just starting sewing, it is better not to touch the silk fabrics - they will fall off and slide, so put them aside until you feel more confident with the sewing machine.
When working with cotton materials, keep in mind that they shrink, sometimes significantly. It is recommended to wash them beforehand, and dry them better with a hot iron (but avoid tanning!).
If you are still not very confident in your abilities, it is better to build patterns on paper, even if they are extremely simple. The pattern of a blouse with a one-piece sleeve in the simplest version consists of several rectangles, but to draw them, and especially cut them out, you need what is called a steel hand - confidently and evenly. And in any case, you will need a few measurements.
to contents ↑Take measurements
In order to measure the proportions of your body, you need the most basic centimeter tape, which is sold in every sewing store. It can be two-sided, and the division is plotted in two metric systems - in centimeters and inches. You can use any (in many company magazines the sizes are given in both systems), but the main thing is that all measurements should be in the same units. If for some reason there is no centimeter tape in the household, you will have to use the grandmother's method, that is, a thick thread and a long ruler. This is not so convenient, but also possible.
You need:
- chest girth (when building a pattern is divided by 2);
- sleeve length (from clavicle to wrist through bent arm);
- length of the product;
- for some models, the hips and waists, divided in half.
You can’t imagine anything easier
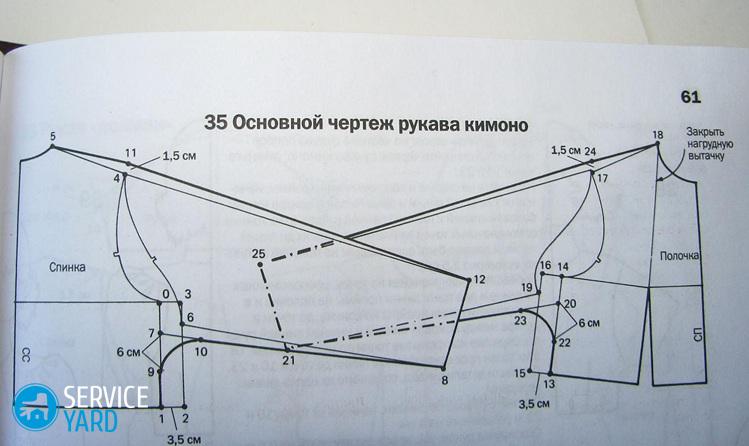
Perhaps the simplest pattern for a one-piece blouse is a kimono pattern. The pattern set includes:
- half before;
- back;
- sleeve.
For this model, you need the widest horizontal measure - half hips. Then proceed as follows:
- Spread a large sheet of paper so that it can fit roughly the entire part that you will draw - there are no equal paper rolls in such matters, but in principle, other materials, like Whatman paper or wallpaper, are also suitable.
- Put a point in one of the corners - let it be A.
- Draw a horizontal line through it.
- Set aside your hips on this line.
- Draw a vertical line, on it set aside the length of the product, which is measured from the cervical vertebra to the bottom.
- Finish the rectangle, strictly observing the angles - you get the basis for the back.
- Now you need to build a cutout - the top line should not be perfectly straight, so determine which line will be top and find its middle.
- Draw a short perpendicular to this point, set aside 1.5 -2 cm.
- Set aside equal distances from the same middle - 6-10 cm each.
- Connect the ends of the cutout with a point on the perpendicular smooth line.
- From the upper corners, lay down the width of the armhole - it can be arbitrary, most importantly - so that there is no less than the distance from the shoulder to the armpit. The sleeve is cut across the width of the armhole.
- Cut the back pattern along the contour.
Shelf
With a shelf you can dream up:
- it can be covered in one piece - just like the back, only the cutout must be made deeper, about 5-6 cm, and a short fastener at the top;
- you can make a shelf of two halves - with buttons or with a zipper;
- a blouse can be wraparound, and such a style, and even sewn from a light flowing fabric, looks especially impressive.
Option 1. A blouse with buttons or a zipper
In this version, we begin to build a pattern of a blouse with a one-piece sleeve in the same way as the back, that is, from a right angle:
- Determine where the top will be, and where is the side.
- We build the upper line - we postpone the half-circumference of the hips, divided in half.
- On the vertical line, we postpone the length of the product, as well as the width of the armhole.
- We finish building the rectangle, on the second side we don’t mark the armhole - there will be a fastener, so we form it — for example, you can add 3-4 cm to the button placket.
- On the top line from the side opposite the armhole, we postpone half of the cutout - do not forget that the shoulder seams on the shelf and on the back should be the same length.
- Down from the same point we postpone the depth of the cut
- We connect this new point with the end of the cutout in a straight line or a smooth line, as you like.
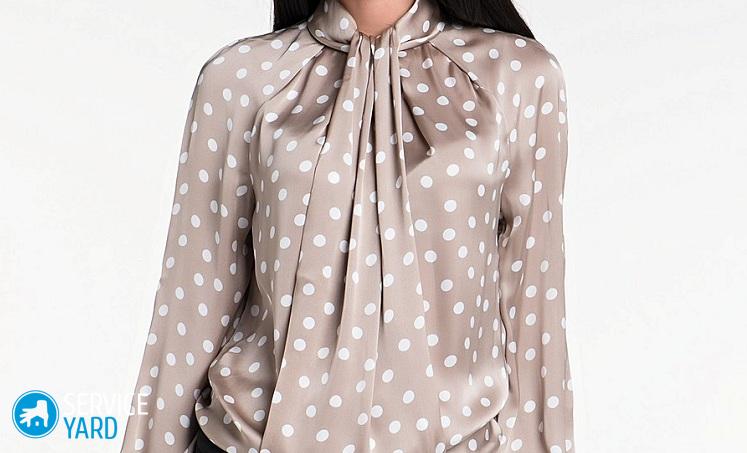
Option 2. With a smell:
- The start of construction is the same as in the previous case. Only the depth of the neck should not be noted - only the width along the shoulder seam should be set aside.
- On the bottom line, set aside the opposite to the already marked armhole, half the hips and set a point - for example, B1.
- We connect this point with the end of the neck.
Important! You can make the smell obliquely - that is, not along the hips, but along the waist.
Sleeve
After you have built the shelf and back, it remains to draw the sleeves. This is also a rectangle, one side of which is equal to the length of the sleeve, and the second is twice the width of the armhole, plus, of course, allowances.
We sew
So, you already have the simplest pattern of a sweater with a one-piece sleeve. It's time to sit down at the sewing machine.
Important! If you are dealing with polyester, it is useful to immediately overcast the allowances. And knitwear is best sewn with a machine that simultaneously grinds and overcasts.
The style is very simple, this model has no tucks and reliefs, so we do the following:
- We sew the shoulder seams, look what happened - the fabric should not wrinkle or gather folds.
- We sweep the sleeves, focusing on the marks of the bottom of the armholes.
- Attach the sleeves.
- We sew the side seam and the seam of the sleeve with one line, as is done when sewing men's shirts, and we do the same on the other side.
- We sew the neck and bottom, if it has not already been done, or we hem them.
- We sew in the zipper, if it is provided, or we smooth the bar twice on the wrong side - first at 0.5 cm, then at the width.
- Sew buttons and make loops.
to contents ↑Important! If the jacket is with a smell, then it can be made with a one-piece belt, or sew a button on the side seam, and make a loop on the smell.
Artist's blouse
There are many ways how to sew a blouse with a one-piece sleeve without a pattern. For example, like this. This model will be on a yoke. The following measurements are needed:
- half girth of the chest;
- the height of the yoke, it is the width of the sleeve;
- length of the product;
- the length of the sleeve;
- half hips.
As in the previous case, you can make a pattern on paper, or you can immediately on the material.The most important thing is the pattern of the coquette, and as for the bottom, you can not cut it at all, but simply lay the rectangle from the fabric with folds and sew it on. The order will be as follows:
- We calculate the total length of the yoke and two sleeves - that is, we add the double length of the sleeve to the half-girth of the chest (it can be long, short, and three quarters).
- Multiply by 2 the height of the coquette.
- Draw a rectangle with the corresponding sides.
- We divide the short sides in half.
- Connect the midpoints with a straight line.
- We find the middle of this line and somehow mark it - let there be a point C.
- We determine where we will have a front and a backside - we mark the halves accordingly, that is, P and Z, for example.
- Through point C, draw a perpendicular in both directions.
- On the front side we postpone 2-4 cm, from the back - 1-1.5 cm, put the points P1 and Z1.
- From the same point on the midline, we postpone 10-12 cm on both sides for a boat cut.
- We connect these points P1 and Z1 with smooth lines.
- Determine where the clasp will be - it can be both in front and behind, and even on the shoulder, and if the fabric stretches well enough - you can do without it.
Important! It is necessary to cut so that the middle of the sleeve coincides with the shared thread.
Bottom and assembly
Cut 2 panels for the bottom of the blouse - their length is equal to the length of the product minus the height of the yoke, and the width can be arbitrary, depending on what folds you want to lay (the main thing is that the width is not less than your half-circumference of the hips).
This design is assembled as follows:
- Sew the bottom stitches along the line for the coquette to be sewn with a basting seam, medium-length stitches (or sew on the machine with long stitches).
- Press the yoke allowances to the wrong side.
- Bast the details of the bottom to the yoke, folding folds.
- Stitch them.
- Stitch the sleeves and side seams.
- Hem the hem or overlock it.
- The same can be done with the neck - that is, overcast or hem.
What are the sleeves?
But with regard to the sleeves, everything is much more interesting. You can just overcast - they will turn out quite wide. But you can make cuffs. Moreover, they can be made using traditional technology, that is, from two strips of the same fabric, and from braid and even wide elastic. In the last two cases, we do this:
- We sew the bottom of the sleeve on a typewriter or manually with a basting seam.
- We tighten the basting until the width is the way we like.
- Sew the elastic into the ring.
- Sew it on a typewriter or manually - it turns out something like a flashlight.
to contents ↑Important! It is better to take a braid of medium width, so that it looks beautiful, and the loop can be made strong.
Base pattern blouse
Models that are sewn without a pattern are full. But still: how to make a pattern of a blouse with a one-piece sleeve? To do this, you need a few things:
- base pattern;
- long ruler;
- pencil;
- paper;
- basic measurements.
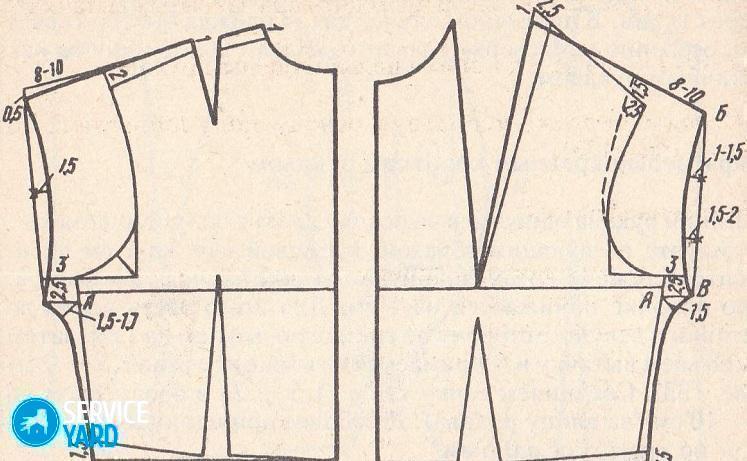
Such a blouse is sewn according to the standard pattern, but with the pattern you will have to work a little. However, modeling is the simplest here. Only the armhole line will have to be changed:
- Circle the patterns of the front and back on a large sheet so that from the side of the armholes there is room for the construction of the sleeve.
- On the shelf, find the end of the shoulder - this is the point where the shoulder seam goes into the armhole.
- From this point (let's call it P), draw a perpendicular to the midline of the shelf to the intersection, and also to the other side.
- Set aside the sleeve length from point P along this line - put point P1.
- From the point P1 down, draw another perpendicular - this will be the bottom of the sleeve, on it you need to mark its width, put the point P2.
- From it towards the side seam, draw a line parallel to the middle of the sleeve, that is, P-P1, to the intersection with the side seam, put the point P3.
- Now we need to deal with the bottom of the armhole - from the point where the side seam ends and the armhole itself begins, put down 6-8 cm down, put the point P4.
- Set the same distance to the bottom of the sleeve from point P3, put point P5.
- Connect the points P4 and P5 with a smooth line.
to contents ↑Important! The question arises: how in this case to be with tucks, which are always based on? It’s best not to label them at all, that is, to sew a loose fit blouse.
Stock footage
Modeling a one-piece sleeve blouse provides a ton of creativity. Modern clothing designers are constantly coming up with new models that do not need complex patterns, and modeling is due to the texture of the fabric and draperies. Therefore, a blouse with a one-piece sleeve is better to sew from soft materials with a beautiful pattern or a spectacular texture.
- How to choose a vacuum cleaner taking into account the characteristics of the house and coatings?
- What to look for when choosing a water delivery
- How to quickly create comfort at home - tips for housewives
- How to choose the perfect TV - useful tips
- What to look for when choosing blinds
- What should be running shoes?
- What useful things can you buy in a hardware store
- Iphone 11 pro max review
- Than iPhone is better than Android smartphones
 (No ratings yet)