

Oversize coat pattern
Giving freedom of movement and creating a romantic image. Versatile and simple clothing, which allows sports shoes and shoes with heels. All this is about the oversize style, which came to us from the last century and in an instant won the hearts of modern fashionistas. In the mid-80s, oversized clothes were worn with leggings and very tight jeans to compensate for the volume of the top. Today, such a model is acceptable even in combination with a dress and classic trousers. For this, women of different ages love her. In tailoring, such a model is perhaps the simplest after a light summer sundress, because it does not have complex parts in large quantities. The main thing is to know how to make an oversize coat pattern or how to download a pattern from a burda magazine for free.
to contents ↑Universal oversize style
It only at first glance seems that the clothes are great to their owner. In fact, the cut of a down jacket or oversized things are not just big, they have enlarged some details, which creates a sense of volume. The most important thing when creating any clothing is to emphasize the merits of the owner and hide the flaws. Therefore, it is important to know who the oversized coat is suitable for yourself:
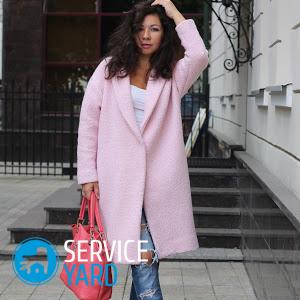
- This style looks great on chubby girls who wear 46-48 clothing sizes. Things of this style, as it were, blur the contours of the body and hide the excesses of the figure, for example, full hips.
Important! Too full girls clothes in this style are not recommended to be worn, as they can visually add even more volume to the figure.
- On overly thin girls, an oversized coat with their own hands looks more profitable - this style adds fragility and tenderness to the image.
- It is worth paying attention to the length of the coat - for example, short and thin girls fit a coat just below the knee, while tall girls look great in a coat of any length.
- Another advantage of this style of outerwear is that in cold weather you can easily put on a warm sweater under a coat, while not feeling uncomfortable due to tight clothing.
- Who definitely should not choose this style of outerwear is girls with very large breasts and women with the “inverted triangle” figure. Such a coat will give them even more monumentality.
Suitable materials
You can sew a modern coat or oversized jacket with your own hands from completely different materials.
Depending on the texture of the fabric, you can successfully complete both everyday and evening look. This season, designers recommend wearing outerwear made of drap, tweed, wool, pile bikes:
- Draped coat perfectly protects against small frosts in the off-season, and if there is insulation, it is suitable for the winter period.
- A tweed coat is well suited for the beginning of autumn, it has a unique relief and does not fade in the sun.
- A fleece coat will appeal to girls who love comfort.
- An oversized coat made of delicate cashmere with your own hands will become a truly double pleasure - due to freedom and due to the softness of the material.
- Models in this style for summer and early autumn and spring are even sewn from thin, softly draped fabrics. Boucle, fine wool and tweed in this model look perfect.
Important! Before buying fabric, you should ask what it is better to sew an oversized coat with your own hands. Consultants can tell you not only the composition of the material, but also how it behaves during socks and after washing. If the seller himself is fond of tailoring, then he will tell you the consumption of material on the coat.
As a rule, the following formula is taken as the basis of calculation. Product length, plus sleeve length, plus 40 cm. But:
- If you are wondering how to sew an oversized coat with a hood, then add the length of the hood to the resulting amount.
- If you plan to add a lot of details, such as large patch pockets, leaflets, flaps, collars of complex styles, then increase the fabric consumption by another 40 cm.
- The same amount should be added to the total footage, if the fabric of your future coat with a complex directional pattern, pile, in a cage or strip.
to contents ↑Important! Also, do not forget to buy the lining fabric and the necessary accessories. Before cutting, make sure to wet-heat the fabric so that it shrinks.
General order of operations
The general instruction on how to sew an oversized coat itself is quite simple and includes several tips:
- First of all, the measurements that will be needed to build an oversize coat pattern are taken.
- All details of the future coat are drawn on paper, best millimeter. Do not try to immediately draw all the outlines on the fabric.
- If the lining fabric is used, then the details from it are cut according to the main pattern, without changes.
- 1 cm allowances are added to all seams. 3-4 cm are laid on the hem of the sleeves and the lower part.
- Sewing products begins with the connection of the shoulder seams, then stitching the sleeve, and only then - the side sections.
- If there are pockets on the oversize coat pattern, then these parts are sewn onto the part before you begin assembling the product. Additional parts are also finished prior to assembly.
- The details of the back, sleeves and shelves, with the exception of the selection, are duplicated on the lining fabric without changes.
Building from scratch
Before you sew an oversized coat with your own hands, however, like any other thing, you will need patterns. The first option, which we will consider in this article, is created from scratch.
Since the oversize coat pattern is quite simple, even a beginner will cope with this task:
- First, create the back of a future product. On a sheet of paper we draw a strictly vertical line with a length equal to a coat, with point A at the top and point H at the bottom.
- Now from the point H to the right we postpone 27.5 cm. This will be the point H1. The resulting segment is the width of the lower part of the front.
- We make the same segment from the highest point A and get the segment A-A1. We connect the A1 and H1 points together and get a rectangle - the basis of our future oversized coat with our own hands.
- On the resulting line from point A1, lay 7 cm down and mark point P. Thus, we obtain the height of the shoulder.
- Now on the oversize coat pattern, create a neckline. From the very first point A we postpone 8 cm to the right. This will be point A2.
- To finally draw the shoulder line, draw a line that connects the points A2 and P. If you do everything correctly, then this diagonal should turn out to be 22.5 cm long. Let us designate the resulting point G1.
- Let's start creating the armhole of the future product. From the starting point A1, we lay down 31.5 cm down, we designate the resulting point with the letter G.
- On the same line, we again draw another segment, now 46 cm long. At its end, put the point T.
- Now again, let's do the neck of the oversized coat with our own hands. In order to draw its depth, lay 3 cm from point A and set point A3.
- We connect the points of the neck and shoulder descents with each other and proceed to the design of the front of the coat.
- From the starting point we draw another AN line vertically down, only its length will be less than the original by 7 cm.
- Now from point A draw 16 cm to the right. From this point, lay 27.5 cm to the left.The resulting segment is the length of the shelf, with an increase in the overwhelming front parts and fasteners.
- Denote the waist. From the previously planned point T to the left, we postpone the width of the shelf, put the point.
- From the bottom of the shelf draw the width of the product and mark it with a dot.
- Now draw a line up so that the drawn points become the vertices of the rectangle.
- Now, on the side seam from the waist up, mark 14.5 cm and get the height of the armhole.
- Connect this point and the width point of the front shelf.
- A pick line is created quite easily. To do this, connect the points H and A1 obliquely.
- In order to finish the pattern of the oversize coat, it remains only to put the points that determine the depth of the neck, the height and width of the collar. The outgoing data for these points is individual measurements and your personal preferences.

When all the lines have been drawn, it remains only to cut the pattern of the oversize coat and transfer the details to the fabric. Then the following operations are performed:
- First, create a collar. We sew parts together, the seams can not be processed, as they will be inside.
- We attach this detail to the back of the future oversized coat with our own hands.
- While all the parts are not connected, we sew the pockets and, if any, the valves to them.
- Now we connect the shoulder seams and insert the sleeves into the open armhole. First you need to notice the part by hand, and only then, making sure of a good fit, stitch the seam on the machine.
- Now it's the turn of the side seams. After joining the shelf, back and sleeves, be sure to process the fabric on the overlock.
to contents ↑Important! Before you start designing the selection, you can insert a decorative piping between the edge of the shelf and the duplicating back side of the back.
Base Pattern Design
In the second option, to sew an oversized coat with your own hands, you will just need a basic pattern of the appropriate size, in which you need to make adjustments. Drawings can be easily found on the Internet or taken from specialized magazines. And then you need to perform the following steps step by step:
- First, let's deal with the shelf and sleeves of our oversize coat pattern. We find the extreme point of the shoulder, lay 2 cm upwards from it. Through this point we build a new shoulder line, the length of which will be equal to the length of the sleeve, in accordance with your measurements.
- Now, from the obtained point, we construct a right angle and draw a segment of 15 cm. This will be the width of the sleeve at the bottom.
- Now we find the armhole line. From it we lay down 5 cm down. This point will be the starting point for the design of the bottom line of the sleeve. We connect it to the lower part of the sleeve with a smooth curved line.
- We will do the oversize of the future coat neck with our own hands 2 cm deeper and draw a lapel line through it.
- On the overhang of the shelves and on the clasp on the pattern, lay 6 cm.
- Do not forget to draw an entry line in your pocket. It usually starts 10 cm from the waistline. In this pattern, burlap does not consist of 2 parts, but of one and is one-piece.
- We reboot and cut separately.
- We cut out the collar. If in the basic pattern of an oversized coat, its sizes are too large, then we proportionally reduce it.
- We model the backrest similarly to the front.
 As a result, after all these operations, we should get the following details:
- the middle part of the shelf - 2 parts;
- side part of the shelf, one-piece with a sleeve and a burlap pocket - 2 parts;
- side or bottom of the shelf - 2 parts;
- middle part of the back - 1 part with a fold
- side part of the back - 2 parts;
- collar - 2 parts with a fold;
- subboard - 2 parts.
to contents ↑Important! All oversized coat details with their own hands are cut out from the main and from the lining fabric. Additionally, burlap pockets will be required from the lining. Strengthen the bottom of the sleeves, the underboard and the bottom of the product with a doubler.
Sewing
Now it’s time to solve the problem of how to sew an oversized coat on your own.Before starting the process, do not forget to prepare the necessary tools. Further actions are performed in stages:
- We attach burlap pockets of lining fabric to the lower side parts of the shelves.
- We superimpose the lower side parts of the shelves on the upper side parts of the shelves, combine according to the markup and sew both burlap - one-piece from the main fabric and from the lining along the lower seam.
- We sweep the burlap pockets on the vertical sides and then we sew the details as single-layer.
- We sweep, grind the side parts with the middle parts of the shelves.
- Do the same with the side parts of the back with the middle part of the back of the future oversized coat with your own hands.
- After each operation, do not forget to process and iron the seams.
- Fold the collar details on top of each other, sew along the outer and short sides.
- The allowances are cut to the corners obliquely. We turn the collar out, clean it out.
- We put the collar on the neck, matching the marks, sew.
- We connect the details of the coat of lining fabric with each other in the same order, process the seams, attach the fit to them.
- Do-it-yourself lining on your oversized coat
- Face to face we attach along the neck of the back, lapels, in front of the coat. Make sure that the collar is between the lining and the coat.
- We turn off the lining, put it into the sleeves.
- Turn up the sleeves, lining on the bottom, iron.
- Then we put a hand from the bottom between the lining and the coat into the sleeve, pull the sleeve by the allowances along with the lining, attach the lining allowance to the allowances of the sleeves.
- We fix the sleeve allowances with hidden stitches.
- We process the oversize oversized coat over the bottom of the coat with our own hands, tuck, hem, manually, tuck the lining allowance and sew.
Our DIY oversized coat is almost done. It remains only to tie the finished cord so that it does not come off, grab it with a few stitches in the seam. We sew 3 buttons, and you can try on.
to contents ↑Modeling capabilities
Do-it-yourself oversized coat, the pattern of which we examined above, with a one-piece sleeve. This model allows you to make various design changes. Namely:
- lighten the volume sleeve;
- make an interesting length ¾;
- profitable to increase the volume of the upper part of the product;
- smooth the border between the torso of the model and the base of the arm;
- narrow the bottom of the sleeve part, leaving the top wide.
On the basis of this model of an oversized coat with your own hands, you can make several variations of different styles and silhouettes:
- The silhouette of the adjacent type with a standing collar. Sleeves with three seams go to the upper areas of the yoke of the front and back.
- Coat of O-silhouette with a lowered shoulder line, narrowed silhouette. The chest tuck originates from the neckline, and the product itself is fastened with buttons.
- DIY oversized coat in the shape of a cape with bat sleeves and a stand-up collar. The fastener is made on the shelves butt, with the help of air loops. The belt is threaded through the loops at waist level.
- With lapels, straight silhouette. Wide shoulder line with stitched stand-up collar.
- Another variation is wide open, straight without a fastener. Sleeves with decorative soft assembly located on the seam line.
- With a sleeve of average length like "semi-reglan". Sleeve details do not reach the neck, there is no collar, the coat fastens with buttons.
to contents ↑Important! The pattern of the coat can be created without preliminary constructions, the cutting of its components is made directly on the fabric.
Stock footage
A do-it-yourself oversized coat that has captivated many fashionistas is also a favorite model and many dressmakers. As we have seen, it is not difficult to build a pattern. In work, this style is much simpler than its classic options.Therefore, even with minimal sewing skills, you can cope with this task, update your wardrobe with a model that will be in trend for several more seasons and which gives everyday comfort.
- How to choose a vacuum cleaner taking into account the characteristics of the house and coatings?
- What to look for when choosing a water delivery
- How to quickly create comfort at home - tips for housewives
- How to choose the perfect TV - useful tips
- What to look for when choosing blinds
- What should be running shoes?
- What useful things can you buy in a hardware store
- Iphone 11 pro max review
- Than iPhone is better than Android smartphones
 (No ratings yet)