Butterflies on the wall
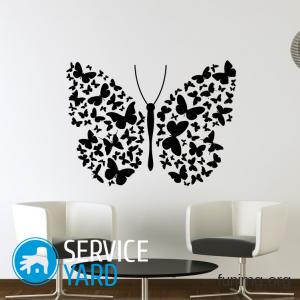
Often we look for different options to create an original interior. Do not lose sight of the simplest and most inexpensive ways to decorate. So, for example, butterflies with their own hands are able to decorate any room with their interesting and, at the same time, simple execution. If you are planning to revive a boring and empty wall, then this option is for you. The fact is that with such decorative elements you can decorate not only walls, but also other areas and objects of the apartment - ceilings, mirrors, clocks, photo frames, panels, lamps, and much more. Today we will consider several detailed master classes on making moths with your own hands.
to contents ↑Butterflies for decor. Production material
Paper butterflies appeared recently, but have already become popular. They look beautiful in absolutely any room - in the kitchen, in the bedroom, hallway, nursery. Such a decoration can be in a chaotic design, in a scattered or suspended state. The latter option is often used on a crib.
Important! Feng Shui butterflies represent a symbol of rebirth, joy and mutual love.
Moth manufacturing materials:
- Colored paper.
- Cardboard.
- Magazines.
- Vinyl records.
- Starched fabric.
- Thin metal (cans).
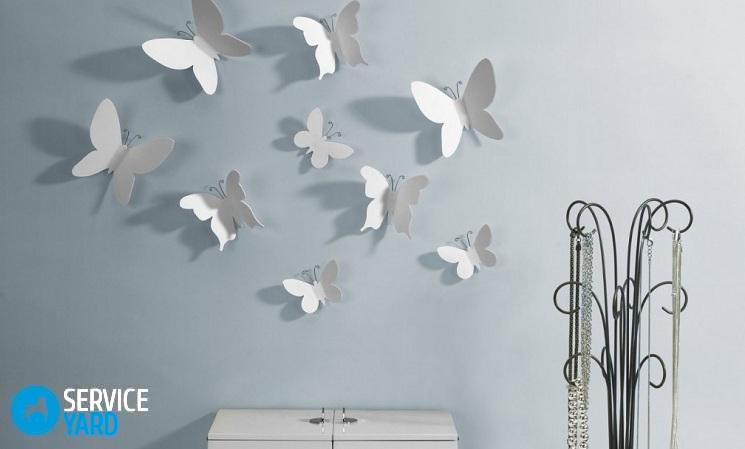
The size of this elegant decoration can be very different. Often you can find a picture in the center of which are large butterflies of bright color, and small beauties of a more delicate muted color scatter along the edges. The shape and color of butterflies is as limitless as the size.
to contents ↑Important! A winged whirlwind looks very original when an entire flock of bright beauties flies from a single butterfly. The most important thing here is to work well on the picture that you want to get as a result.
Do-it-yourself paper butterflies on the wall
Presented to your attention three detailed workshops on the manufacture of paper moths. All methods are simple to madness, even a child can cope with such work.
Option 1
To make such a simple, but very bright addition to the interior, you will need such materials and tools:
- Loose cardboard.
- Colored paper (you can take a self-adhesive film).
- Magazine pages.
- Scissors.
- Safety pins
- PVA glue or scotch tape.
- Pen or felt-tip pen.
Work Stages:
- We prepare one or more cardboard templates.
- Using ready-made samples, we begin to make moths - we outline the stencil on colored paper or on a self-adhesive film. The size and number of insects is up to you. Self-adhesive film will be very easy to stick to the wall, although the first option to attach is also not difficult.
- As the main material, we used precisely a self-adhesive film, so at this stage we just remove the paper layer so that the body of our beauties becomes sticky.
- Glue the body of the butterfly on the wall. Leaving wings fluttering. If you used paper, magazine sheets, then attach the moths to the wall with pins, double-sided tape or PVA glue. It all depends on how long you want to fix this decor.
Important! In addition to this decor option, paintings are often used to decorate walls. And it’s not at all necessary to buy reproductions or standard landscapes.Homemade panels created from various materials look much more interesting. And it can be essentially anything. Here are just a few ideas on how to make your own paintings:
Option 2
To perform butterflies in this version, you need to prepare the following list:
- Colored paper (it is better to take double-sided).
- Pencil.
- Scissors.
- Double sided tape.
Working process:
- We draw the image of a moth on colored paper, and then cut it out. This will be a kind of blank for the manufacture of the rest of the winged. At will, you can make several samples of different shapes and sizes.
- Now apply the cut image to the colored paper. We circle and cut out new beauties. In order to cut several accessories at once, put several sheets in one pile at once, bend them in half, draw half of the insect and cut it out. After opening the folded paper, we get several identical butterflies at once. This technique is very convenient due to the fact that at one time you will get a lot of winged for just one completed action.
- We lay out the cut out elements on the floor in order to determine their location on the wall.
- We apply a small square of double-sided tape to the body of each butterfly.
- Tear off the protective layer from tape. We glue the colored beauties according to the previously conceived scheme.
Important! If you want to visually expand the space of a room a little, give it a lot of lightness, read about how to choose and apply a mirror in the interior.
Option 3
The method is a bit similar to the previous options, but still there are some differences. Let's look at what you need to take to do a paper moth with your own hands:
- Cardboard.
- Colored paper in pink and its shades.
- Pencil.
- Scissors.
- Double sided tape.
Manufacturing Technique:
- We draw a butterfly on a sheet of cardboard, cut it out.
- Pick up a bright pink colored paper (you can take any other color). We attach our template to it, and then cut out a large butterfly, which will be the most central. Next, we will take as a basis a butterfly pattern for cutting out paper onto a wall of different sizes.
- We pick up a lighter pink shade and do the same work as I did with a bright color, only this time we should get a smaller butterfly. We perform similar actions with other shades of our jewelry. For simplicity and speed of production, we recommend using the same method of folding paper into a stack. This applies only to butterflies of the same size.
- We glue our beauties to the wall with a narrow double-sided tape.
The wall decor with butterflies is finished! The work is a little painstaking, but an excellent result is worth the effort!
to contents ↑Important! There are many more interesting ideas on how to decorate the walls in a room. And many of them are quite simple to implement, but they will take a little time and will be in a unique design. See also our following master classes:
From vinyl records
You will obviously like this method, since the butterflies will turn out to be not only beautiful, but also very durable, and their volumetric shape will not leave anyone indifferent. Such a glossy composition will luxuriously sparkle under any light source.
Detailed master class:
- We draw butterflies on a vinyl record. To do this, you can use a ready-made cardboard template, which you just need to circle.
- In a microwave or oven, melt the disc a little. We do this to obtain a softer and more flexible material that can be easily cut.
- We wait one minute or until the edges begin to bend. We take out the plate from the oven.
- We cut the disk according to the intended drawings.
- We grind the edges of the butterflies with sandpaper, removing all burrs and sharp corners.
- We fix the moths on the wall with PVA glue.
That's all the work! Black butterflies on the wall are ready to please the eye!
to contents ↑Do-it-yourself butterfly painted on a wall - paper stencil
Of course, the carved decor looks beautiful, but the wall painting occupies its leading position among the options for interior design. Now we will consider a way to decorate the wall with painted butterflies with our own hands. To create such an image, you need to stock up with such materials and tools:
- Cardboard or plastic for stencil.
- Acrylic or water based paint.
- Fluorescent paint for contouring.
- Brush or sponge for painting the image.
- Stationery knife.
Manufacture:
- We well think over the type of created picture.
- We transfer our idea to thin cardboard or plastic.
- We make a workpiece from the selected material.
- We mark on the wall the points of attachment and the direction of the moths.
- We breed paint. We build a tool for applying pigment to the wall - we attach a small piece cut from a sponge to the brush.
- We fix the sample with masking tape, and then transfer it to the wall.
- After the paint has completely dried, it removes the stencil.
to contents ↑Important! When choosing this method, you should clearly understand one nuance: to apply paint to the stencil you need only a thin layer so that when you remove it, your drawing does not crumble.
Butterflies on the wall - decor in the form of a picture
The panel with bright butterflies scattering in different directions also looks no less impressive. To implement such an idea, you will need:
- Glossy magazine.
- Picture frame.
- Several stencils of different sizes.
- Scotch.
- Scissors.
Instruction:
- First, we parse the magazine into separate pages. We cut the colored pages into squares equal to the size of the butterflies. We attach blanks to them, and after that we cut out winged insects.
Important! One important rule should be taken into account: the number of moths must be such that they fill the center of the panel, but at the same time do not lie on top of each other.
- We prepare a thick sheet of paper (you can take a Whatman paper), which will become the basis of our photo frame.
- Glue double-sided tape to a white sheet of moths. We make sure that the insects do not completely adhere to the canvas, but somehow rise above it. To achieve a volumetric effect, insert a small piece of foam between the tape.
- Insert the framed sheet into the photo frame.
A picture of multi-colored butterflies is ready!
to contents ↑Important! The picture will turn out prettier if you use the tint flow of flying moths. Such a work of art will look more harmonious.
Mounting Methods
To fix moths on the wall and not only you can use different methods, namely:
- Glue. Winged beauties can be fixed on the surface partially or completely. For these purposes, PVA glue, wallpaper glue or sapper glue is well suited. The most important thing is not to go beyond the borders of the carved decor, then the work will look neat.
- Pins You can use ordinary pins, but it is better to take decorative pins with beads, beads, pearls. One part of the pin will be pushed under the wallpaper, and the other - the one that is beautiful, will adorn the butterfly outside.
- Double sided tape. The most common method of attaching butterflies to the wall and other surfaces. When using double-sided tape, consider how long you have been fixing the moths. Double-sided tape will not be able to be removed after application to the coating.
Important! This option should be used only when you do not mind the wallpaper or you do not plan to make repairs.
- Threads. It is advisable to use this option for origami butterflies suspended by thin threads or colorless fishing line from a ceiling plinth, crib, or located along the wall, scattering in different directions from the slightest rush of air.
Stock footage
Of course, decorating walls, ceilings and other objects with butterflies with your own hands It requires a lot of time, patience and a flight of creative imagination. If you take into account our detailed instructions for the manufacture of soaring decor, you can get an award as an original decoration for your home.
 (No ratings yet)