

DIY jar with wishes
Very often we think about what to give to one person or another for a holiday: birthday, March 8 or February 23, Valentine's Day, New Year or any other. Even a child can make a jar of wishes with his own hands, and it will be a great gift for any occasion! What ideas to take note of, how to prepare such a surprise, and which notes to put there - all of this will be discussed in this article.
to contents ↑How to make a jar with wishes with your own hands?
Such an original gift can be made for a loved one, boss, child or parents - everyone will like it. There are several ways to arrange a jar of happiness and put a wish list there. Consider the most original of them.
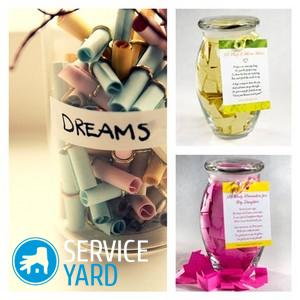
Method number 1. Jar with wishes in vintage style
A jar decorated in vintage style can be presented to anyone. It all depends on how you decorate the gift.
Important! Making a gift, try to take into account the preferences of the person to whom you want to give it.
To make such a jar with wishes you will need:
- A small glass or plastic jar.
- Paper.
- Twine (jute thread).
- Tea, coffee or milk.
First of all, you need to age the paper. You can do this with tea, coffee or milk and a lighter:
- To make using tea or coffee, you need to brew one of these drinks, pour it into a rectangular bowl and drop sheets of paper there for 15 minutes.
- After this, the paper must be carefully removed and hung to dry.
- Before use it is recommended to iron with a iron.
Important! After soaking in tea and coffee, the paper becomes brittle and easily tears, so you need to work with it very carefully.
Further actions:
- Using milk and fire, paper must also be aged carefully. Sprinkle milk on a paper sheet, and then hold a lighter under the sheet. In places where milk has fallen, yellow spots will appear.
- On aged paper we make labels and wishes. You can write them by hand or, if you are not sure of the accuracy of your handwriting, print using a printer.
Important! Labels should have approximately the following contents: on the one that will be in front, we write the general topic of notes in the bank, their purpose. The second label indicates how to use the contents of the jar.
- Glue the labels to the jar using double-sided tape or glue.
- We hide the lower part of the labels under the twine, which is attached to the jar with glue.
- The lid can also be slightly decorated. Make small drawings, sign who the jar is for, a little jute thread around the edges, and much more. Do not be afraid to show your imagination!
- We wrap the leaves with wishes into a “roll” and tie them with a small piece of twine. We add ready-made wishes to the jar.
The number of wishes is up to you!
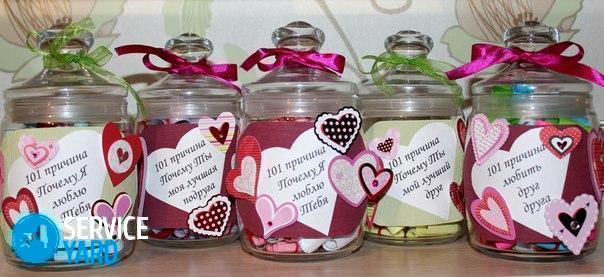
Method number 2. Bright jar with wishes
An excellent gift will be a bright jar with DIY wishes for your birthday. The style in which the jar will be made can be called modern, youthful or vibrant due to the use of a large number of modern means.
For work you will need:
- Glass or plastic jar.
- Colored paper.
- Decor elements: rhinestones, paints, artificial flowers, etc.
How to act:
- Labels and notes with wishes are made of colored paper.You can use sheets of different colors - in this case, your jar will be more colorful and vibrant.
- Glue the labels to the jar, and then the fun begins - the decor. For it, you can use rhinestones, making up drawings, artificial flowers from them. You can use decoupage to decorate or draw something yourself.
- Notes can be simply collapsed several times, you can add various figures from them or tie them with ribbons of different colors.
Method number 3. Jar with wishes in a marine style
Such a jar with wishes with your own hands will be an excellent reminder of the rest, a souvenir and a tool to help you relax, because for many people the sea is associated with calm.
To create such a gift you will need:
- Empty jar.
- Paper.
- Elements of marine subjects (shells, pebbles, sand, etc.).
The design of the jar will be slightly different from the previous options:
- Shells are attached to one side of the can with glue or adhesives.
- On the remaining gaps, smeared with glue, sand is poured.
- When everything dries, the remnants of sand are removed.
- Glue a pre-prepared label on the front side of the can, on which you can write the dates of your vacation, the name of the souvenir or the name of the person for whom the gift is intended.
- Notes can also be made on a nautical theme.
Important! In addition to notes in the jar, you can put a few shells.
Similarly, you can make your own jars with wishes on other topics.
to contents ↑What else can you fill the jar with?
In addition to notes, you can put many more interesting gizmos in a jar with wishes:
- If the jar is thematic, then you can add items that match the main theme of the gift. For example, in a “sea” jar you can put shells and small pebbles from the coast.
- You can fill the jar with colored beads. This will make the gift even more vivid and unusual.
- Notes can be made from one word and glued to round flat beads. These beads fill the jar.
- For sweets, a jar of sweets with your own hands will be an ideal option. In addition to sweets, you can put notes in a jar to cheer you up.
- If a loved one leaves for a long time, you can give him a jar with his own photo inside. On the back of the photo you can write wishes, recognition and much more.
5 wish gift ideas
There are many gifts with wishes. Do-it-yourself jar with wishes is just one of them. Here are some more ideas for such gifts.
Wish Cake
A great gift for any holiday, because it combines two things beloved by many people: sweets and kind words. True, “sweets” in this case are not edible, but this is not important.
The idea is this: each piece of cake is a box in which there is a note with wishes. The design is entirely up to you.
Important! You can make each piece in your own unique style, or you can choose one for all. Of course, in the box you can put not only notes, but also real sweets, interesting little things and much more.
Tree with wishes
A gift for all occasions. It can be given for any occasion on your own or on behalf of the company. There are two options:
- The base of the tree is the trunk, you can draw or embroider on any surface.
- The second way is to make the trunk voluminous (their real branches or blanks, which are sold in stores). In this case, you will need another vase, pot or stand for wood.
Leaflets are cut out of cardboard or paper. On each leaflet wishes are written. Leaves are attached to the tree with the help of strings.
Important! In addition, you can decorate the tree with beads, flowers and ribbons.
Bag of sweets
“Bag of good mood” will be a great gift for children who love sweets. It is simple to execute, but it delivers a bunch of positives to the recipient:
- From the fabric you need to sew the most ordinary bag.
- We sew a piece of fabric with the inscription “Sack of good mood” or something like that.
- A note with wishes is attached to each candy. This can be done with a ribbon or glued directly to the wrapper.
Wish Book
The book is done as follows:
- You can buy a notebook and make a beautiful cover for it with your own hands.
- And you can make your own book. To do this, fold regular office paper in half and fasten it with thread.
Important! The cover is done to your taste. You can decorate it with artificial flowers, rhinestones, beads and other bright little things.
The frequency of wishes in the book depends only on the decision of the creator. They can be written in a row or one per page. Also on the pages of the book can be found various drawings and decorations that cheer up.
to contents ↑Stock footage
All interesting and creative gifts! We hope our ideas came in handy and you not only brought them to life, but you were also able to improve them by showing your imagination.
- How to choose a vacuum cleaner taking into account the characteristics of the house and coatings?
- What to look for when choosing a water delivery
- How to quickly create comfort at home - tips for housewives
- How to choose the perfect TV - useful tips
- What to look for when choosing blinds
- What should be running shoes?
- What useful things can you buy in a hardware store
- Iphone 11 pro max review
- Than iPhone is better than Android smartphones
 (No ratings yet)