

DIY clothing tags
Every girl with good taste and good sewing techniques will someday want to create her own brand. If you connect imagination, organize the process correctly, do everything qualitatively - there will be no end to those who wish to purchase an original thing. And for better recognition of your brand, and for its promotion, you will need labels on clothes, for example on a hat or on a jacket. This article will discuss how to make tags on clothes with your own hands.
to contents ↑What is it for?
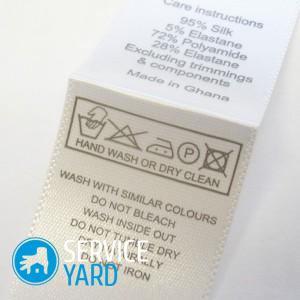
A tag for knitted items is the face of your clothes, because on this small piece of fabric all the information about the product is collected:
- name - the name of the company or pseudonym of the person who manufactured the garment;
- information about the purpose of the thing;
- washing recommendations.
In addition, the label gives handmade items even more uniqueness.
to contents ↑Important! Of course, you can order it in a special workshop, but usually they produce labels in very large runs, which means that you will overpay very much. Moreover, it will be more pleasant if you make them in your own corporate style, having independently developed a design, and propagate as you need.
Do it yourself
So, to create labels for clothes with your own hands, you do not need to be educated as a graphic designer. The procedure for creating a logo is very easy, because you will need minimal knowledge of any graphic editor and a bit of imagination.
Method 1
For further actions, the following items will be needed:
- Special thermal transfer paper for light fabrics.
- A meter of light satin ribbon (1-2 cm wide).
- Laser or color printer.
- Scissors for fabric.
- A small piece of fabric.
- Lighter.
Let's move on to design development and further manufacturing of the label. In order to create tags for clothes with your own hands, you must follow the following algorithm:
- Draw your company logo in your favorite graphics editor. You can also turn to the help of an experienced designer, download the image on the Internet or slightly change someone else's label.
Important! There should be a minimum number of colors on your logo (maximum two).
- When the logo is thought up and drawn, it must be mirrored. This is for convenient printing tags on the fabric.
- Create an A4 page and completely fill it with just invented labels.
Important! Make sure that there is enough free space between the inserts.
- Print this sheet on thermal transfer paper, cut it into squares with logos.
- Step back from the edges of the satin ribbon 1.5-2 cm and put a printed blank on it, then cover it with a prepared piece of soft cloth and iron the structure with no iron.
Important! To see if a workpiece is printed on a ribbon, turn it over and see if the workpiece is visible on it. If yes, the image was successfully reprinted.
- Next, you should remove the paper and go through the ribbon with the iron again, turning it face down.
- Stepping back from the tag 1.5 cm, cut it and process the ends with fire.
In the future, the finished label can be sewn or glued to your things.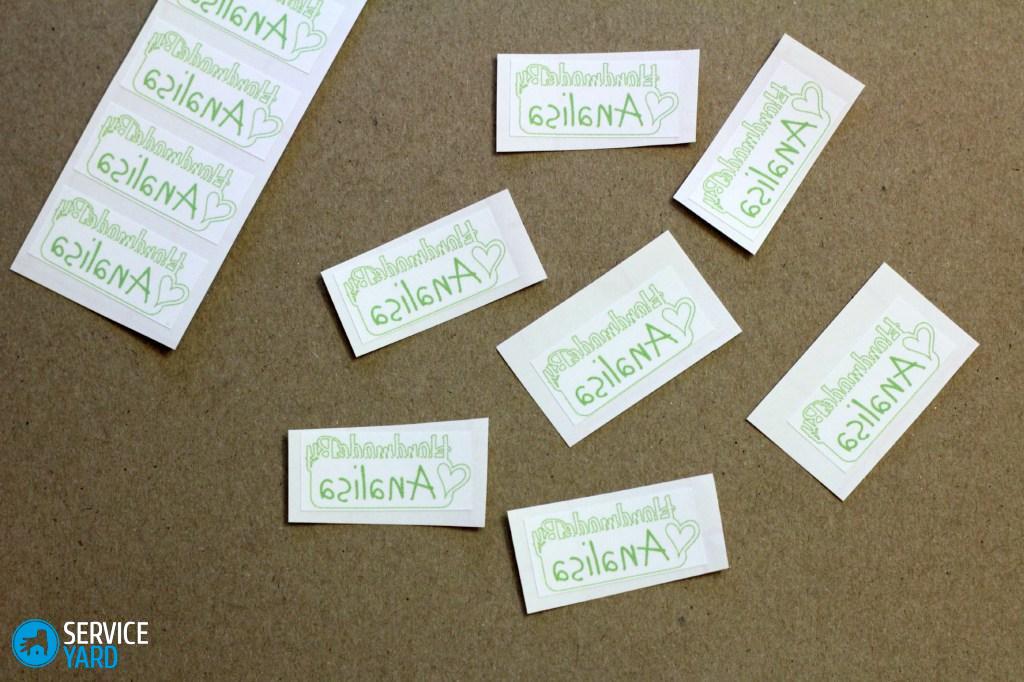
Method 2
If you do not have special thermal transfer paper at your disposal, and a piece of tissue is still very necessary, use the following method for making a DIY label for your clothes.
To do this, you will need the following items:
- Silk ribbon 2-3 cm wide.
- Acetone or nail polish remover with its presence in the composition.
- Scissors for fabric.
- Matches or lighter.
- A piece of soft cloth.
- Iron.
- Ready-made mirrored logos.
- Laser printer.
The manufacturing method is slightly different from the previous one. Here's a quick guide to making similar labels:
- Print the finished logos on the printer and cut them.
- Measure the desired segment on the tape and copy its distance as many times as the number of images you have printed.
- Cut the tape according to the applied marks, scorch the segments along the edges with a lighter so that it does not crumble and ultimately looks neat.
- Attach a paper-printed label to the ribbon in the middle with a paper clip.
Important! We recommend using black clamps, because, unlike the others, they do not fade when using aggressive agents.
- Pour bonded materials with acetone. It is not necessary to feel sorry for him, the more it is poured, the better the final result will be.
Important! This procedure is best used on pre-prepared children's oilcloth, so as not to damage the furniture.
- Press the paper firmly against the ribbon with a tissue. When your logo is visible on the back of the ribbon, you can carefully remove the paper.
- Iron the tag on the back. It is necessary to use the “silk” mode.
Stock footage
This article told you about the very useful ability to make labels for clothes with your own hands, because every woman will always need such a skill, even if she is not engaged in sewing. The ability to make tags and hang back on clothes with your own hands may be needed even if you are asked to sign clothes for the child in kindergarten.
- How to choose a vacuum cleaner taking into account the characteristics of the house and coatings?
- What to look for when choosing a water delivery
- How to quickly create comfort at home - tips for housewives
- How to choose the perfect TV - useful tips
- What to look for when choosing blinds
- What should be running shoes?
- What useful things can you buy in a hardware store
- Iphone 11 pro max review
- Than iPhone is better than Android smartphones
 (No ratings yet)