

Do-it-yourself ironing board cover
The process of ironing clothes and linen does not bring joy to everyone. And if you also have to use a low-quality iron or a fairly shabby ironing board - you don’t want to start the process at all, because it will be difficult, and it will take much more time. In order to clean the iron so that it easily glides and irons fabrics, we told you in other articles. In the same, consider how to make a new cover on an ironing board with your own hands.
to contents ↑Ironing board cover
Ironing board - a necessary and most important assistant to care for your clothes. Its surface should be smooth and clean. No matter how often you use it, the ironing board cover becomes unusable over time, and ironing becomes torture. We will help you deal with this problem.
Let's look at the whole process step by step. Let's start with the selection of materials.
Which fabric to choose?
First you need to choose the material. The new cover will serve you for more than one year, if you choose it correctly. The fabric for the ironing board cover should have the following characteristics:
- heat resistance - do not melt at high temperature;
- density - strong and smooth, but not sliding;
- do not shed.
Important! If there is a picture on the canvas - wash in hot water and make sure that the picture will not be reprinted.
Cotton meets all these requirements:
- bleached calico with a density of more than 145 g / sq.m. - when buying, check with the seller or look at the label on which the density is indicated;
- satin;
- teak;
- flannel.
Important! Choose a light fabric, without a pattern, so that the matter is monophonic.
As for the sizes - in order to sew a cover for an ironing board with your own hands, you will need:
- 60-80 cm of fabric with a width of 220 cm.
- If the web width is less than 1.5 m, then the quantity must be calculated. To do this, measure the length of the board and the width. Measure the most distant points. Then add 20 cm to the width, and multiply by 2. The resulting figure will be the desired length.
Lining selection
By listening to the tips, you can choose the right lining.
Tip 1
The color of the material should be light tones, because under the influence of high temperatures and steam, your new case will change color.
Important! Usually choose white batting, felt, sintepon or foam.
Tip 2
It is better to give preference to white batting or felt. This type of matter has a natural basis and some roughness. Due to this, it will fit snugly to the board, will not slip.
The sealant from synthetic winterizer or foam rubber under the influence of hot steam, will quickly become worthless.
to contents ↑Important! Batting or felt needs to be bought as much as fabric.
A simple case for a wooden ironing board
Do you have a wooden ironing model? Then you do not need a sewing machine. We will tell you in detail how to repair the ironing board with your own hands using a stapler for furniture. If you do not have such a tool in the house, then you can use small post nails and a hammer.
Important! Do not completely hammer in nails. Leave ⅓ of the nail. First, we hammer everything along the contour of the board, then, when the cover is fully stretched, we bend the nails in one direction.
Having prepared everything you need, we get to work.
Important! Pulling the cover by this method, you will get a flat surface on which there will be no folds and creases.
Step-by-step instruction:
- Remove the old upholstery with cover. This is necessary so that in the future the old cover does not spoil your new one.
Important! Worn out cover can be used instead of patterns. To do this, you need to spread it and smooth it well, attach it to the wrong side of the fabric and circle it with a pencil (the usual one that you use for drawing).
- Make a pattern for which you need:
- spread the fabric on the floor with the wrong side up;
- turn the board over and attach the upper part to the wrong side of the material;
- circle the outline with a simple pencil, remove the board, retreat to 5-8 cm allowances, draw a solid line;
- to cut.
Important! Place the board parallel to the width line of the canvas. If the cover is skewed, it will be problematic to smoothly and correctly pull it onto the board.
- The same actions must be performed with batting, only allowances to be made smaller - 3-6 cm.
- Patterns are ready.
- Attach the batting to the board.
- Glue the “Moment” glue to the board along the contour.
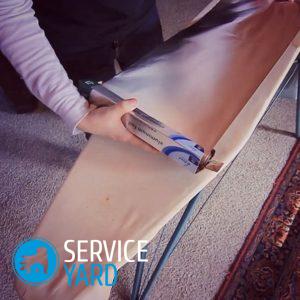
- We stretch the fabric, which will require:
- Fasten the fabric with several brackets (nails) on the back of the board (in width, where there is a straight line, not a rounded one), at the same time fold the fabric with the lining inward. It is necessary to bend the edges by 2-3 cm.
- Pull the fabric forward fasten with a bracket in the middle on one side and on the other.
- Pulling the fabric, alternately left and right must shoot brackets on both sides.
- Finally fix all the areas.
- The corners are laid as an envelope, on the wrong side of the board, thoroughly fixing.
- Form roundings with the help of folds, also well secured with brackets (nails).
to contents ↑Important! Before you start hauling the board, wash the material for the cover at high temperature. Cotton fabric often shrinks a lot.
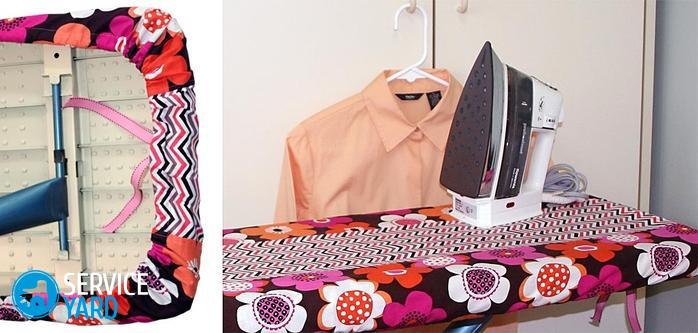
Sewing a cover on an ironing board with your own hands
Ironing boards nowadays are more often produced in the form of a metal frame covered with a mesh. For such models, the hauling method is not suitable, here you need to sew a cover on the ironing board with your own hands and pull it.
We will describe in stages two ways how to sew a cover with your own hands:
- The first method is easily handled by experienced seamstresses.
- But the second is more suitable for beginners.
Important! Before you start sewing the cover, you need to stick the blank lining to the board or shoot with staples. Follow all the steps in the same order as when updating a wooden board.
Method 1
The material on the cover and lining is 60 cm with a fabric width of 220 cm. How to proceed:
- Cut patterns as described above.
- To process the edges:
- bend around the entire circumference of 0.5 cm and iron it;
- bend 1 cm and bast by hand, then sew on a sewing machine, leave a gap of 1-1.5 cm, to retract the elastic.
Important! This process is best done first with your hands. It will be neat and beautiful, especially rounded sections.
- Insert an elastic band or cord - we’ll tell you about several methods. You can use any of your choice:
- Put the elastic on the safety pin, thread it into the finished edge, fasten both ends together along the entire circumference.
Important! Correctly choose the length of the gum. If it is too small, it will be bad to put on the board, and a large one will not fit tightly.
-
- Insert the cord in the same way, only tighten the ends and tie them tightly.
- The method of “lacing” - you need to additionally make small loops of the cord or fabric. Fix them with a machine line along the entire circumference of the cover every 10-15 cm, symmetrically. Pass the cord from one end of the board to the middle, as if “lacing” the boot, and from the other - similarly, to the middle.
Method 2
Having sewed a cover for an ironing board with your own hands according to this method, you will get a double-sided cover. It can be changed by the parties. One side can be made light - suitable for ironing white things, the other side is darker - for colored and dark things.
How to act:
- Make a pattern:
- you need to prepare 2 cuts - 60 cm and a fabric width of at least 150 cm;
- fold two cuts face to face, then make a pattern, as described above, give allowances of 10-15 cm and draw a contour, but at the end you need to put marks where we will not build.
- Sew a cover:
- it is necessary to step back from the edge of the workpiece 1 cm and sew exactly along the entire circumference, securing in the intended place;
- turn the product onto the face through the hole that was left;
- flatten along the line, iron with an iron;
- sew the place of the eversion by hand joint to joint, leaving 2-3 cm, so that later you can thread the gum;
- make an interval from the edge of the product 2-3 cm and lay a line around the entire cover.
- Insert the rubber band. Also use a safety pin to retract the elastic and secure it. Pull on the board.
Stock footage
Well, that’s all - the do-it-yourself cover on the ironing board is ready, and your board in a new outfit is ready for a new test. We hope you managed to choose a simpler method for yourself and you coped with the task without any problems.
- How to choose a vacuum cleaner taking into account the characteristics of the house and coatings?
- What to look for when choosing a water delivery
- How to quickly create comfort at home - tips for housewives
- How to choose the perfect TV - useful tips
- What to look for when choosing blinds
- What should be running shoes?
- What useful things can you buy in a hardware store
- Iphone 11 pro max review
- Than iPhone is better than Android smartphones
 (No ratings yet)