

Decoupage boards do-it-yourself napkins
Today, the use of decoupage technique has become a very fashionable trend. This is a rather original solution in order to decorate various things that have already lost their former beauty, or to bring a special touch to the interior. This technique involves varnishing paper napkins, postcards, and more. Such work can be done with furniture, all kinds of household appliances and even a cutting board. Making decoupage boards with napkins with your own hands is very simple and does not take much time if you first familiarize yourself with the basics of such creativity. We will tell you about them in this article.
to contents ↑What devices are needed for decoupage?
Before you start decorating a cutting board with your own hands, you should purchase all the necessary materials and tools:
- Cutting wooden dostochka.
- Acrylic primer or white paint.
- Acrylic lacquer.
- PVA glue.
- Napkin made of paper.
- Brushes.
- Foam sponge.
- Sandpaper (nulevka).
All these materials must be bought in order to get a beautiful composition.
to contents ↑What do you need to know for a beginner before decoupage boards?
If you only learned about such creativity and want to try yourself in this direction, you need to take into account several important rules specific to the decoupage technique:
- Initially, it is necessary to properly sand the surface of the board.
- Then you need to treat it with a primer.
- Next, apply white acrylic paint.
- Any desired pattern is applied.
- The surface of the cutting board is varnished.
- After varnishing, each layer is sanded.
Experienced people in this field recommend that beginners first familiarize themselves with the cutting board decoupage master classes on the Internet, and only then begin the creative process.
to contents ↑What should be the napkins?
In this technique, only the top layer of the napkin is used, on which the drawing is depicted. The use of one layer provides a high-quality and reliable fit to the decorated structure.
 Consider the main types of napkins used for decoupage:
- Special paper napkins, size 33 * 33 cm. They can be purchased at a special store for needlework.
- Conventional three-layer napkins with a pattern. They can be purchased at any store. By the way, for the price they are quite cheap.
- Paper handkerchiefs are more dense, as they consist of four layers. Sold in packaging.
to contents ↑Important! In order to make the line of the picture clearer, the necessary parts are cut out of the paper handkerchief, and the background is tinted with a suitable paint shade.
Ways to glue napkins
You can stick a napkin in different ways and any of them will be correct, since each decoration process is individual:
- With an iron. To do this, you need parchment, glue, a napkin, and a do-it-yourself board decoupage design. Glue a paper handkerchief with glue to our base. Then cover with parchment and heat the surface with a hot iron. Thus, the element quickly and evenly stick together.
Important! This method is only suitable for flat surfaces.
- Using a file. Turn the napkin down on the file with a pattern.Glue and water are dripped onto the central part. Then smooth the surface of the paper drawing. Thus, the pattern goes to bed without bumps and wrinkles.
- Using a brush. A paper handkerchief is laid neatly on the surface. After that, a little water is poured into the center of the napkin and distributed throughout the area with a brush. Soft pile carefully smoothes out all the flaws.
to contents ↑Important! Do-it-yourself DIY decoupage is ideal for convex structures.
Decorating cutting board
In the decoupage technique, the use of any type of paper is allowed: newspapers, napkins, wrapping paper. But despite such ample opportunities, you must follow the rules that will help you achieve a good result in the creative process:
- Using printer paper is not recommended. Otherwise, the picture depicted on it will very quickly smear.
- You should not use too thick paper, as a result you will not get a flat surface, and the product will not look neat.
- Small sharp scissors are used. Perfect for manicure.
- The brush should be no more than 2 centimeters wide.
- Any type of varnish is applied. The main thing is that it be on an acrylic basis.
- It is best to use PVA glue diluted with water for bonding.
These little tricks will help you create a wonderful, colorful work.
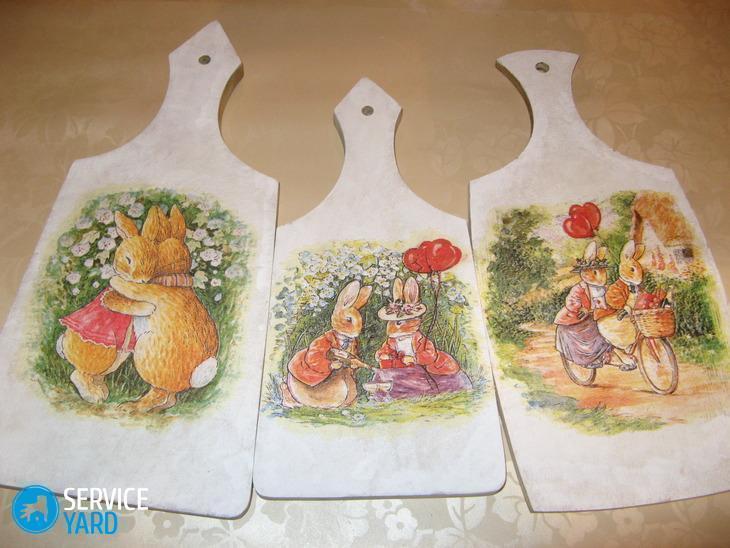
to contents ↑Original decoupage chopping boards
You can decorate a cutting board with your own hands using a wide variety of drawings. Most suitable would be images of fruits and vegetables.
Consider one of the simplest examples of decorating wooden planks:
- Polish the board with sandpaper.
- Tape over the edges of the protector so that they do not get paint on them.
- Prime the surface. The movement should be performed as if you were pushing the primer into the fibers of the board.
- Paint the surface with white acrylic paint using a foam sponge.
- Cut a piece of the picture from a paper handkerchief.
- Glue the part to the post.
- Lubricate the surface of the board with varnish, let it dry.
- Fill the background of the composition with a paint that matches the color of the selected fragment.
After a few simple steps, you can decorate a boring and inconspicuous chopping board.
to contents ↑Wood Decoupage Workshop
Consider one of the most popular workshops on how to decorate a cutting board with your own hands.
You will need the following tools:
- Board.
- Acrylic colors - gray and white.
- Two cysts - one large, the other smaller.
- Lacquer.
- Napkin with the image of greenery.
- Sandpaper.
- Candle.
- PVA glue.
- Sponge
- Soft bristled toothbrush and glass.
We begin to create:
- Color the board with white paint using a sponge.
- Next, cut out the fragments of the picture.
- We put pieces of our drawing on a dry surface, grease with a mixture of water and glue from above.
- We process the edges of the board with a wax candle and apply gray paint.
- After this, it is necessary to apply white and gray paint to the brush, with careful movements, spray on the surface of the cutting board.
- We leave to dry our work of art for several hours.
- We cover the composition with acrylic paint.
to contents ↑Important! It’s a pity to chop cabbage for such an amazing beauty, so you can hang it as a designer interior detail or give it to someone.
Stock footage
In this article, we told you in detail about the decoupage technique and offered a master class of the board with do-it-yourself napkins. We hope you have taken advantage of the ideas, and now in your kitchen there are original little things that make you feel warm and all guests are delighted.
- How to choose a vacuum cleaner taking into account the characteristics of the house and coatings?
- What to look for when choosing a water delivery
- How to quickly create comfort at home - tips for housewives
- How to choose the perfect TV - useful tips
- What to look for when choosing blinds
- What should be running shoes?
- What useful things can you buy in a hardware store
- Iphone 11 pro max review
- Than iPhone is better than Android smartphones
 (No ratings yet)