

Decoupage plates with do-it-yourself napkins - for beginners, step by step
Since the beginning of time, people have liked to decorate their home with beauty created by their own hands. Decorating the house with things that keep your warmth, you can create a unique atmosphere of harmony and express yourself. In addition, handmade handmade gifts created in a single copy are always highly valued. Needlework as a hobby is becoming more widespread, plate decoupage is one of its most spectacular and affordable. This is due to the penny cost of materials, ease of execution and a chic result. If you were looking for information on the topic of decoupage plates with do-it-yourself napkins for beginners, step by step, or want to find new ideas for inspiration, then this article is for you.
to contents ↑What is decoupage?
The literal translation of this word from French means “cut out”. The term “decoupage” is usually called the technique of gluing a picture to an object, which ends with a varnish coating.
This trend was born in Germany at the end of the 15th century, in this way craftsmen decorated the furniture they made. A century and a half later, the fashion for images in Japanese and Chinese styles developed, making decoupage even more popular. Since the middle of the XIX century, when printed pictures appeared on the mass market, decoupage has become a craze.
This fashion reached our country only at the beginning of this century, and the number of enthusiasts is only growing: furniture, clothes and shoes, household items and everything that can be decorated with this technique are decorated.
to contents ↑Decoupage Types
Decoupage can be done in many ways.
Straight
In this case, to make the plates with your own hands, an image or photo is placed on the front side of the plate.
Back
The picture is placed on the back of the plate.
to contents ↑Important! Clear dishes are best for this.
Materials for work
Decoupage is usually done with these materials.
With napkins
There are special napkins designed for decoupage, but regular paper ones are also suitable - the only difference is in the method of gluing them.
With craquelure
So that graceful cracks appear on the surface of the plate, it is coated with paint of a special composition.
Egg shell
It is placed directly on or around the image.
With photo
The technique is the same as when using napkins, only the image is a printed photo.
to contents ↑Which plate is best for decoupage?
Not every plate is suitable for our purpose, because often the dishes have a relief or pattern. To decorate the plates with your own hands, opt for the simplest white porcelain plate with a smooth surface.
to contents ↑What is needed for decoupage?
A toolbox is determined by the exact technique you will be working on. The basic kit looks like this:
- plate, since today we are considering decoupage of plates;
Important! If you don’t have a smooth plate at hand, you can use the emery cloth to remove the pattern from any other.
- scissors - most often convenient manicure;
- brushes, rollers, sponges;
- PVA or acrylic glue;
- alcohol;
- primer;
- acrylic paints;
- varnish - useful for the final coating.
Important! Acrylic or polyurethane is suitable.
For the main drawing, select one of the following options:
- picture or photograph;
- craquelure;
- napkins - special for decoupage or plain paper.
Important! If the picture of your choice is placed on thick paper, rub it on the back until lumps appear - so it will become thinner.
To decorate your own handmade decorative plates, use eggshells, beads, pieces of fabric, rhinestones and any other decorations that you like.
to contents ↑Decoupage Techniques
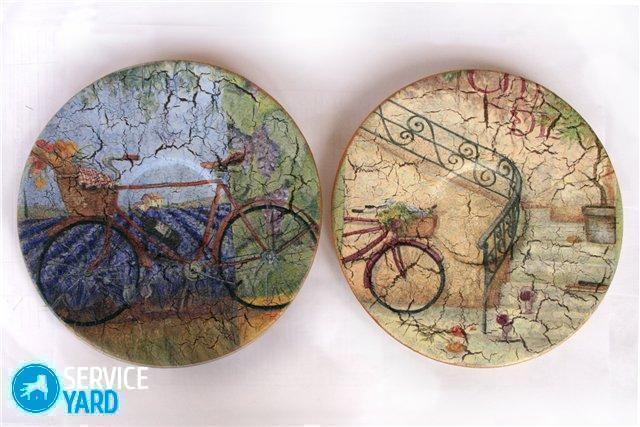
We present to your attention several decoupage techniques. Using them, you can realize your most original creative ideas, as well as not only decorate your own home, but also prepare gifts for any holiday.
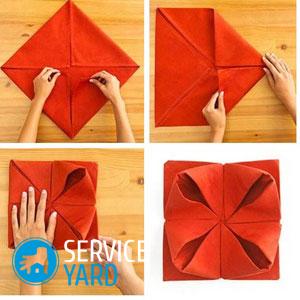
Direct decoupage with drawing:
- Cut the desired pattern with scissors.
- Moisten a cotton pad with alcohol and wipe both surfaces of the plate to degrease.
- Dry the dishes to avoid bubbles and wrinkles in the image.
- Carefully place the cut pattern on the front of the plate.
- Cover it with glue, evenly distributing it with a brush.
- After waiting for the glue to dry, cover the entire surface with varnish, let it dry completely.
Important! This method is used to make a decorative plate. If you want to use the dishes for their intended purpose, make the decoupage of the plate with do-it-yourself napkins in the following technique.
Reverse decoupage with drawing
This method makes sense only on a transparent plate:
- Cut out the pattern and degrease the surface by wiping it with alcohol.
- Place the picture on the back of the plate.
- Glue with glue not the whole picture, but only its edges.
Important! Try not to get on the front of the plate.
- When the glue is completely dry, varnish the product.
Plate decor with plastic beads and beads
Applying this simple technique, you will be surprised how interesting it can be to decorate plates with your own hands:
- Lubricate the plate with refined sunflower oil.
- Spread beads and beads on its surface.
- Put in the oven (200o) and wait until they partially melt.
- Remove from oven. After the plate has completely cooled, fix the result with varnish.
Important! The beads should be exactly plastic, others - will not give the desired effect.
Lace plate decoration
To get a plate decorated with graceful lace, take these simple steps:
- Saturate the lace with transparent glue.
- Stick on a plate and let dry.
- Trim the excess fabric and finish the job by varnishing it.
Decor plates volumetric figures
Another interesting way to make decoupage plates with your own hands:
- The necessary materials in large quantities can be found in the departments of toys. Get a set for making gypsum figures and, following the instructions, make a figure for decorating the plate.
- When the figure dries, cover it with emulsion paint.
- Stick the figure on a plate and open the work with varnish.
Important! To make the product particularly colorful, paint the figures and plate with paints before coating with varnish.
Plate decoration with shells and starfish
Surely you have more than once brought from the sea yourself or received seashells, pebbles and starfish as a gift. These things are the best suited to make decorative plates with your own hands:
- Degrease the surface with alcohol.
- Put the adornments on the glue in the order that you like best.
Important! For best results, the adhesive should be thick and transparent.
- When the glue is completely dry, cover the plate with varnish and enjoy this piece of the sea!
Other plate decor options
In addition to decoupage, there are many ways to complement your interior with handmade details.This will not only create a special character of space and give you pleasure, but also help to save. The variety of methods for decorating plates is very large:
- glass painting;
- decor with ribbons;
- stained glass window;
- point techniques;
- quilling;
- marbling.
to contents ↑Important! Ceramic plates are best for painting. The paint applied to them adheres well and the application process is easy.
Stock footage
Today, using the Internet, you can easily find dozens of options for decorating do-it-yourself plates and other interior items. Let your imagination come true and never be afraid to experiment!
- How to choose a vacuum cleaner taking into account the characteristics of the house and coatings?
- What to look for when choosing a water delivery
- How to quickly create comfort at home - tips for housewives
- How to choose the perfect TV - useful tips
- What to look for when choosing blinds
- What should be running shoes?
- What useful things can you buy in a hardware store
- Iphone 11 pro max review
- Than iPhone is better than Android smartphones
 (No ratings yet)