

DIY wooden bread box

Do-it-yourself wooden breadbasket is not such a popular item in the kitchen interior as an ordinary breadbasket. But, unlike the more modern “brothers” of plastic, it looks solid and very beautiful, is an environmentally friendly item, and the bread in it remains soft and fresh for longer. And if you also love to experiment and are ready for further creativity in order to equip your house with items of your own unique production, we offer you in this article drawings and a master class on how to make a bread box with your own hands.
to contents ↑Preparatory work
You must prepare the room before starting production. Stock up on all the necessary materials and tools, prepare drawings for the future product that will fit the size, and also think about the way the door of your breadbox works. You can even make an approximate example if such work is carried out for the first time. Last but not least, the design of the bread box is thought out.
First you need to determine the material from which the body will be made. The bread box can be made of:
- Plywood
- Bamboo
- Tree;
- Birch bark.
to contents ↑Important! Any of the listed materials is excellent for breathability and also regulates the moisture level inside the bread box. Quite often they are combined in one product. It is thanks to these special properties of wood that bread retains its smell and taste for a long time.
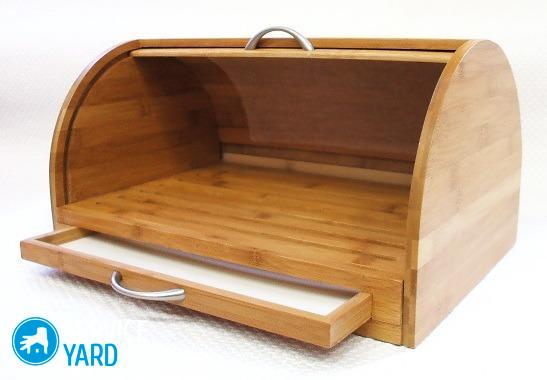
Wooden bread box
Making a wooden bread box with your own hands is quite easy.
Important! You must take into account that ash, linden and birch will become the ideal material for this product. Spruce and pine have an extremely persistent smell, which will subsequently absorb bread.
The manufacturing procedure itself can be immediately divided into several stages:
- According to the drawing, all the elements that must necessarily fit tightly together are cut from the tree. Sizes may vary.
- All cut parts can be joined with screws, furniture studs or wood glue. More skilled craftsmen use a spike to connect. A spike is formed on one part and a notch on the other.
- Joints are coated with glue for better bonding. Moreover, absolutely all compounds must be thoroughly processed. This is done with ordinary sandpaper.
- At the end, the doors are made. A modern wooden bread box, as a rule, is equipped with a door in the form of a curtain, which is made of thin strips.
- In order for the shutter door to move, make a groove inside the case inside which this door will move.
- You can open the surface with varnish, but be sure to varnish on wood, and not varnish for nails or for hair, having previously painted it with a pattern.
Important! You can make a simpler version of the door. In this case, the curtain opens outward. It, like the previous version of the door, is made of planks of small height. Often the planks can be replaced with a bamboo mat, which is fastened with a strong thread.
In any case, the bread bins will be incredibly roomy as well as functional.
to contents ↑Important! Thanks to the material from which the product is made, the bread box is completely environmentally friendly and will suit all kinds of interior styles.
Bread bins made of bamboo
Bamboo material is not only an ornament for facing the body of a finished product. Quite often, some craftsmen make small-sized bread bins from bamboo napkins.
Important! A similar product will be manufactured within 2-3 hours, and not days, and this is the main plus.
To make such a bread box with your own hands, prepare the following tools and materials:
- Bamboo napkins;
- Cardboard;
- Self-adhesive;
- The cloth;
- Scissors;
- Pencil for marking;
- Decorative pen made of wood.
 Useful manufacturing tips:
- The dimensions of the future product are limited solely by the parameters of the napkins.
- Make a body out of cardboard.
- On the one hand, the side walls must be rounded. This is done so that the door closes without interference and carefully adheres to the structure.
- Glue all parts with glue.
- From above, from the inside, the finished case is glued with self-adhesive. Thanks to it, your cardboard case will become much stronger.
- The last stage is the bamboo finish. Cut the napkin into 2 parts. The first must correspond to the size of the bottom, and the second to the door.
DIY open bread box
To make a small, beautiful, comfortable and original open breadbox that will decorate your table during lunch, stock up on the following materials.
Thick cardboard
You can take a box from under some device, cut a piece of the required size.
Catchy fabric
You should like the fabric and fit perfectly into the interior of your room where the bread box will be located. It will depend on the fabric whether the decor will be interesting with your own hands.
Important! Take better flax and cotton. Flax is especially relevant for the simple reason that it is incredibly durable, natural, bread crumbs will not clog in the middle of its threads. But if you take cotton, then this situation will occur.
Thread
You can also take bright threads if you want to make seams that stand out. In certain cases, the fabric is sewn together with thick threads and in a chaotic manner, so that it becomes more noticeable.
Important! However, in order to constantly store bread, such a product may not be suitable. Even if you cover the bread with a towel longer than one night, it will not stand idle - it just starts to dry out. That is why it is more profitable to make a small open bread box.
General tips:
- In order for the interior of your kitchen not to contain extremely catchy and large-scale products, you need to make a small bread box.
- In no case should it resemble a container or a tray with high sides, which is why 20-25 cm in diameter should be enough.
Making a bread box:
- Cut a square or rectangle from one sheet of cardboard about 20x20 cm plus about 5 cm for the height of your future bread box.
- Mark with a pencil on the inside of your future bread box the bends of the sides and bottom. Take a ruler or knife and make bends. This must be done very carefully so that the cardboard receives a minimum number of cracks during work.
Bread Case
A particularly interesting sewing method is that even at the stage of forming a cardboard form on all side sides, you can make cuts right down to the bottom. And for all the details, make a separate cover, for which:
- First, sew the bottom of the bread box, which you can make somewhat soft by filling with a small amount of cotton wool, which will create a larger volume for the future product.
- Then sew covers for the sides, which will then be worn on them.
- In the upper edge of each side you can sew on one rope, which will be connected to each other, thereby fastening the sides of the bread box.
to contents ↑Important! This version of the bread box with your own hands is especially good because you can not cover it with an ordinary towel, but make a special cloak on an elastic band.
Stock footage
From this article, you learned what a wooden bread box can be, and made sure that making it yourself is not very difficult. Try it, show your imagination, and then this applied interior element will become a real decorative decoration of your kitchen.
- How to choose a vacuum cleaner taking into account the characteristics of the house and coatings?
- What to look for when choosing a water delivery
- How to quickly create comfort at home - tips for housewives
- How to choose the perfect TV - useful tips
- What to look for when choosing blinds
- What should be running shoes?
- What useful things can you buy in a hardware store
- Iphone 11 pro max review
- Than iPhone is better than Android smartphones
 (No ratings yet)