

Do-it-yourself sofa-swing for a summer residence
Everyone, probably, remembers their childhood sensations from riding on a swing. Up to the sky and the whole world under your feet! I would like to keep such a feeling further? Of course, but it’s not always worth swaying so much. You can relax yourself in the country. For example, do-it-yourself sofa swings - what’s not an option? First of all, it’s nice to swing on them. In addition, this is a kind of training of the vestibular apparatus. Consider a simple design option, how to please yourself by creating such a system with your own hands.
to contents ↑Hanging sofa swings: types
Some models are designed for children, and some for adults. Therefore, before choosing a model, you should clarify the weight for which it is designed. In addition, the material from which the frame and the base are made may be different. You can use metal or wood. The children's version may be plastic, but, as a rule, it is unlikely to withstand a couple of seasons.
But the design is unlimited:
- Sofa on chains;
- Bench with soft seat;
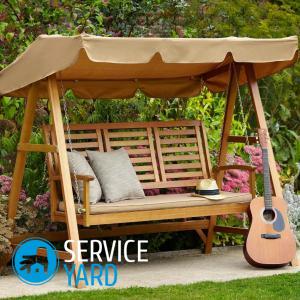
- Arbor with protection from the sun and rain.
Important! To protect the wooden frame, immediately use varnish. Moreover, this must be done before the design is mounted.
Most often, do-it-yourself swing chains are installed outdoors, especially if they have a canopy. But nevertheless, they can be suspended in enclosed spaces, provided that the ceiling can support the weight of the structure.
to contents ↑What are good wood products?
Wooden swings have a lot of advantages, which are:
- Simplicity of manufacture. For your own production of such an element of the interior you do not need to be a professional carpenter, you need only minimal skills with this material.
- Low financial costs. The manufacturing cost will be less than in the case of metal.
- Universality. Wood is an excellent material not only for the manufacture of small single structures, but also for large sofas.
- Harmoniousness. Such a product will be perfectly combined with a garden style, unlike a metal swing, which will not be appropriate everywhere.
- Environmental friendliness. No one will dispute that wood is a natural, environmentally friendly material.
- Security. This material is quite soft, so the possibility of injury to children is minimal.
to contents ↑Important! If careful pretreatment of wood is not carried out in order to prevent the negative impact of external factors on it - precipitation, excess moisture, sunlight, frost, etc., rotting of the material, its deformation is possible. This is the main disadvantage of such models.
What are good metal products?
Similar swings are characterized by:
- Longevity. This material will last for many years without breaking or undergoing rotting.
- Reliability. It is difficult to argue with this statement, since the metal is solid and stable.
- Practicality. The material is not affected by negative environmental factors: rain, snow, sunlight.
- A variety of models. The swing can be collapsible, welded or forged. You can choose the right option for your site.
- With the appropriate skills, hand-made manufacturing is possible.
to contents ↑Important! Despite a considerable number of positive characteristics, sofa swings for giving with your own hands made of metal have a number of minuses. For example:
- On the one hand, it is good that the material is dense and hard, but it can easily be injured.
- In order to avoid corrosion, periodically need to apply a layer of special paint.
Do it yourself garden swing
In fact, making a hanging sofa swing with your own hands is not so difficult. Consider an example with an A-shaped frame.
Important! The first step is to choose a place to install. The surface should be flat. It is better to choose a place behind the house to relax in full. Pay attention to the obstacles in the back and front: they should not be.
Materials for work
We carry out the preparation of materials and tools:
- Lumber with a section of 100x100 mm, four pieces of 3 meters;
- A beam with a section of 80x80 mm, one piece 2.5 meters long;
- A beam with a section of 45x56 mm, twelve meters;
- Edged boards 30x100x600 mm in size, one piece;
- Covering boards measuring 26x46 mm, eighteen meters;
- Pillows (if desired);
- Chains with large links;
- Corners made of metal;
- Eyebolts or hanging hooks;
- Furniture bolts;
- Self-tapping screws of different lengths;
- Materials for the roof (plywood, boards or straw);
- Concrete mortar;
- Screwdriver;
- Grinders or jigsaws;
- Building level;
- Power Planer;
- Electric drill.
Working process
When everything is ready, proceed to the assembly:
- We choose a bar on which there should be no knots and cracks. Wood should be of a durable variety: cedar, spruce, oak or birch.
- We make side racks. The difference in the width of the racks and the seat should be more than half a meter. For example, if the seat width is 0.8 m, then the vertical bars of the supports should be at a distance of at least 1.3 m. All the necessary angles are sawn with an electric jigsaw. To connect the upper part of the bars, long self-tapping screws or furniture bolts are used.
- We mount side ties. Side racks need to be divided into three parts.
Important! At the same time, keep in mind that the calculation is based on the soil level. That is, you need to recline about 60 cm, on which the racks will enter the ground.
- Ties will be located on the border between the lower and middle thirds of the racks. It is necessary to measure and saw off the required length. For fixation, metal corners and self-tapping screws are used.
Important! To make the structure more durable, you can make another screed located at a distance of 20 cm from the top of the racks.
- It is necessary to cut two isosceles trapezoid whose height is 10 cm. Using self-tapping screws and metal corners, they need to be fixed on the inside of the bars at the very top of the structure. They will become an additional support of the supporting crossbar.
- To make a seat, you will need to create two frames. For a seat - 2000x500 mm in size, for a back - 2000x650 mm. To strengthen the internal contour of the frames, vertical stiffeners are used. Self-tapping screws and corners are used to connect the back and seat. For a covering the facing board is used. Armrests are also available.
- The suspension mount is created using eyebolts: one pair is screwed into the backs, its upper beam, and the second into the seat, its front beam.
- Using screws, we carry out the installation of the bearing support on the side racks.
- We dig holes in which side supports will enter. Their depth should be at least 0.8 m, since racks will enter at 0.6 m from them, and the rest of the space will be used for a pillow of crushed stone.
- After filling the gravel, we place the bars in the pits and fill it with concrete.
- Using the construction level, we install the racks so that they are at an angle of 90 degrees.
Important! The depth of immersion of the racks should be the same, otherwise - the design will not be stable and will become unusable very quickly.
- After installing the rack, you need to fix it with rope extensions for about two days until the solution solidifies.
- Check if the crossbeam is firmly fixed.
- Using a drill, prepare the holes in the beam. In them, using eyebolts, we fix the suspension rings.
- We carry out the installation of the bench.
Stock footage
As a result, not so much time was spent, but meanwhile, an almost perfect place to relax is ready. For greater comfort, soft cushions are placed on the seat. So that they are operated as long as possible, it is better to equip them with covers that can be easily cleaned if necessary.
- How to choose a vacuum cleaner taking into account the characteristics of the house and coatings?
- What to look for when choosing a water delivery
- How to quickly create comfort at home - tips for housewives
- How to choose the perfect TV - useful tips
- What to look for when choosing blinds
- What should be running shoes?
- What useful things can you buy in a hardware store
- Iphone 11 pro max review
- Than iPhone is better than Android smartphones
 (No ratings yet)