

DIY electric underfloor heating
During the construction or repair process, homeowners always think about how to make their living more comfortable. Nowadays, a device for underfloor heating is very popular. But many refuse this idea, since installation work is very expensive. But you can save money and make an electric heated floor with your own hands. How? - Read our article.
to contents ↑Types of Electric Floors
The modern heat-insulated floor connected to the power supply is presented in the form of a system of cables, or TENOV connected in mats. A separate group consists of innovative designs, which include infrared rods, and film models.
But all of these options have a number of common symptoms:
- The base of the floor must be dry before installation;
- Necessarily need grounding and insulation;
- The equipment has a thermostat;
- The service life is quite long.
But there are differences presented by the installation features, the quality of the generated heat, and the interaction with floor coverings.
Cable floor heating
- Such a system has already become a classic, as the design is very convenient and reliable.
- Such a floor consists of a cable cut into sections, a sensor for temperature control and a temperature regulator.
- Thus, the system turns on only after the temperature drops below a certain level.
Important! You can use simple temperature controllers, and more complex devices that monitor not only the temperature of the floor, but also the temperature in the street.
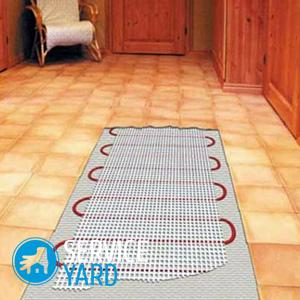
Thermomat (thin cable floor on the grid):
- In the manufacture of using a very thin cable, mounted on a fiberglass mesh.
- The heating core in the cable is surrounded by a shield, insulation and a protective sheath.
- The cable in the mats is single and two-core. Two-core models are used to heat rooms in which people are constantly, as they are characterized by a low level of electromagnetic radiation.
Important! Thin cable floor is laid on an old tile or finished screed. For laying under tiles, this option will be the most optimal.
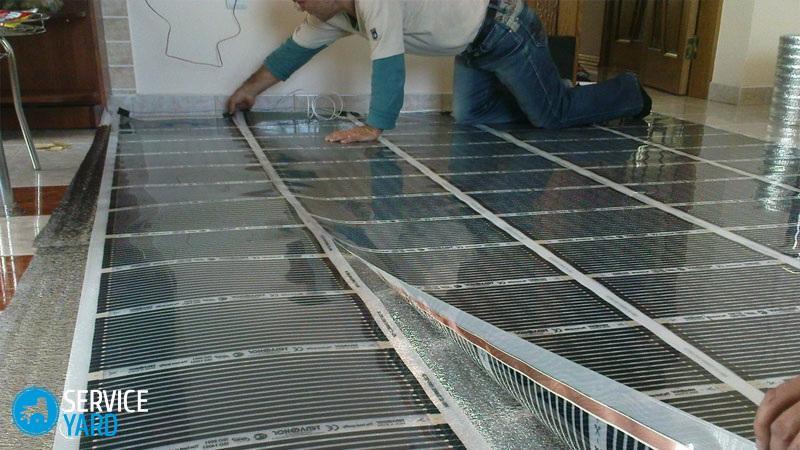
Infrared underfloor heating
In this type of floor, the heating element through which the electric current passes begins to emit electromagnetic waves, due to which there is an increase in the temperature of all objects that appear in their way. In this there is a similarity of the infrared floor and the rays of the sun. The heat from the conductive element passes into the floor covering, which lies on top, and air is already heating from it.
Different types of underfloor heating require a different finish flooring:
- Cable floor and thermomats - you should choose ceramic tiles, laminate or porcelain tiles;
- Infrared film and carbon rods - laminate, carpet, linoleum or wood.
What is needed for installation?
Before you learn how to lay a warm electric floor with your own hands, you should decide on the necessary tools and materials.
So, you have to get:
- Thermal insulation (polystyrene foam or polyethylene foam with a layer of foil);
- Dowels or special glue;
- Grid for plaster;
- Primer;
- Dowels with washers or clips made of plastic;
- Cable;
- Thermostat and mounting box for it;
- Thermal sensor;
- Corrugated plastic tube;
- Puncher;
- Alabaster;
- Sand and cement;
- Fiberglass and plasticizers;
- Mounting tape;
- Notched trowel;
- The capacity in which the solution will be mixed.
When everything you need is prepared, you can begin installation work.
to contents ↑Level the floor and lay the insulation
Do-it-yourself electric underfloor heating installation and installation begins with a thermal insulation layer:
- Most often in this case, polystyrene foam with a density of 35 is used.
- If the room is located below, which is heated, its thickness should be 20 mm, and if not heated, 30-50 mm.
- The exception is private houses with a concrete base laid on the ground. In this case, the thickness of the insulation should be at least 100 mm.
Lay the insulation layer after the floor is completely level. There should be no pits, cracks and distortions on it.
Important! If there are defects in the screed, they are disposed of with cement. In the presence of skew and significant damage, you need to make a new screed.
 When the floor is level, it’s time to lay the insulation material:
- We process the entire surface with a primer. This step is necessary in order to prevent the formation of fungus and mold.
- We glue the insulation or fix with dowels.
- We lay the plaster mesh, fasten using special clips made of plastic or dowels with caps.
to contents ↑Important! The length of the dowels must be equal to the thickness of the insulation layer. With this fastener, the insulation is even better fixed.
We calculate the cable and get ready for installation
For heating to be productive, at least 80 percent of the room must be covered with cable. Before starting the installation process, the resistance of the cable sections must be checked, a deviation from the passport data of about 10 percent is allowed.
Important! The cable does not need to be laid in places where heavy appliances or furniture are standing.
When laying the cable from the walls, you need to retreat six to seven centimeters.
to contents ↑Important! When calculating the cable laying step, the following formula should be used: centimeters in step = heated area x 100 / cable length.
Setting the thermostat
We act as follows:
- We are preparing a hole in the wall, we will cut the furrow to the floor.
- Insert the mounting box into the hole, fasten with alabaster.
- The corrugated tube coming out of the box fits into the furrow and is covered with alabaster on top.
- The end of the tube is discharged into the heating zone and is located between the cable loops so that the temperature controller is in the center.
Important! We lay the pipe without bends, in the location of the temperature sensor it is necessary to create an elevation using a wooden bar. This is done in order to achieve the location of the sensor immediately below the floor, which means - for the correctness of its readings.
- Wrap the end of the tube tightly with insulating tape so that the solution does not get into it.
We lay the cable
Before you make a heated floor electric, you need to learn the rules of laying the cable. It fits in the form of a snake, while you must observe the previously measured step:
- We lay the cable, fix it with plastic ties.
- Check how efficient the system is.
- To mount the screed, a mixture of sand and cement is used, in a ratio of 3 to 1.
Important! The solution can be supplemented with appropriate plasticizers or ready-made mixtures. It is possible to add fiber.
- The solution, which is laid on a grid with a cable, must have a thickness of at least 4-5 cm.
- When the screed is dry, the floor covering is laid.
to contents ↑Important! For at least a month, the inclusion of a warm floor is prohibited, since the screed does not have time to completely dry out.
Cable Management Rules:
- When choosing a heating cable, the length is calculated based on the area on which heavy furniture will not stand.
- Do not cut cable.
- Turning on the screed or adhesive mortar until the screed is completely dry will result in a cable malfunction.
- The cable management surface must be clean; you can use an industrial vacuum cleaner for this.
- The sensor should not be embedded in the solution - it is better if it is in the corrugated tube, it is easier to replace it in case of breakage.
- Where the cable heats up, there should be no air pockets in the cable tie. Otherwise, it may overheat and break.
Stock footage
As you can see, you can install the underfloor heating yourself. But without skills, this is unlikely to succeed. If you are not sure that you can handle it, it’s better to call specialists for help.
- How to choose a vacuum cleaner taking into account the characteristics of the house and coatings?
- What to look for when choosing a water delivery
- How to quickly create comfort at home - tips for housewives
- How to choose the perfect TV - useful tips
- What to look for when choosing blinds
- What should be running shoes?
- What useful things can you buy in a hardware store
- Iphone 11 pro max review
- Than iPhone is better than Android smartphones
 (No ratings yet)