

Drywall on the walls with your own hands under the wallpaper
The modern market provides a lot of different materials, from which it is not always easy to choose suitable ones. Depending on whether you want to quickly complete the repair work, do everything thoroughly and for a long time or leave yourself the opportunity to often change the interior in accordance with fashion trends and your preferences. Drywall sheets allow you to perfectly level the surface for a short period of time and with minimal labor, therefore they are so often used for repairs. No exception and wall decoration. Below we will analyze how to prepare drywall on the walls with your own hands under the wallpaper.
to contents ↑Why putty?
The first thing that masters do when working with drywall walls is putty them. A logical question may arise: why? After all, the walls are already smooth. The thing is that:
- When installing the sheets, the joints will surely be visible, as well as the places where they were attached to the screws.
- If you immediately stick a sheet of paper wallpaper on such a design, through them all the bumps will be visible.
- But even denser wallpaper options will not help to cover uneven areas, especially if a light color is chosen for them.
Important! Another important point that many do not think about: if you want to glue the wallpaper, they naturally have to be removed. And if the coating was without putty, then drywall may not withstand such a strong mechanical stress, and you will have to dismantle the entire structure.
These are the main points that indicate the need for puttying the walls under the wallpaper. Let's talk about the finishing material itself.
to contents ↑A little bit about drywall
A sheet of material is represented by a gypsum sheet sandwiched in cardboard on both sides. The size of one sheet is standard: 2.5 meters by 1.2 meters. Therefore, in order to sheathe a large area, the sheets of material are joined together.
Characteristics of working with the material:
- GCR is characterized by a smooth and even surface that does not require special efforts to level it.
- The joints of the sheets are processed using a reinforcing mesh and putty mixtures.
- GKL installation is carried out using self-tapping screws.
Next, we will figure out how to putty drywall under the wallpaper, but first we will choose the right mixture for the job.
to contents ↑A little bit about putty
When doing independent work, it is very important to choose a quality putty. Consider the basic tips from experienced craftsmen.
Recommendations:
- When choosing in a store, always look at the shelf life of the mixture. If it is absent, or you have suspicions that the date has been corrected, it is better to immediately refuse such a purchase.
- You should also pay attention to the appointment of funds. For processing under the wallpaper, we need a mixture for interior decoration.
- Before buying, read the instructions on the package. There are ready-made mixtures, but there are compounds that need to be specially prepared and even insisted.
- If you have chosen the mixture that you want to cook, you will need a construction mixer to mix the composition until smooth. For the same purpose, you can also use a nozzle for a drill.
But this is not all you need to know about putties. The composition of the mixture is also important.
Gypsum plaster
The gypsum-based mixture does not tolerate high humidity, it can become cracked. Therefore, its use is possible only in dry rooms.
Cement
Compositions, the main component of which is cement, tolerate moisture well. Therefore, they can be safely used when decorating kitchens and bathrooms.
Leveling
These mixtures are suitable for correcting joints, cracks and other surface flaws, but they will not be suitable as a final stage of work due to coarse grinding.
Universal
These are compositions based on polymers, they are very economical to consume, resistant to high humidity and can be used for any stage of decoration.
Important! When making a choice, take a look at the compounds that need to be prepared. Often their cost is lower, and the consumption is much less, because you can prepare the mixture as necessary in small volumes.
When choosing ready-made compounds, you need to monitor the tightness of the lid, otherwise the product will quickly lose its properties.
Next, we will figure out how to prepare drywall on the walls with your own hands under the wallpaper.
to contents ↑Wall preparation
Before starting work, you need to remove all dirt from the gypsum board, as well as conduct a small test on how fasteners protrude above the wall. To do this, it is enough to draw a wide rigid spatula along the wall surface:
- If he will cling to the fasteners - correct with a screwdriver.
- If the screws protrude, they are screwed in to drown, if they are very drowned - on the contrary, they are twisted and rearranged to another place.
- If the top layer has peeled off somewhere, it is carefully cut and applied to this part of the primer.
Ground surface
A primer for gypsum plasterboard walls is necessary, since in this way you reduce putty consumption, increase the adhesion of the coating and protect the wall from the adverse effects of various factors.
Important! Note that GCR absorbs moisture well, and accordingly - it is necessary to choose a primer marked “for highly absorbent surfaces”.
It is necessary to prime the entire wall, especially carefully soaking up the corners and joints of the sheets. Next, you need to wait for the composition to dry out and find out how to putty drywall with your own hands under the wallpaper.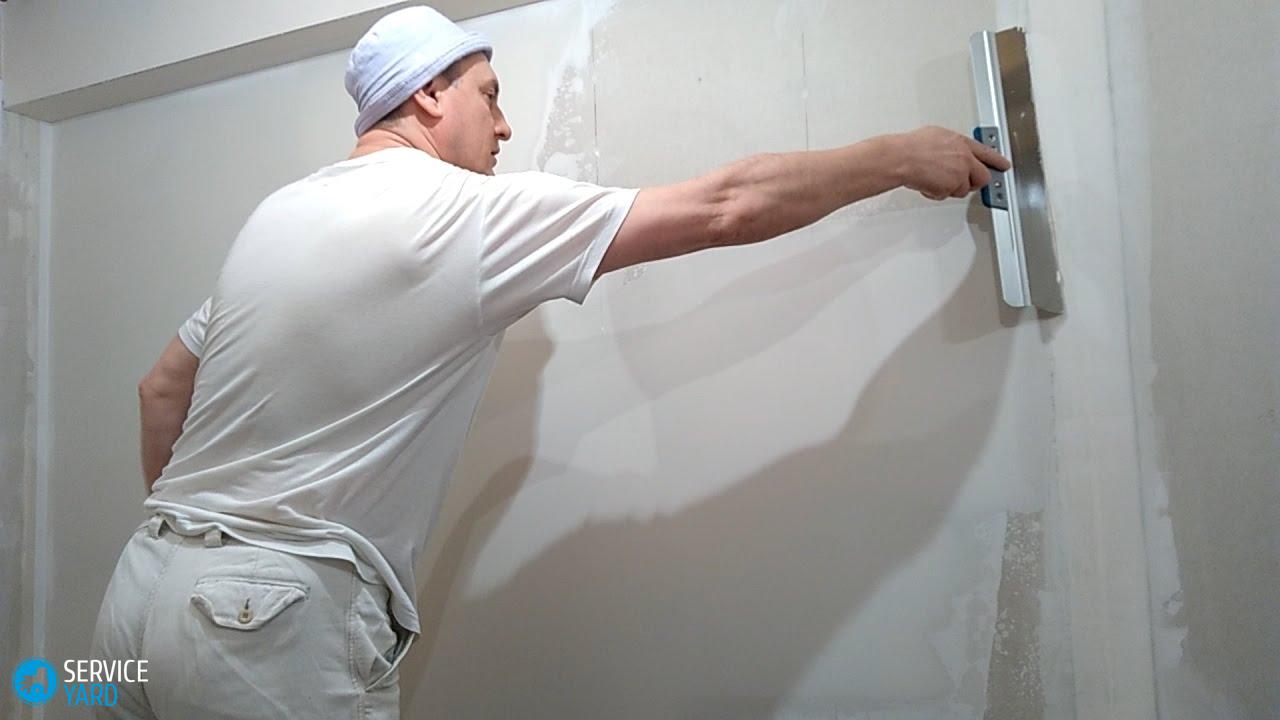
Putty walls
So, for starters, we apply the first layer of putty. We need it in order to:
- repair cracks and dents;
- smooth scratched areas;
- remove holes from screws;
- close all seams and joints and corners.
Important! At the initial stage, do not be afraid to apply a little more mixture. When dried, it will shrink.
Next, we will deal with the question of how to putty drywall under a wallpaper with your own hands.
We will need
In order for the work to go quickly and successfully, you need to prepare everything you need in advance.
What tools are needed?
- A construction or ordinary sharp knife;
- The roller is wide and narrow;
- The craftsmen are soft and hard, wide and narrow;
- Brush;
- Capacity for work with putty;
- Construction mixer.
But repair will not work without materials, so we will prepare them.
What is needed from the materials?
- Reinforcing mesh - serpyanka;
- Water-based primer, or other suitable for GCR;
- Universal putty or two types - finishing and for joints;
- Metal corners;
- Sandpaper;
- Skin and respiratory protection.
Important! If you are going to use a ready-to-use mixture, you will not need a construction mixer, but you will also have to mix it with a small stick from time to time.
So, what steps should we take after preparation?
Initial work sequence:
- To completely hide the screws under the composition, apply the putty crosswise.
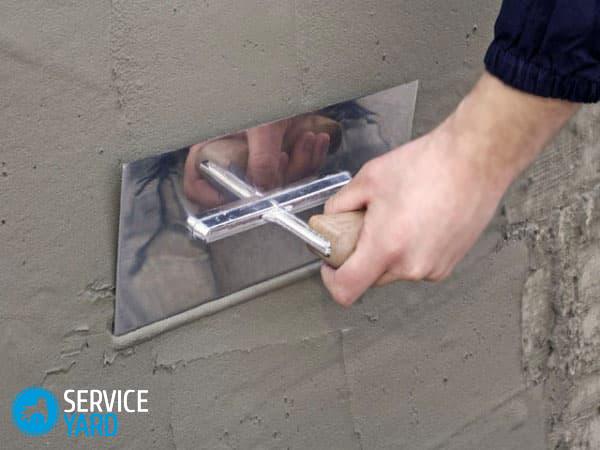
- To seal all seams and joints, a reinforcing mesh is first used, which is carefully glued so that the seam is in the middle.
- Next, we begin to close the seam, working first from top to bottom with a narrow trowel, and after that - they level along the wide one.
For corners, a separate technology is used.
Work on the corners:
- Take a corner or a plastic profile, apply it to the corner and draw a pencil around the borders.
- We will remove the corner, we will make, according to our marks, the notches, with a depth a little more than the profile.
- Next, we cover the recess with putty mixture, press the corner into it.
- We smooth the putty that climbed up when pressed in and add a little more mixture from above to completely hide the profile behind the composition.
Important! For processing internal corners, a reinforcing mesh is used. After finishing work, you must wait until the walls have completely dried out and primed them again.
Next is the final stage - finishing the walls of drywall for wallpaper.
Completion of work:
- This stage of work is to create a thin and uniform layer. In this case, the mixture should be diluted to the state of sour cream.
- It is most convenient to make such finishing by finishing putty and a wide spatula.
- Take your time, do all the work as accurately as possible, without sudden movements.
to contents ↑Important! If, after the mixture has seized, you notice a slight unevenness - you can remove it by erasing it with sandpaper. Next - it is necessary to wait for the complete drying of the composition and primer the surface again. If necessary, finishing work can be repeated several times.
Stock footage
If you carry out all the work correctly, then you will understand that there is no particular difficulty with material such as drywall. The wall decoration for the wallpaper on this is completed, and you can proceed with the actual work with wallpaper. Have a good repair!
- How to choose a vacuum cleaner taking into account the characteristics of the house and coatings?
- What to look for when choosing a water delivery
- How to quickly create comfort at home - tips for housewives
- How to choose the perfect TV - useful tips
- What to look for when choosing blinds
- What should be running shoes?
- What useful things can you buy in a hardware store
- Iphone 11 pro max review
- Than iPhone is better than Android smartphones
 (No ratings yet)