

How to glue 3D wallpaper?
Volumetric murals appeared in the field of view of designers relatively recently. But this type of finish is quickly gaining popularity. In stores you can find quite a lot of types of such finishing materials, and the only thing that stops many apartment owners so far is the question of how to glue 3D wallpaper. Now you will know about it.
to contents ↑Advantages and disadvantages
Analysts predict a great future for this type of finish. They have reasons for optimism, since 3d-wallpapers have excellent qualities:
- they are almost impossible to damage, since they are already glued to the surface, which can only be entered into the interior;
- they are usually made moisture resistant, so that you can glue 3 d of wallpaper in any room, including the bathroom;
- do not burn;
- do not fade;
- Surprisingly, they are made from natural materials;
- environmentally neutral;
- do not cause allergies;
- easy to wash;
- allow you to radically change the space.
In a word, any owner dreams of such a finish. But not everyone can afford such a luxury - while 3D wallpapers are still quite expensive. Before gluing 3D murals on the wall, think about whether they really need to be placed on vertical surfaces. Nothing prevents you from decorating the ceiling in this way, and the room will feel like flying. You can arrange something like a window by inserting a 3d panel into the frame.
to contents ↑Important! Volumetric wallpapers are best glued not on all walls, but on one or two.
Select a picture
As you know, different rooms in a house have different purposes. Finishing should be chosen taking into account this circumstance, since the drawings of 3D wallpapers are extremely diverse. You can stick photo wallpapers with 3D effect:
- in the nursery;
- in the bedroom;
- in the bathroom;
- in the living room;
- in the hall;
- in the kitchen.
Children
In the room for children there is no need to cover the entire wall with voluminous wallpapers. You can limit yourself to the picture. We must be very careful about the plot. Volumetric wallpapers are almost eternal, and children tend to grow. So your kid will probably like the picture from his favorite cartoon, but how will he react to this when he goes to school? Will have to change the finish, but it is quite expensive.
So it’s better to choose neutral subjects:
- animals;
- plants;
- pictures from the life of the deep sea;
- space plots.
Of course, if your preschooler has younger brothers and sisters, children's panels will eventually come to them.
Kitchen
This is a multifunctional room where residents of modern city high-rise buildings both cook, have dinner, and make closest friends. If the sizes allow, it is necessary to allocate at least two zones - working and dining.
But in the kitchen there can be a mini-living room and a workshop. And each of these zones can be separated from the others by 3D wallpaper. For working and dining, still lifes are most suitable for fruits and vegetables, with flowers, as well as pictures of nature.
Important! If there is a dining table by the wall, you can paste wallpaper with a sea view or garden view. Then you get a window onto the terrace, and the kitchen will always have summer.
Hallway
In this room, a panel without a plot is better. An abstract drawing will help to visually expand the space, but you will not need to select another finish for it. And if the hallway is big? Then anything suits you - mountain and sea landscapes, views of roads and rivers.
Bathroom
In this room, pictures on the marine theme look perfect - fish, dolphins, whales, octopuses, strange shells. Panels with ships and beaches are also suitable. In a word, everything that is connected with water and with relaxing on the shore or traveling to fabulous islands is suitable.
Bedroom
This room is primarily intended for relaxation. Everything should be calming here, including voluminous wallpapers. Typical stories for the bedroom:
- starry sky;
- sky with clouds;
- flowers
- calm forest landscape;
- view of the old city.
Important! In the bedroom, as in the nursery, there should not be paintings with aggressive or disturbing subjects.
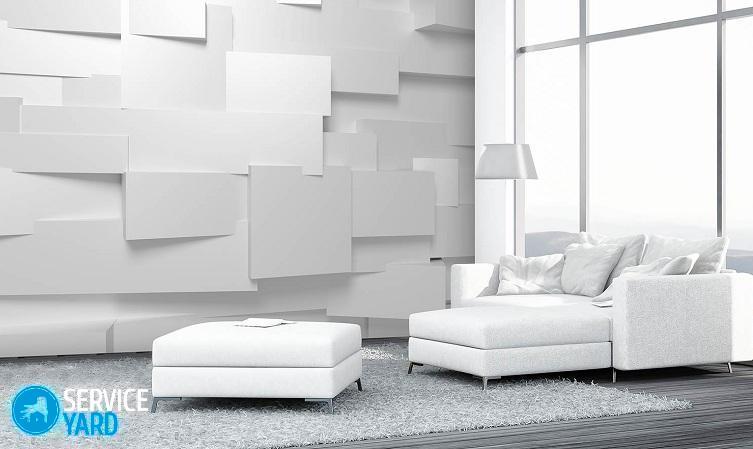
Living room
In this room the family gathers together, holidays are celebrated here and cheerful guests are received. The plot of the volume wallpaper depends on the style. For Provence, it will be a view of the garden, for Hi-tech - an abstract illustration on a technical theme, for Classics - a forest landscape.
to contents ↑Important! In any room, you can use fluorescent 3D wallpapers, but they look best if the space theme prevails in the room.
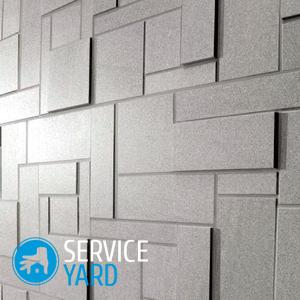
3D wallpaper selection
Before gluing 3D wallpaper, you need to choose the option of their placement. It could be:
- picture in a frame or without it:
- a piece of wall with a smooth transition from one plot to another;
- the center of the composition, which continues to other parts of the wall.
Here are some design features of such wallpapers:
- In the first case, everything is simple. For 3D wallpaper, a piece of the wall stands out, the frame is made - flat or three-dimensional. Flat is obtained using ordinary wallpaper or simply drawn, volumetric - ordered in a baguette workshop.
- The other two options require some artistic skills. Two scenes can be combined simply with lines, but it is best to draw an ornament between them. However, nothing prevents to choose the usual color and style of the usual wallpaper - paper or fabric.
- In the second case, you still have to draw lines. For example, a three-dimensional panel hangs in the center, rays or stems of plants depart from it. It is very important to choose the right paint and material for the background.
Cooking Tools
For pasting a room with voluminous photo wallpaper some tools are needed. Prepare:
- building level;
- plumb line;
- putty knife;
- roulette;
- flute;
- putty;
- sandpaper with different fractions;
- primer with antifungal components.
You also need to prepare:
- glue for heavy wallpaper or hard surfaces;
- a bucket or basin;
- rubber roller;
- brushes.
Cooking the wall
Before you glue 3D wallpaper on the wall, you have to tinker a bit with the surface itself. However, the process is not much different from preparing for pasting a room with the most ordinary wallpaper:
- Remove the old trim - it must be removed completely.
- If you can’t tear off the old wallpaper, soak it and remove it with a scraper - you can also work with sandpaper with large grain.
- Pull out all nails and other fasteners.
- Inspect the wall - there should be no cracks, cracks and noticeable irregularities on it.
- Putty cracks.
- Check how smooth the surface turned out - there should not be any deviations from the vertical at all.
- If the surface is flat, and the wallpaper will be in the entire wall - apply a layer of soil and let dry.
- Remove bumps.
- Apply another layer of soil, after which it will be possible to proceed with wallpapering.
to contents ↑Important! The wall should be as perfect as possible - any unevenness reduces the effect of the effects of volumetric wallpaper.
Markup
If the wallpaper occupies only part of the surface, the wall must first be leveled, then marked out and only then applied to the ground. The markup is done like this:
- On a plumb line, draw several vertical lines on the wall.
- Mark on each of them the distance from the floor to the bottom edge of the wallpaper and from the ceiling to the top.
- Draw lines between the marks.
- On horizontal lines, mark the distance of the painting from one and the other corners.
- Connect the marks in pairs.
- Check the angles and parallelism of the lines.
- If there are several paintings, lay them on the floor and number them. Do not forget to number the sections on the wall.
to contents ↑Important! If a deviation is detected. the wall will have to be leveled again.
Why is soil needed?
Some novice repairmen ask: is it necessary to prime the wall? For ordinary wallpapers, maybe not. But here for photowall-paper this step is obligatory:
- Without primer, part of the glue is absorbed into the wall.
- Under the voluminous wallpaper, mold can settle, because they do not pass water, therefore, antifungal impregnation is needed.
- The panel is quite heavy, the soil provides a more reliable grip on the wall.
Start to glue
If the wall is ready and even marked, it's time to glue. Consider the following points here:
- You must have an assistant. And ordinary wallpaper is more convenient to glue together, and if you are dealing with heavy material that requires great accuracy, then even more so. In general, such work is best done by three or four.
- Do not start decorating if the house is cold or too hot. The optimum temperature is 20-25 ° C.
- Drafts do not need you either. During operation, it is better to close the windows and doors, and even more so - you need to keep them in this condition for at least a day, or even two to three days after gluing.
Important! You can cope with heat by increasing humidity - for this you need to place several buckets of water in the room.
Crucial moment
The most crucial stage is coming:
- Pour cold water according to the instructions.
- Take a wooden stick and start stirring water quickly - so fast that you get a funnel.
- The assistant during this time should neatly fill the estimated amount of glue in small portions.
- Lay the wallpaper face up on the floor so that the whole picture is visible.
- Apply glue to the area to be glued first.
- Stick one piece - one that is closer to the ceiling from one of the corners.
- Smooth it with a brush.
- Expel air bubbles from under the sheet with a rubber roller - you need to move from the center to the edges.
- Stick a second fragment under it, then the rest.
- Start the next row from above, strictly controlling the lines of the picture - the joints should not be noticeable.
- If air bubbles still remain, and all the wallpapers are already pasted, make a puncture and release the air, and then smooth the sheet.
Important! If 3D wallpaper is in the form of strips from floor to ceiling, then it is better not to try to glue the entire strip right away, but to press the very top part until it adheres to the wall, and only then gradually go down.
Angles
It is especially difficult to paste over corners with volumetric wallpaper. But difficulties can be overcome if you take an even spatula and wrap it with cloth, best of all cotton. Pressing a sheet of wallpaper in the corner, swipe it with a spatula, and it will stick without bubbles and folds.
to contents ↑Stock footage
Now you are ready to glue 3 d wallpapers in your home. Moreover, if before that you had a practice with ordinary wall coverings, there will not be big problems - the technology, in principle, is the same. Now you only need to remember the important nuances and clearly adhere to them during work.
- How to choose a vacuum cleaner taking into account the characteristics of the house and coatings?
- What to look for when choosing a water delivery
- How to quickly create comfort at home - tips for housewives
- How to choose the perfect TV - useful tips
- What to look for when choosing blinds
- What should be running shoes?
- What useful things can you buy in a hardware store
- Iphone 11 pro max review
- Than iPhone is better than Android smartphones
 (No ratings yet)