

How to glue polyurethane ceiling skirting?
The gluing of ceiling skirting boards is the final stage of repair. The process is not difficult and quite simple. Why mount such products? Fillets carry out two important functions: practical and decorative. Using these materials, you can mask minor defects at the junction of the wall and ceiling, as well as create a finished interior composition. Therefore, it will be useful to find out what types of fillets are, and how to glue a polyurethane ceiling baseboard.
to contents ↑Advantages
The ceiling plinth is a building material in the form of a plank, its length can reach five meters. They can be made of wood, gypsum, polystyrene and polyurethane. Below we would like to dwell in more detail on the latter option.
This type of skirting board is made from durable, but at the same time, lightweight material, which is also called “foamed plastic”.
What are the benefits of this type of finish? In fact, such skirting boards have a huge number of advantages:
- The material from which the fillets are made is absolutely harmless to health and is environmentally friendly.
- Durability. The life of skirting boards is nearly thirty years. Moreover, for such a long period they do not lose their presentable appearance.
- Products perfectly hide the flaws and irregularities of the border of the ceiling with the wall. Some trims can even mask wiring and other communications, such as an Internet cable.
- Resistance to moisture, sunlight and various temperatures.
- Possibility of cleaning and care. Skirting boards can be treated with detergents.
Important! However, this does not apply to aggressive detergents, so read the instructions for the cleaning agent before use.
- The elasticity of the material. The flexibility of the skirting board makes installation quick and easy. It is this kind of fillet that is used to finish surfaces with curves or ridges.
- Fine decorative qualities. Skirting boards are suitable for interiors of various stylistic trends - from Classics to Modern. Elements are produced in white, if desired, they can be painted.
- Representation and assortment. The abundance of fillet designs is huge. You will be able to choose products in shape, size and decor.
- Skirting boards are lightweight, easy to handle, and therefore, installation will not be expensive.
As you can see, the edging of the joints of the ceiling and walls in the form of a polyurethane fillet is an ideal finish.
to contents ↑Important! The baseboard has a low impact resistance, that is, after a significant impact, dents can appear on its basis.
Types of ceiling skirting
Before deciding how to glue the polyurethane ceiling baseboard, let's still find out some of its types.
Types of skirting boards in external execution
So, the facial appearance can be classified as follows:
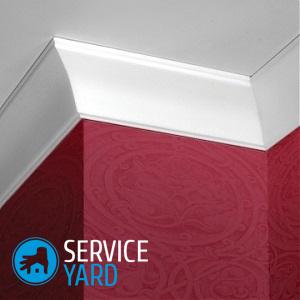
- Smooth baseboard surface. Products of this type are the simplest, their main task is to hide the corners. They are also distinguished by the lowest cost, because the decorative capabilities of such panels are very modest.
Important! The main advantage of smooth skirting boards is their least tendency to dust settling and pollution, as a result - caring for them is very simple.
- Shaped execution.These products can already boast of a more intricate configuration, which creates a pleasant appearance of the panels. At the same time, fillets are characterized by laconic forms.
Important! This type of skirting boards occupies a leading position among peers.
- The relief surface of the baseboard. This type of fillet is already, in fact, an element of design and interior decoration.
Important! Most often, the relief is similar to an elegant and luxurious gypsum stucco. Because of this, it is advisable to use it not in all interiors, but in the most suitable styles. For example, Baroque, Empire or Classics.

Types of skirting boards by purpose
Another classification of products implies a difference in their purpose and distinguishes the following types:
- Ceiling decorative. These are standard trims that are designed to form joints. Their feature in the absence of operational load.
Important! Separately, it is possible to distinguish skirting models with a high degree of elasticity, which are used for finishing curved planes.
- Ceiling lights. First of all, this type of plinth is a very original and stylish decoration of the interior. The configuration of such fillets is different than that of traditional strips: special grooves for installing LED strip can go along the entire length of the product, or there are holes in the base for mounting built-in lighting devices.
Skirting options
Well, we note a couple more characteristics of polyurethane ceiling skirtings. They are separated by the angle of the bevel on the front side, which can be equal to:
- 30 degrees.
- 45 degrees.
- 60 degrees.
Another important parameter of the plinth is its width. There are three types of fillets:
- Narrow. The width of such products is in the range of 10-50 mm. Their use is advisable in rooms with low ceilings. The laconic narrow bar looks very stylish in such rooms.
- Medium. The width of these skirting boards varies between 60-150 mm. These products are best suited for most apartments and houses, since the optimal ceiling height for them is 2.5-2.7 m.
- Wide. Their width is 160-350 mm. Such voluminous elements are only suitable for the decor of spacious rooms with high ceilings of more than three meters.
Installation methods for ceiling skirting boards
After choosing this or that product, it is time to ask the following question: what to glue on a polyurethane skirting board for? There are several options, and we will talk about each of them.
Putty
If you ask professional veneers, how to glue a polyurethane ceiling skirting? The answer will be - of course, putty. During the repair process, the mixture most likely remained in small quantities, and it’s easy to work with it.
Pros of using putty for skirting:
- It does not take a long time to press the fillets to the surface and wait until they grasp it.
- During installation, the joints can be leveled with a mixture, covering various cracks and crevices.
- Robust material that holds the bars firmly.
Clay and its types
It is logical that for gluing skirting boards there are corresponding adhesives. Glue for polyurethane foam ceiling skirtings is divided into the following types:
- Polymer compositions. It is based on chemical solvents, so the glue spreads a characteristic pungent odor during use. It will disappear when the composition is completely dry.
Important! Advantageous properties of polymer glue are high strength and moisture resistance.
- Acrylic This type of glue is odorless, but is produced on the basis of water. Therefore, it must not be used categorically in rooms with significant humidity.
You need to choose one or another type based on the purpose of the room: for children, use acrylic glue, and for the bathroom and kitchen use polymer.
Important! The most popular brands of adhesive for ceiling skirting boards made of polyurethane are “Titanium” and “Moment”.
Pros in their favor are:
- Excellent binder base.
- Durability and reliability.
- Speed of action.
Liquid Nails
Polyurethane Ceiling Skirtings: How to glue on “liquid nails”? First of all, we note that this type of construction adhesive is applicable to a wide variety of materials. The composition is able to perfectly hold the ceiling fillets for many years.
There are two types of “liquid nails”:
- Neopropylene. The basis for the manufacture is an organic solvent, so the glue has a pungent odor that disappears after it has completely dried. Up to this point, this adhesive should be used with some caution and safety precautions. Especially well, these “liquid nails” have proven themselves in conditions of high humidity.
- Acrylic This type of retention agent is the safest and most harmless. But they are only suitable for dry rooms.
Installing skirting boards: steps
Before installing the products, determine the perimeter of the room, based on which, calculate the number of strips. Depending on the size of the room, select the appropriate baseboard width.
Important! The style of the interior also imposes some features on the choice of baguette: for patterned walls, choose concise smooth models, for plain decoration - more elaborate.
Now we turn to the question of how to glue the polyurethane ceiling skirting step by step.
Stage 1: Surface Preparation
Of course, in no case can you start installation without preliminary processing of the planes. Gluing places of decorative strips are prepared in this way:
- We put the plinth to the place of its installation, put marks indicating the lower edge of the product.
- Through the construction level we draw a straight line that marks the place of gluing the baseboard.
- It is on this strip that we remove the previous finish, if any, to the layer of plaster or the concrete base of the wall.
Important! If you dismantle the finish a little less with a margin of 1-2 mm, then avoid the formation of cracks in the future.
- After the walls are completely cleansed of the finish, we cover the surface with a penetrating primer. This composition can be replaced with a light adhesive solution or warm ordinary water, but it is better not to experiment.
- We are waiting for complete drying.
Stage 2: Material Adjustment
Before gluing the polyurethane ceiling skirting, it is necessary to adapt it to the appropriate size. We recommend doing this:
- The most difficult and important docking is the connection of baseboards in the corners. For these purposes, you will need a special tool for ceiling baguettes - a manual miter box.
- Plinth put in the miter box in the position in which it will be installed. Then we press it tightly enough, cut it off at the required angle.
Important! Cutting is best done with a saw for a given type of material or with a very sharp paint knife.
- Before gluing, it is necessary to attach plinths to each other in order to exclude the presence of gaps. If there are any, then the adjustment is carried out until the parts are completely connected, cutting off the excess material.
Stage 3: Direct Wall and Ceiling Mounting
The installation process can be described as follows:
- We determine what to glue on the ceiling baseboard made of polyurethane. We have already considered the possible options above, now you will use the specific one. Most often, special glue is nevertheless used for these purposes.
Important! Before applying the adhesive, be sure to read the instructions to avoid possible reactions with polyurethane.
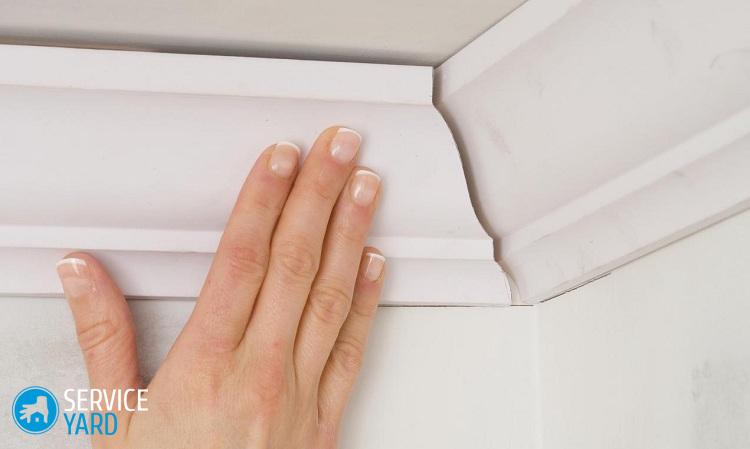
- We begin to apply glue to one of the skirting boards, which will be located in the corner.
- Then we apply it to the surface of the wall, carefully align and press it as tightly as possible. You must hold the bar until you make sure that the glue is “seized”.
Important! If excess adhesive appears during installation, remove them with a clean cloth or sponge. It is better to do this right away so that the tracks do not remain in the form of spots on the baseboard itself.
- Glue the remaining panels in the same way.
Important! For excellent joining of skirting boards between each other, we recommend applying a neat layer of glue to their ends. If the compound protrudes slightly, remove it again with a clean rag.
Stage 4: Finishing the skirting board
This stage cannot be called mandatory, since most often the processing of the plinth after its installation is not required. But there are times when the refinement of the appearance of the baguette is necessary, based on the requirements of the interior.
In this case, we perform the following actions:
- The cracks that are between the elements are sealed with acrylic sealant.
- Along the entire length of the skirting board we glue masking tape on the surface of the wall and ceiling. He will protect them from traces of paint.
- Apply the desired color to the baseboard.
Important! For polyurethane skirting, the best type of paint is a mixture based on acrylic or latex. The application of dye can be done using a brush or spray.
- When the paint has dried, remove the masking tape. Your updated baseboard is ready.
Stock footage
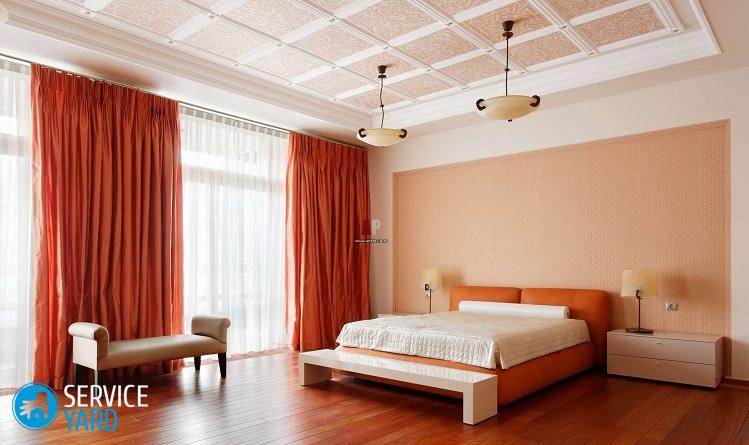
That's probably all you need to know about how to glue a polyurethane ceiling baseboard. I would like to note that this process is very simple, it is easy to do it yourself. And the assortment of skirting boards will bring to life the most striking and original ideas, as a result - the interior of your house will become more elegant and individual.
- How to choose a vacuum cleaner taking into account the characteristics of the house and coatings?
- What to look for when choosing a water delivery
- How to quickly create comfort at home - tips for housewives
- How to choose the perfect TV - useful tips
- What to look for when choosing blinds
- What should be running shoes?
- What useful things can you buy in a hardware store
- Iphone 11 pro max review
- Than iPhone is better than Android smartphones
 (No ratings yet)