

How to make a water lily out of paper?
On the shelves of modern stores you can find goods for every taste. But at the same time, at all times, things made by their own hands were valued above all else. That is why every year the activity associated with the creation of paper flowers at home becomes more and more popular. Such original, beautiful, delicate plants adorn holiday tables, halls, wedding arches, they are presented as gifts to loved ones. The modern decor looks great water lines. This article will be very useful for you, because in it we will tell you how to make a water lily out of paper.
to contents ↑Origami Technique Benefits
Many people today are engaged in needlework, using a variety of materials for work. If you have accumulated a little bit of multi-colored paper at home, then you will like the techniques described below that tell you how to make a water lily out of paper.
Origami helps not only usefully take your free time, but also learn something interesting, new, previously seemingly incomprehensible. Such work helps to develop fine motor skills of the hands, increases intellectual and creative potential, activates memory, makes the imagination richer, allows a person to balance their emotional mood.
to contents ↑Important! After normalizing the emotional and psychological state, a person begins to receive moral satisfaction from what he does. Finished crafts can be presented to relatives and friends. Gifts created with their own hands have a positive energy, due to the fact that the creator puts a part of his soul into them.
DIY simple water lilies
To make a paper water lily with your own hands, follow these instructions:
- Take a piece of white paper, draw a circle on it by hand or use a compass. The diameter of the circle should be 16 cm. On two separate leaves, make two more of the same circles.
- Draw another circle, only with a smaller diameter, for example, 8 cm. Using two perpendicular lines, divide the circle.
- Connect the ends of the lines with dashes in such a way that you get a rhombus, divided into a dozen parts.
- In the center, draw a circle of even smaller diameter than the previous circles.
- Draw leaflets for all circles. It is important to make the lines slightly arched.
- Take the scissors and cut out all the circles and petals.
- Bend the petals to the top.
- Cut a strip of 20 cm long, 1 cm wide from yellow paper.
- Every 5 mm, use a ruler to mark the dashes on the strip.
- Cut the fringe according to the strokes we then use to decorate the flower in the center.
- Roll the strip into a spiral with the handle.
- To prevent the spiral from opening, fasten the ends of the fringe with glue.
- Remove the spiral coiled strip from the handle.
- Take the green paper, cut the leaves for our water lily, place them in the center of the sheet.
- Fasten the fringe right in the center.
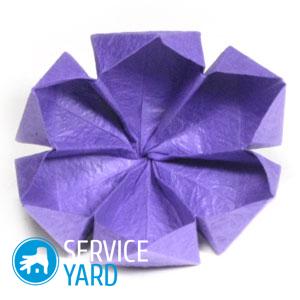
Master class on creating an original water lily
As you have already seen, there are several schemes for making a water lily, with which you can then decorate any event. Prepare scissors, glue, paper, pencil, compasses for work.
The technique of creating a flower looks like this:
- Take a square sheet of paper, bend it diagonally, then unfold it.
- Bend the corners of the square towards the center. It is important that the sides of the corners coincide.
- Expand the square so that the corners lie in relation to each other perpendicularly. As a result of the performed manipulations, your square will turn into a rhombus.
- Bend the corners to the center again.
- On the wrong side, turn the craft toward you; in this position, bend the ends to the center again.
- Bend the curved triangle with one hand a little to the side.
- Determine the place where in the triangle this fragment is connected from the back of the product.
- Bring the back triangle up, then gently bend it in the direction of the front of the workpiece. The main thing is to do everything carefully so as not to damage the paper.
- Bend the outer triangles, then return them to their places to bring the petals to the front side with the back. In the same way, lift and shape all the petals of a water lily.
- Turn the layout with the back side, take the remaining triangles down.
- To give the petals a rounded shape, gently press the center of each of them with your fingers.
- Decorate the flower with sparkles or colors to give it a complete look.
Stock footage
Now you know how to make a water lily out of paper with your own hands in stages. Each of the given master classes is interesting and simple in its own way, but the result is equally beautiful, voluminous, most similar to real flowers.
- How to choose a vacuum cleaner taking into account the characteristics of the house and coatings?
- What to look for when choosing a water delivery
- How to quickly create comfort at home - tips for housewives
- How to choose the perfect TV - useful tips
- What to look for when choosing blinds
- What should be running shoes?
- What useful things can you buy in a hardware store
- Iphone 11 pro max review
- Than iPhone is better than Android smartphones
 (No ratings yet)