

How to sew pillow letters with your own hands - step by step, patterns
Unique pillows in the form of volume letters are very popular now. They can be sewn with one letter or the whole name, decorating with different elements of the decor at your discretion. You must have seen soft registered pillows-letters at home with friends or in a store where such cute beauty is sewn to order. You liked this idea, but you don’t know how to do it? We will help you in solving this issue. In this article, we will talk in detail about how to sew letters-pillows - M, D and others with your own hands step by step. Patterns, patterns and useful tips for choosing materials will help you cope with the work easily and naturally.
to contents ↑Materials and Tools
In order to start work on sewing soft letters, the first thing you need to stock up on materials and tools:
- Fabric to choose from.
- Threads matching the color of the selected fabric.
- Filler - synthetic winterizer, holofiber, cotton wool, foam rubber.
- Paper for a pattern.
- Centimeter.
- Pins
- Needle.
- Scissors.
- Chalk or soap (for drawing).
- Sewing machine.
- Decor Elements.
Preparatory stage
Before you begin, you need to consider some important points:
- The color of the fabric.
- Type of fabric.
- Color and quality of threads.
- Sizes of soft letters.
What fabric to sew the pillow letters from? The choice of fabric depends on who the pillow will be for - an adult or a child:
- For the baby, you can choose a fabric with an original pattern, and a letter pillow made from a plain fabric is perfect for a gift for an adult.
- The fabric for sewing voluminous pillows should not be very thin, or, on the contrary, dense and unpleasant to the touch. For such work, quite strong and non-coarse fabrics are perfect: fleece, dense chintz or soft flannel.
to contents ↑Important! For sewing letters, you can use ordinary threads, but it is better to choose kapron. They can withstand strong tension and will last a fairly long period.
How to sew the pillow letters with your own hands? Step by step, patterns with photos
How to stitch pillow letters? Currently, there are several methods for sewing soft letters with your own hands. The first is the lightest, which is suitable for beginner needlewomen, and the second is a little more difficult for more experienced seamstresses.
First way:
- First you need to make patterns of future pillows in the original size. To do this, draw a sketch on paper and cut it out.
Important! A paper sketch will serve as a template for the outline of the letters on the fabric.
- We fold the fabric in half so that the front part is inside, transfer the previously made template to it.
- After that, we cut the fabric blank along the intended contour.
Important! Do not forget that you need to do this very carefully, as soft pillow letters with your own hands will be sewn on the front side. Therefore, the contour should be as even and tidy as possible.
- At the next step, we sew the letters together with a manual seam “over the edge” and leave a small amount of non-sewn space in the blanks in order to fill the pillow with filler.
- Using a knitting needle or a toothpick (depending on the size of the letters), slowly fill the entire empty space with soft padding polyester, cotton wool or other suitable material.
Important! We fill the pillow with the material until it fills all the empty space. In the end result, the letters should turn out to be voluminous and even.
- At the final stage, we sew the hole with a blind seam and just cut the thread.
That's all, the pillow letter is ready! Now it can be used to decorate the interior or active games.
Second way
When sewing a soft letter in the second way, one should take into account the following moment: letters such as L, C, P, U make it a little easier to sew than, for example, A, B, F, Y. Therefore, in this master class we describe the first letter of the alphabet, it is complex:
- Initially, we make a paper pattern and cut out the template.
- We fold the fabric face to face and fix the template on it using tailor pins.
- After that, carefully cut out the letter from the fabric, leaving allowances for seams of about 1.5-2 cm. Thus, we should get two identical parts of the letters.
- At the next step, we cut out all the side parts: pieces of fabric, the length of which is calculated by the formula: add two allowances to the width of the letter.
Important! Decorate the side of the letters of the pillows with a different color - this will add contrast and originality to the product.
- Now we begin to sew the side parts with the front side.
Important! Do not forget to stitch the letters face to face, since at the end of the work the letters must be turned out.
- We sew the middle of the letter-pillow with our own hands to the front side.
- On the obtained upper part of the letter, we impose the lower part of the product and sew, leaving a small part unpacked, about 4-5 cm, in order to later turn the product and fill it with filler.
- We turn out the stitched letter-pillow, evenly fill it with filler.
- Finally sew the hole.
- Steam the pad well with an iron.
Now you know how to sew a pillow-letter with your own hands in different ways.
to contents ↑Use of decorative elements to decorate pillow letters:
- Various volume accessories will nicely decorate the finished volume letter - bows, buttons, beads, sequins, appliqués, ribbons, lace, patch pockets.
- Hand embroidery will look extraordinarily beautiful. You can make a personalized pillow and embroider on it, for example, initials, date of birth, or the full name of a person.
- Show imagination and ingenuity by making a letter-pillow for the baby, because with the help of decorative elements it can be turned, for example, into an animal, fruit or a favorite character. With this design, you will “kill two birds with one stone” - decorate the pillow beautifully and help your child learn the alphabet, shape and color.
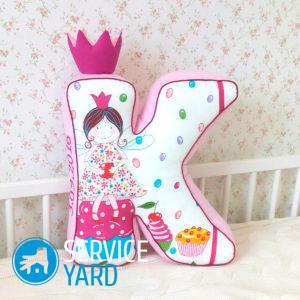
Important! For example, the letter K can be executed in the image of a funny little man with outstretched hand, and adding eyes and ears can be obtained from the letter Z of a cute bunny.
- You can decorate children's voluminous pillows with the help of cut out figures from felt, for example, to sew or paste a sun with clouds or a tree with fruits on its surface. So the baby will not only conveniently lie on this product, but also develop his creative thinking.
to contents ↑Important! If you use a glue gun to fasten elements from felt, then be extremely careful - excess glue on the front side can spoil the attractive appearance of the pillow letter.
Recommendations and other ideas
We offer you to familiarize yourself with the main tips:
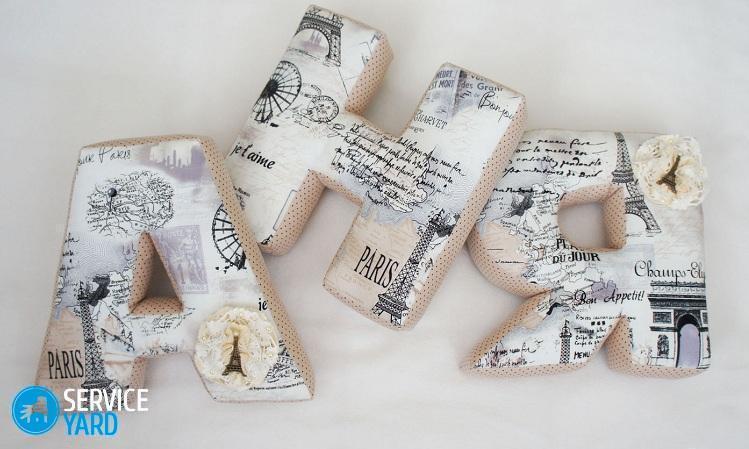
- Before you start making the pillow letters with your own hands, think through a combination of all the fabrics that you want to use in the process.
Important! The sides of the pillow can be made plain, and the front and back can be bright and colorful, but in the tone of the fabric. It all depends on the preferences and creative impulses of the needlewoman.
- When you apply the pattern to the pillow so that the fabric spreads evenly further, it is necessary to make cuts in sharp corners, and vice versa, notches in blunt corners.
Important! This must be done, because after stuffing the cover with filler, the product may skew, as a result, a curve or a tightened letter will be obtained.
- For a change, for your baby you can sew not one letter, but a whole alphabet with your own hands.
to contents ↑Important! The manufacturing process is the same as in our step-by-step master class, but in this case a lot of fabric of different colors will be required so that the letters are different and easy to remember.
Stock footage
Now you know how to sew pillow letters on your own without spending a lot of money. To sew such an ornament with your own hands is to put your soul and tender feelings towards a loved one. Such original pillows in the form of letters will be a great gift, which emphasizes the fact that this thing was made for a particular person, and not just bought in a store. Such products can be a decoration not only of the interior or the children's room, but also add new colors to the photo shoot, for example, for newlyweds you can embroider initials or words of love and recognition. We wish you creative inspiration!
- How to choose a vacuum cleaner taking into account the characteristics of the house and coatings?
- What to look for when choosing a water delivery
- How to quickly create comfort at home - tips for housewives
- How to choose the perfect TV - useful tips
- What to look for when choosing blinds
- What should be running shoes?
- What useful things can you buy in a hardware store
- Iphone 11 pro max review
- Than iPhone is better than Android smartphones
 (No ratings yet)