

DIY bed frame
A bed is that element of the house that directly affects your sleep patterns. Accordingly, how much a quality interior item you have affects your mood and well-being. And of course, you can make quite good furniture, and specifically a frame for a bed with your own hands. How to make it - you will learn a few below.
to contents ↑Wood frame - DIY craftsmanship
Initially, you need to solve the issue with the parameters of the mattress. Naturally, everyone would like to have a large and comfortable bed in the room, however, they often have to be content with exactly what they have.
Important! As an example, we will consider the procedure for manufacturing a wood frame for the most popular options, namely a spring mattress of 2000x1800x220 mm. Such parameters are quite enough for two adults of average build.
Materials for work
First of all, pay attention to the choice of material for the manufacture of the frame. If you want to make a frame for a mattress with your own hands made of wood, choose a high-quality durable material that has passed the appropriate inspection and processing, has no external defects. All this must be confirmed by a certificate.
Prepare tools for work in advance:
- drills and an electric drill;
- jigsaw;
- staples and furniture stapler;
- scissors;
- construction knife;
- Screwdriver Set;
- hammer.
For the manufacture of the frame itself, a calibrated planed board 3 cm thick is used - from this material a product of high strength will be obtained. As for the remaining parameters, we need:
- 2 boards with parameters 2070x300 mm for sidewalls;
- 2 boards 1810x300 mm for the front and back back;
- supporting beam 1920x60 mm.
Training:
- Prepare a bed drawing with the exact dimensions of the parts.
- To make the frame, add tolerances to the dimensions of the mattress - about 1-1.2 cm on each side.
Important! Consider the internal dimensions of your frame, which should perfectly fit the selected mattress. If you are doing this kind of work for the first time, then clearly adhere to the following recommendations. Over time, when you gain experience, you will be able to change anything at your discretion.
- Mark the cut lines with the cutter on the ruler.
- To keep parts of the same type the same, first cut one part of the appropriate size, and then use it as a template.
Important! Better take glued blanks - they fundamentally differ in predetermined geometry. As a result, the side walls should be 2040 mm long, and the front and rear walls should be 1500 mm long.
Manufacturing process:
- Divide the front wall in length into 3 identical parts. Mark the markings on the edges of the individual parts. Repeat the same with the back wall.
- Mark as much as 11 cm from the top of the workpiece and attach the support bars in the places of the mark. Use screws to secure.
- On boards that are designed for side walls, measure from the top 7 cm, then beat off the line with a marked cord.
- Next, screw the support beam along the entire length. Self-tapping screws at this stage are screwed in only from the inside.
Important! In advance, find out the thickness of the beam and the board using a tape measure. Relate these parameters to the length of your screws. This is done so as not to spoil the front surface of the future frame.
- Screw the vertical sections of the timber to the sidewalls, departing from the edges of 2 cm.
- After that, attach another board to the front wall, which will soon become the headboard. Before attaching the board, glue the ends with glue on the wood and perfectly level the workpieces.
- From the outside, additionally strengthen the headboard with the help of three rails glued to the same glue on wood and screwed with screws.
Important! Round up the upper corners of the workpiece in advance, or give them some other shape at your discretion. At this point you will need a jigsaw.
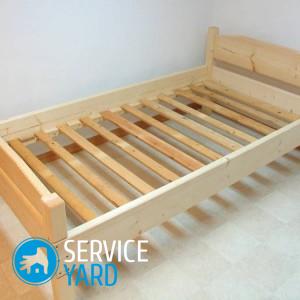
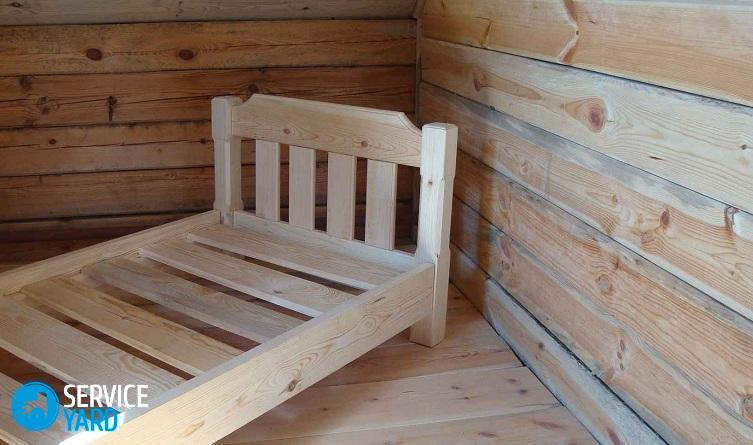
- After - cover all blanks with stain. On top, apply quick-drying varnish on polyurethane, in 2 layers.
As a result, if you did everything correctly, you will get an excellent frame for a bed with your own hands. This sturdy and incredibly reliable design fits perfectly into the interior of every bedroom.
to contents ↑Do-it-yourself metal bed frame
The metal frame of the bed with your own hands is much more difficult to manufacture, because it requires special skills to work with the grinder, welding machine and other relevant tools. If you possess such - forward to new successes in home assembly of furniture!
Materials
Prepare materials for the production of the frame:
- corner 40x40 mm and channel 65x32 mm;
- profile pipe 20x20 mm for crossbars and racks.
Important! In this case, the frame parameters also depend solely on the size of the mattress you have chosen. As a rule, frames of the following parameters are made:
- length - 200, 195, 190 cm;
- width - 200, 180, 140, 120, 90, 80 cm.
Manufacturing process
First they start to make backs:
- Cut the workpieces from the profile pipe and lay them on a flat horizontal surface. Fix the workpieces, only then proceed to start working with the welding material.
Important! During welding, periodically check the diagonals as well as the right angles. The sides of the frame, which are opposite each other, must have exactly the same length.
- Take the grinder and channel. Fabricate 4 side and 2 center brackets to secure the frames. Equip each of the brackets with a spike with a bevel of approximately 5 ° to the vertical.
Important! The frames of your future bed will be laid on these fixtures.
- Weld the finished brackets to the backs of the frame, maintaining a distance of 350 mm from the floor surface.
Important! It is the brackets that will bear the entire main load, so they need to be welded with an integral seam along the contour.
Then proceed to the manufacture of the frame - for this, use the channel and corner:
- Take the channel and make blanks. The length of the workpiece should be the same as the side of the frame.
- Connect the workpieces with a corner.
- On the horizontal shelf of the corner, remove the areas for docking with the channel.
Important! You must weld all these joints with a whole weld.
Further work procedure:
- Set the prefabricated backs of your future bed in an upright position. Put the frames and cut the places under the grooves on the lower shelf of the channel. Use a drill to drill holes with a diameter of 9 or 8 mm. Fit the groove under the spike using a soldering iron with a rectangular or square cross section.
- Make a grid for the mattress using a steel strip and a welding machine.
- Mount the thrust bearings to the pillars of the backs, as well as the caps on their upper ends. Cut out these structural elements in the form of a flat circle from a steel sheet.
- Use a grinder to weld. Pre-clean all seams of all kinds of debris.
- Treat the structure with the selected finishing material. At the same time, we recommend focusing on the interior of the room, as well as our own preferences.
Stock footage
Now you can rationally evaluate your knowledge and skills in order to understand whether you can assemble a reliable bed frame with your own hands, or if you need to pre-work out a little more on simpler products and objects.In any case, if you have enough material, then do not be afraid to experiment, just not forgetting about safety measures during any production work. Good luck!
- How to choose a vacuum cleaner taking into account the characteristics of the house and coatings?
- What to look for when choosing a water delivery
- How to quickly create comfort at home - tips for housewives
- How to choose the perfect TV - useful tips
- What to look for when choosing blinds
- What should be running shoes?
- What useful things can you buy in a hardware store
- Iphone 11 pro max review
- Than iPhone is better than Android smartphones
 (No ratings yet)