DIY chair

The chair is one of the most comfortable, cozy, and therefore popular interior items. All chairs are usually divided into 2 categories: with or without a frame. The finished product is often not cheap. But for home masters, nothing is impossible. Do-it-yourself armchair is a completely solvable issue. In the article, we consider detailed workshops on the manufacture of soft products, as well as the original wooden products for the garden.
to contents ↑Upholstery Types
Upholstery for upholstered furniture is one of the important points. The presentable appearance of the product largely depends on it. Before you make a chair, decide on the type of upholstery fabric. Here are the most popular options:
- Velours. Noble, fleecy fabric resembling short fur.
- Shenill Fleecy, durable fabric made from a mixture of natural and synthetic fibers. It does not slip, it retains a beautiful appearance for a long time.
- Flock. Outwardly, matter resembles velor, but more practical. Flock is easily cleaned of contaminants, so it is recommended to use it for upholstered furniture in a nursery.
- Jacquard. Strong dense patterned fabric, which is characterized by increased strength. Disadvantage - inhalation may cause puffs.
- Artificial suede. High-strength material that is great to make a do-it-yourself chair. Faux suede embossed looks especially beautiful.
- Tapestry. Solid expensive fabric made of natural fiber, with visible weaving. Threads of different colors form a pattern.
A set of necessary materials
When it comes to frame construction, the simplest option for the frame is plywood cut according to the pattern. The best option is birch plywood. Of consumables - self-tapping screws and nails.
You will also need a set of carpentry tools:
- Metal ruler, compass, protractor - for marking.
- Vice: manual and desktop.
- File.
- Hacksaw.
- Manual scissors.
- Hammer.
- A set of adjustable wrenches.
- Soldering iron.
- Pliers.
- Drill.
- Punch.
- Chisel.
- Punch.
to contents ↑Important! If you want to make a fashionable and non-standard chair-bag with your own hands, then the set of necessary equipment will be significantly reduced. You only need a sewing machine and stuff for stuffing.
Work planning
The beginning of any business is the preparation of a clear plan of action. Think over the design of future furniture. Making frame chairs is more difficult and costly, but they have a more respectable look than frameless designs.
Success in making a bean bag chair depends on how accurately and correctly the patterns are composed. This is not so much furniture production as the art of tailoring. Do not forget to calculate the budget of the event.
to contents ↑Important! It’s good if you have an old, but quite decent and durable chair. In this case, much is simplified, since you can restore it and get an interesting vintage thing.
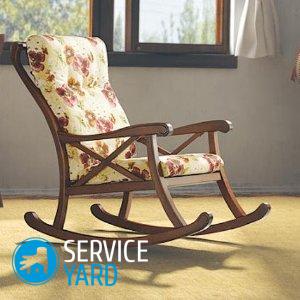
Classic soft
Such a thing as a do-it-yourself easy chair requires a long preparatory stage. From the materials you will need:
- Plywood in 20 mm thick.
- Sandpaper.
- Electric drill.
- Sets of screws and thin nails.
- Electric jigsaw.
- Headbands made of metal.
- Foam rubber.
- Glue for carpentry.
- Masking tape.
- Ruler, tape measure.
- Stain, glossy dye of black color.
- Pencil.
Now you can get to work:
- Download the drawing of the chair you like, calculate the consumption of materials.
- Make cardboard templates on a scale, transfer the contours to plywood, then cut the parts with a jigsaw.
- Sand and grind the surface of the wooden parts. Pay particular attention to the end areas, soaking them well with linseed oil.
- Paint or stain the side parts. Fasten the ends of the sidewalls with metal rims. Secure the rims with screws.
- The next stage is covering the product. Begin tightness from the back of the back, while using faux leather. Then proceed to tighten the remaining parts of the product. Fasten the fabric with wallpaper nails.
to contents ↑Important! It is advisable to process the attachment points with wood glue. The chair will turn out more solid.
Bag chair
This product is also known as a pear chair. To make it you will need:
- Coarse calico or satin fabric - 3.0 m.
- The fabric for the manufacture of the outer cover is 3.5 m.
- Clasp "lightning" - 1,0 m.
- Filler.
- Pieces of contrast fabric for decoration.
The procedure for the manufacture of this model of chair is as follows:
- Download the patterns of the bean bag chair that you liked the most.
- Make cardboard patterns to scale.
- Transfer the contours of the chair to the fabric. It will be necessary to sew the inner and outer covers separately. As a result, you will get 2 bottoms (upper and lower) and 6 cloth wedges.
- Stitch the wedges together. In the resulting bag, leave a small area unstitched. Sew the top and bottom bottoms. After you have finished sewing the top cover, sew the inner cover in the same order.
- Cut out the decorative elements of the appliqué and wash on the outside.
- Insert a zipper into one of the wedges. In case of contamination, you can remove the outside and wash.
- Fill the inner bag with synthetic filler about ⅔. Now it remains to put the inner bag in the outer one. Button the zipper.
DIY chair ready! As you can see, there is nothing particularly complicated here.
to contents ↑How to make a do-it-yourself easy chair for a children's room?
To make a frameless soft chair in the nursery is no more difficult than a regular chair-bag. The difference is only in color.
Important! It is better to choose a fabric that is bright, tunes in positive and cheerfulness. Shades should not be too flashy or annoying.
Here is one of the options for upholstered furniture in a child’s room:
- Frame chair can be made in the form of a semicircular sandwich. For the rear wall, hardboard is used, for the front - plywood.
- Gently glue the furniture foam onto the base, on top of which the upholstery will lie.
Important! The best options for upholstery are flock or eco-leather. Even if a young artist paints the upholstery with felt-tip pens or paints, you can completely remove the marks.
- The maximum height of the chair for the baby should not exceed 600 mm.
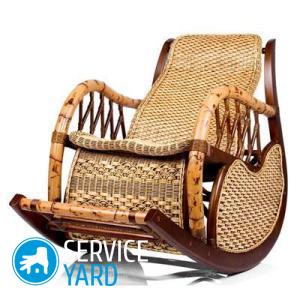
Wooden chair for a summer residence
Here is another interesting option: a wooden chair with your own hands. Wood is a practical, beautiful and durable material, which, moreover, is perfectly processed. In addition, wood in the independent manufacture of home or country furniture has the following advantages:
- The availability of a variety of lumber, their relatively low cost.
- Naturalness, environmental cleanliness.
- Pleasant smell of wood. Softwood smells particularly nice.
- Unique wood texture.
Important! It should be noted that the conditions in which country furniture is located, if not extreme, are close to them. Therefore, special attention should be paid to the processing of parts with an antiseptic. In this case, the furniture will serve you much longer.
Pine, spruce, ash, oak, larch or beech are best suited for home furniture production. Parts that are not heavily loaded can be made from linden or alder.
So, we make a garden chair with our own hands.Drawings for starters choose simpler. When choosing a design, be guided by two "golden rules":
- Choose the design that you fully understand. Mentally work out the whole procedure. Prepare tools in advance that are convenient for you.
- Consider the place of use of the furniture and the design of the room in which this furniture is to be entered. For example, the best option for a summer residence is a folding product or an antique chair.
Manufacturing procedure
Consider a simple model, which consists of such components:
- Sidewalls - 2 pcs.
- Tsargi - 3 pcs.
- Cross rails - 35 pcs.
It is these 35 rails that will form the surface of the seat.
The most difficult part of the job is sawing the side parts:
- First make a pattern on the cardboard and only then, making sure of the correct action, transfer the contour to the material. The best option for making sidewalls is plywood with a thickness of 3 cm. Use an electric jigsaw to cut parts.
- Sand the end parts of the sidewalls. Using a manual router or grinder, remove the chamfers.
- Now cut 3 pans from the plywood. Each length is 120 cm, width - 10 cm. Sand these details, it is not necessary to chamfer.
- From a bar of 50x25 mm, cut 35 segments, each of which is 120 cm long. Next, as usual, there is sanding and chamfering. For fastening, prepare 12 confirmats 5x120 mm and self-tapping screws for wood 4x45 mm (40 pieces).
- Mark the places for attaching the king. There are 3 of them: in the foot, head and in the middle of the outer arches of the sidewalls. Drill through 8 mm through holes for the drawer side.
- Pull the sides of the product with three drawers. For holes in the end parts of the drawer, use a 5 mm drill.
- Now fasten pre-prepared pieces of bars to the seat using self-tapping screws.
- The final stage - glossing over the chucks and cracks with putty on wood. After that, sand the product, prime the surfaces and paint with varnish or acrylic paint.
Stock footage
As you can see, making a chair with your own hands is quite realistic. In the independent manufacture of chairs of various types, there is nothing particularly complicated. Good luck to you!
 (No ratings yet)