

DIY lamp for plants
Planting seedlings of many horticultural crops is carried out in the winter. Therefore, additional illumination of young plants with imitation of sunlight is an objective necessity. According to experts, the best option for arranging artificial lighting are LED phytolamps. The topic of today's article is a lamp for plants. Of course, such products are also on sale, but a home master can make a lamp on his own.
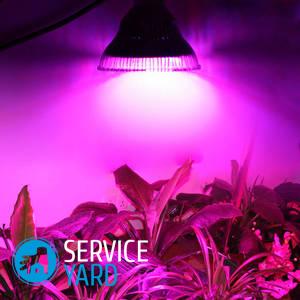
to contents ↑Advantages of phyto illumination
Photosynthesis in most plants occurs only in good light. Therefore, you can not do only with natural light in winter. Firstly, in winter there are many cloudy days, and secondly, short daylight hours are clearly not enough for the normal development of plants.
Until recently, fluorescent lamps of blue and yellow colors were used for illumination. According to modern scientists, it is much more appropriate to use several colors of the spectrum at different stages of the growing season:
- Blue - promotes better root development, helps form a low compact crown.
- Red - it is advisable to use during flowering and ovary formation. In addition, the red part of the spectrum contributes to better seed germination.
- Yellow backlighting contributes to the formation of lush green leaves.
to contents ↑Important! According to experiments, the efficiency of LED phytolamps is much higher than that of fluorescent lamps.
DIY LED lighting benefits for plants
LED sources have these advantages:
- In the area of the fitolamp, the air does not heat up.
- The effect of lamps of a certain color on plants makes it possible to increase the intensity of photosynthesis, accelerate the development of roots, and form a good compact crown and a powerful root system of the plant.
- The use of additional radiation promotes the production of phytohormones that increase the protective properties of plants.
- An opportunity to assemble the lamp independently, with the minimum expenses.
- Economical power consumption. Compared with other types of lighting fixtures, they consume 8 times less energy.
- Resistance to high humidity, frequent watering of seedlings does not adversely affect the lamp.
- High degree of fire safety.
- Long working life - about 50 thousand hours.
- Environmental Safety. LED devices do not contain toxic and harmful substances.
Secrets of proper use:
- To increase the efficiency of illumination, it is necessary to correctly position the lamp in relation to plants, while maintaining an optimal distance. Since there is practically no heating of the air with LEDs, you can place the backlight directly above the seedlings.
Important! The duration of exposure of the phytolamp is regulated, depending on the time of year and the period of the day.
- Supports for phytolamps are made of plastic or wood. Suspension on metal or flexible wire chains is possible. At different times of the year and under various weather conditions, the duration of use of the phytolamp is from 2-3 to 12 hours.
Important! When picking plants, illumination should be temporarily suspended until the seedlings are strengthened and their natural growth begins.
- Picked seedlings are illuminated with red and blue lamps in the same proportions, from a half day to 16 hours.
How to assemble a light source yourself? - Scheme 1
DIY LED lighting for plants in the greenhouse can be done without any difficulty. Materials that are useful for work are quite accessible:
- Protective cover (suitable for old fluorescent tubes).
- Different color diodes - at least 70 pcs. (blue - 20 pcs., white - 20 pcs., red - 30 pcs.)
- Fan.
- LED matrix - 4 pcs.
- Anodized aluminum sheet - taking into account the size of the body.
- The power supply is 12 or 24 V.
DIY lighting for plants - procedure:
- Drill several ventilation holes in the lamp housing.
- Attach the LEDs to the aluminum sheet with hot melt adhesive (it can be replaced with epoxy).
- Fix the plate with the LEDs placed on it on the device screen.
- Solder the wires to the matrix, connect the reverse ends to the power supply.
- Mount the cooling fan on the aluminum plate.
- Give the aluminum plate a slightly curved shape for easy reflection and diffusion of light.
to contents ↑An important point is the ratio of red and blue lamps. White lamps also do not hurt, because they are a realistic imitation of sunlight.
Making phytolamps on LED strips. Scheme 2
How to make a DIY lamp for plants with your own hands on LED strips?
For work you will need:
- Blue and red LED tapes.
- PVC sheet with dimensions of 200 x 200 mm, with a thickness of 2 mm.
- Power connector
- Power supply for 12 V.
Step 1
Cut the LED strips so that you get 10 red and 3 blue segments of 0.2 m each. Place them on the PVC sheet in this order:
- Reds - 1.
- Blue - 1.
- Reds - 2.
- Blue - 1.
- Reds - 2.
- Blue - 1.
- Reds - 3.
Important! It is advisable to purchase a tape without an adhesive. A tape with a layer of glue is not the best option, since it will constantly peel off. It is advisable to “plant” it on heat-resistant adhesive.
Step 2:
- The next step is to solder the pieces of tape with wires, not forgetting to observe the polarity.
- Connect the connector to the power supply.
Done! It remains only to place the finished lamp over seedlings, plug it into the network and test it in action.
to contents ↑Stock footage
The advantage of LED lamps for plants with their own hands is not only their cheapness. You can choose the configuration, the optimal number of LEDs and the color ratio.
- How to choose a vacuum cleaner taking into account the characteristics of the house and coatings?
- What to look for when choosing a water delivery
- How to quickly create comfort at home - tips for housewives
- How to choose the perfect TV - useful tips
- What to look for when choosing blinds
- What should be running shoes?
- What useful things can you buy in a hardware store
- Iphone 11 pro max review
- Than iPhone is better than Android smartphones
 (No ratings yet)