

DIY chandelier
The interior of any apartment sometime requires certain changes to be made for variety and the necessary accents. To set the sound for the whole interior will help to organize the proper lighting of the room. One of the most successful solutions in this matter will be the installation of original lighting fixtures. If your budget was not ready for additional spending on a similar element of the interior, then a do-it-yourself chandelier is just what will help you. And in our article you will find useful ideas for creating a ceiling from improvised materials and tips for designing an updated interior.
to contents ↑DIY chandelier lights - a variety of ideas and materials
An original design is the basis for the success of any DIY product. For the manufacture of the ceiling of the chandelier, it is necessary to stock up with improvised materials, from which the decor of the exclusive product will be made. Fortunately, there are plenty of them today:
- woolen threads;
- metal wire;
- Balloons;
- tatting;
- paper molds for cupcakes;
- office paper;
- wine and glass bottles.
Especially for you, we have made a selection of instructions for making a ceiling lamp for the chandelier with our own hands, using which you can get a designer lamp at home.
to contents ↑Barbecue Chandelier
Having on hand small wooden sticks that cooks usually use to make barbecue, you can easily make an interesting shade on your kitchen. To implement this idea you will also need:
- organza ribbon;
- glue;
- any decor details as desired.
Important! Such a chandelier made of wooden sticks will look good in a country house or in a country-style kitchen.
Making it at home is not difficult at all:
- Barbecue sticks are laid out on top of each other around the perimeter of the square and fastened with glue. The height of the future ceiling depends on the height of the ceiling in the kitchen, as well as your desire.
- Above the ceiling is closed with chopsticks stacked in parallel. For the cartridge it is necessary to leave the corresponding hole in the middle. So that the top material does not extend beyond the edges of the product, the ends of the sticks must be cut off.
- Organza ribbon can decorate the protruding ends of the sticks at the corners of the product, or use the decor as you wish.
Then you just have to wait until the product dries and hang it on a hook using the same organza ribbons.
to contents ↑Cardboard Chandelier
A cardboard shade is an excellent decorative element for your apartment, the design of which you can choose for yourself. Making it is very simple - for this:
- You will need to print a special stencil. You will get duplicated parts with slots in the middle to connect them.
- Details can be pre-painted in any suitable color.
- For fastening strength, a wire or thick thread can be inserted into the joints through holes that need to be made in advance.
- The ceiling lamp is suspended from a hook on the ceiling with a special chain or cord that can be painted in the color of the product.
A similar principle of work is suitable for a more durable plastic chandelier. But due to the difficulty of cutting parts with ordinary scissors, you will have to use an electric jigsaw.
to contents ↑Important! Such a home-made ceiling can be decorated with any elements. For example, glitter nail polish, sequins, rhinestones, thread lace or fabric flowers are ideal. It all depends on your fantasies.
Wine Bottle Chandelier
Let's look at another master class on how to make a chandelier with your own hands, this time from wine bottles:
- In addition to the bottles themselves, you will need a glass cutter. Using it, cut the bottom of the bottles along a pre-drawn line.
Important! To protect yourself in the future from a cut, grind the sharp edges with sandpaper.
- Then a wire is drawn through the neck of the bottle, to which a cartridge with a lamp is connected.
- As a basis for fastening, a wooden board is quite suitable, where you can connect several prepared bottles at once.
to contents ↑Important! You can decorate a home-made chandelier with absolutely any materials, but it is best to leave the bottles intact.
Thread chandelier
An original, but simple in terms of manufacturing method, lamp is obtained from threads. You can connect children to the work on its creation, and you will need the following materials:
- Threads. An ordinary jute twine or woolen thick thread is suitable. You may need about 50 meters of their total length. The color scheme depends on the interior concept.
- PVA glue and brush for applying it.
- Balloon. A round ball is best suited to create the correct shape for the ceiling.
- Vaseline.
Here's how to make such a chandelier with your own hands:
- Inflate the balloon to the desired dimensions of the future lamp.
- Using a felt-tip pen, draw on the top and bottom lines that will limit the area for winding the threads.
- Apply petroleum jelly to the ball, and pour PVA glue into a suitable container for convenience.
Important! It is better to process the glue with the thread as it is wound, do not try to dip the entire skein into the glue immediately. Winding threads is necessary in strictly drawn in advance boundaries. The density of the product depends on your idea of the future lampshade.
- In this form, leave the ball to dry for at least a day.
- After making sure that the home-made shade has dried, pierce the ball with a needle and remove its remnants. As a result, you get a lampshade of solid threads, with a hole for the cartridge in the upper part.
Important! For additional decor of such a ceiling, you can use small artificial flowers or butterflies, beautiful beads and ribbons. The same principle of operation is suitable for creating a lamp from woven lace.
Now, having learned how to make a chandelier of thread with your own hands, you can install the original interior decor in the kitchen or in the bedroom of your apartment.
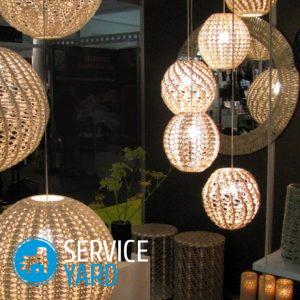
to contents ↑Chandelier Chandelier
Shebby-chic style always sends us to a warm childhood, to a cozy grandmother's house. This style is gaining popularity in creating modern interiors. To create a chandelier in the style of Shabby Chic you will need:
- wire or an old metal planter to create a frame structure;
- decorative chain or thread;
- beads, beads, sequins for decoration;
- the cartridge itself and the lamp itself.
Here are some features to consider when manufacturing such a lamp:
- A chandelier chandelier is a design of several rings located in two or three levels one above the other. They are connected, as a rule, by chains or decorative wire.
Important! The size of these rings affects the style of the future chandelier - vintage Classic is made of rings of different sizes, and Modern - on the contrary, requires the presence of rings of the same size.
- The center of the future chandelier is an old garden basket, from which the frame of the product departs with a wire, creating a circle in several levels. Paint the frame before the decorative stage of the lamp.
Important! Experts recommend decorating the product after attaching it to the ceiling and installing the cartridge.
- Then it remains with the help of chains of different tension and beads pierced by them to decorate a makeshift chandelier. Threads with beads or glued sequins are also suitable for this purpose.
- You can achieve the effect of dimmed light by simply pulling a dense fabric around the frame.
to contents ↑Important! This DIY lampshade for a chandelier will perfectly complement your Provence-style interior.
Minimalism style chandelier
Another original idea for creating a homemade lampshade is a product made of plastic spoons. For its manufacture, the following materials are required:
- five liter plastic bottle;
- plastic disposable spoons;
- Super glue;
- lampholder with lamp.
Operating procedure:
- First of all, you need to cut off the bottom of the plastic bottle and the handle of the plastic spoons, leaving a 2 cm long stalk.
- Then, using the bottle as a base, glue the spoons one after the other, starting from the bottom.
- To make the future lampshade look more attractive, the spoons should be glued strictly along horizontal rows that overlap each other.
Important! The finished chandelier is reminiscent of fish scales in structure, and due to its high density it gives dim lighting. By creating different forms, you can get a lamp resembling a pineapple or lotus flower.
Also an interesting option for lighting devices will be a shade from the bottoms of plastic bottles. Such material is very similar in finished form to many small flowers. Therefore, the bottles can be selected multi-colored or painted in advance. A similar lampshade will be a great addition to the summer terrace in a country house.
to contents ↑Creating a homemade lampshade decor
The perception of any design in the interior depends directly on the created lighting in the apartment. Any style requires a certain type of lighting. If you have not found a suitable lighting fixture in stores, then you can make it yourself:
- Wall lights are usually installed in the relaxation area, creating dim lights. Home-made sconce always successfully fits into the concept of the interior of your apartment. For example, for a children's room you can create a lamp of brighter colors, and in the bedroom - pastel shades, adding notes of romance.
- The popularity of LED lamps has been gaining momentum recently, and you can also make them yourself. For this, the actual LEDs themselves and various decorating material are needed. The role of the latter can be played by beads, dense fabric, metal elements and others. The basis for the LED lamp you can choose an old chandelier.
to contents ↑Important! Masters recommend using 12 V LED strips for home lighting.
Stock footage
Making a chandelier with your own hands is very simple, as you can see by reading our article. The creative process itself is quite fascinating, so you can easily connect the whole family to it.
- How to choose a vacuum cleaner taking into account the characteristics of the house and coatings?
- What to look for when choosing a water delivery
- How to quickly create comfort at home - tips for housewives
- How to choose the perfect TV - useful tips
- What to look for when choosing blinds
- What should be running shoes?
- What useful things can you buy in a hardware store
- Iphone 11 pro max review
- Than iPhone is better than Android smartphones
 (No ratings yet)