

DIY matchbox furniture
Probably in every house you can find matchboxes. But few people know that they are an excellent material for creativity, and without any problems you can easily make furniture from matchboxes with your own hands. Such creativity will be especially interesting for the child, because every kid loves to play with dolls, and they also need furnishings. Like real ones, only in miniature. In this article, we will tell you how to easily and simply make original furniture from such an affordable and cheap material.
to contents ↑Make a bed
If the baby has a small baby, then you need to put him to bed somewhere. And any mom needs to know how to make a bed out of matchboxes. To make it, you will need to acquire:
- Two matchboxes;
- Glue;
- Paper;
- Paint;
- Wire;
- Two beads.
Next, proceed as follows:
- Glue together two packs of matches. They will serve as the base of the bed.
- We attach the base to the paper sheet and circle with a pencil on all sides. At the same time, you should leave room for the ends and draw backs.
- We cut out paper templates in two copies and glue to the base.
- We paint in the desired color.
- Beads are strung on a wire and attached to drawers.
to contents ↑Important! For decoration, you can use a mattress, a blanket and a small pillow.
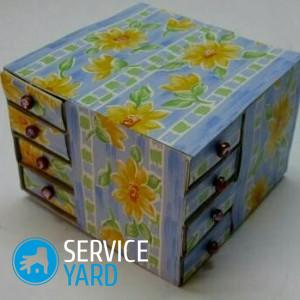
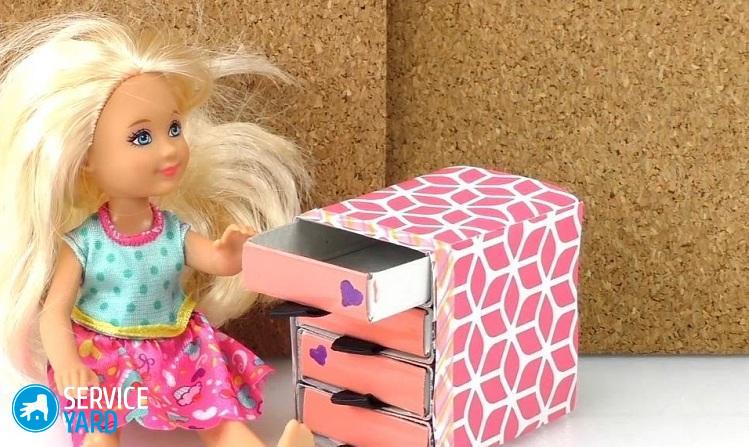
Make a chest of drawers
When doll furniture is made from matchboxes with your own hands, you can not do without a chest of drawers. Moreover, it is suitable not only for the game - it can be used to store hairpins and jewelry.
Preparation required:
- Matchboxes (3 pcs.);
- Glue;
- Toothpick
- Wire;
- Cardboard;
- Beads.
Next, follow the instructions:
- From cardboard we glue the frame for the chest of drawers. Requires the manufacture of side walls, bottom, countertops, partitions between the drawers.
- We insert the boxes into the frame.
- Glue toothpicks to the front of the “drawers”, cut off the excess.
- Using a wire, we attach the beads to the boxes.
Make a chair
How to make furniture for dolls from matchboxes? We have already examined the bed and the chest of drawers, and now we will learn how to make a beautiful armchair.
This will require preparation:
- Colored decorative paper;
- Colored double-sided paper;
- Four empty matchboxes;
- Double-sided tape;
- Stationery glue;
- Rulers;
- Scissors;
- A simple pencil.
Follow the instructions:
- On a colored double-sided sheet, we measure four rectangles, whose dimensions are 11 by 8 cm.
- Cut out the rectangles.
- We glue each packaging with paper.
- We glue the blanks with glue or double-sided tape. One of them fits horizontally, the second - vertically.
- To decorate the seat we use decorative sheets.
- To decorate the other two boxes, we also cut out the decor. The dimensions of the rectangles are 4 by 3 cm.
- We glue the sheets in the middle of the boxes.
- The remaining packaging is vertically glued to the previously glued base.
The chair is ready! For a complete set, it remains to do a few more of the same.
to contents ↑Making a car
In order to captivate a child, it is not enough to know how to make furniture from matchboxes. For example, not all boys will be interested in this process. With the help of such material, you can make many different useful little things.Consider how to make a car, which the baby will then play with pleasure.
Preparation required:
- Six matchboxes;
- Four bottle caps;
- Two sticks of chupa-chups candies;
- Bar of plasticine;
- A simple pencil;
- Rulers;
- Colored paper;
- PVA glue;
- Glue brushes;
- Awl;
- Scissors.
We follow the instructions:
- Using paper, glue two boxes in length (along the long side).
- We are preparing the second same template.
- We glue the blanks together. They should be located one above the other.
- On colored sheets, we outline the resulting structure.
- The base is pasted over with sheets of the desired color on all sides.
- Glue two boxes on top of each other.
- We glue them on all sides with colored paper.
- From color sheets (white, yellow or blue) we cut a rectangle 1.5 by 12 cm in size.
- Fold the paper four times.
- On the upper side of the base, we round the corners, cut the workpiece in places of bends.
- Headlights are cut out of paper.
- We put plasticine inside the bottle caps.
- On a long base in the middle we glue a small blank.
- “Windows” of colored paper are glued to the cab. We glue one at the front and the back one by one, cut the remaining two pieces of paper in half and glue them on the side with the rounded side down.
- Glue headlights.
- Using an awl we make holes for the wheels.
- Insert the sticks of sweets into the resulting holes.
- We put corks with plasticine on sticks.
The machine for the games is ready!
to contents ↑Stock footage
The most pleasant thing in crafts from matchboxes is the ability to create with your child. And also the fact that the material is accessible to everyone and convenient for the manufacture of various products.
- How to choose a vacuum cleaner taking into account the characteristics of the house and coatings?
- What to look for when choosing a water delivery
- How to quickly create comfort at home - tips for housewives
- How to choose the perfect TV - useful tips
- What to look for when choosing blinds
- What should be running shoes?
- What useful things can you buy in a hardware store
- Iphone 11 pro max review
- Than iPhone is better than Android smartphones
 (No ratings yet)