

Mounting the frame under drywall on the wall

Unique drywall constructions allow you to align the walls, mount a suspended ceiling and realize almost any ideas in the design of rooms. Most of the above works require the installation of a special crate, in other words, it is necessary to mount the frame under the drywall on the wall. The frame is an important component of the entire drywall construction, on which the strength and durability of GKL fasteners depend. Today we will tell you how to make a frame for drywall on the wall, what material is better to use for this purpose.
to contents ↑The advantage of drywall walls and ceilings
The device frame under the GCR has several advantages:
- The ability to hide engineering communications.
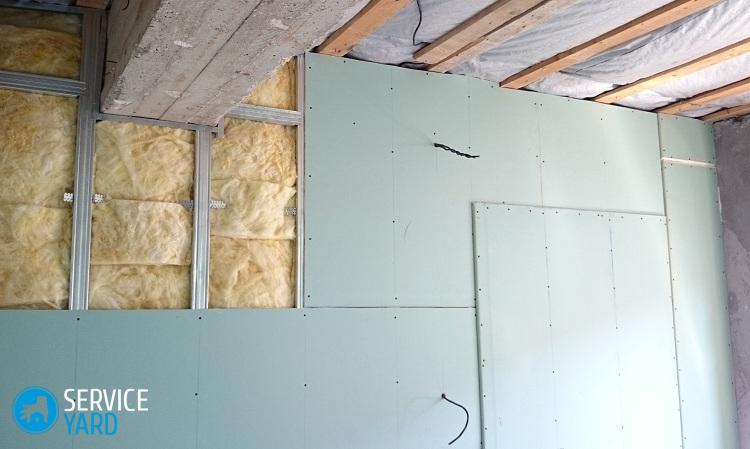
- Perform heat and sound insulation of the walls.
- Perform any partitions.
- Allows you to mount LED strip, built-in lights.
- Possibility to install a cassette type air conditioner (if the room height allows).
The main types of frames for GKL
Before proceeding with the manufacture of the frame, determine the material. To date, two materials are used for the crate:
- Wood. Wooden crates are used exclusively in dry and warm rooms. Wood is an environmentally friendly and high-quality material, but it is not as durable as metal. In addition, before making the crate, the beam must be treated with special compounds that will protect it from decay, mold, fungus and accidental fire.
Important! If you decide to use a tree, then give preference to coniferous species (timber moisture should not exceed 15%).
- Metal. The metal profile is easy to use. It is stronger and more durable, so modern steel profiles are much more popular than wooden ones.
to contents ↑Important! Very often, a combined frame is used, in which almost the entire crate is made of a metal profile, and in places where the load on the wall is increased by appliances or furniture, a wooden block is inserted into the profile.
Accessories for the frame
Galvanized metal profiles come in several varieties:
- Rack profile (PS). Has a U-shaped section. Designed to form a wall frame. It is installed strictly vertically in the guide profiles (PN). The transverse dimensions of the profile are 50x50, 50x75, 50x100 mm.
- Guide profile (PN). The section has a U-shape and is identical to the rack-mount. Profile width: 50, 75, 100 mm, and height - 40 mm. The profile is used in the construction of the wall frame and the creation of partitions. The metal profile is fixed to the floor and ceiling, forming a frame for the main structure.
- Corner profiles (PU). They are made of perforated metal and serve to strengthen the corners and align the joints of adjacent walls. The angular profile (85 degrees) can be both internal and external, it can differ in parameters and purpose.
- The ceiling profile (PP) has 3 longitudinal grooves. Cross section 60x27 mm. PP are used as the main elements of the ceilings and walls frames.
- The ceiling guide profile (PNP) has a cross section of 27x28 mm; it is used to fasten ceiling PP profiles.
- Arched profile (PA).It can be concave or convex, it is used to design doorways of arched type and create suspended structures of complex wave-like forms.
Important! If you decide to make a wooden wall frame, then the cross-section of the structure racks should not be less than 40x70 mm, and horizontal elements - 30x50 mm.

Additional details
Additional elements are used to connect the elements of the metal profile with each other and their fastening to the base:
- Extension cords. The standard length of metal profiles is 2.75-4 m; if a longer length is required, a unique coupling is used.
- Crab. The element has a cross-shaped shape and is used at the intersection of profiles. Crab provides the strength of the frame.
Important! A two-level crab is mounted on top-level software for reliable fixation of the profile of the lower level.
- Direct suspension. The element is mounted to a wall or ceiling and is bent along special lines. Profiles are inserted and fixed into the resulting U-shaped opening.
- Anchor clamp makes it possible to adjust the height of the inter-ceiling space from 25 cm to 1 m. Its supporting part ensures a stable position of the PP.
Hardware
Hardware for mounting rails and suspensions. Hardware for fastening is selected, depending on the surface:
- If the walls are concrete, then the profile and anchor suspensions are mounted with dowels 6x40 mm or 6x60 mm, depending on the quality of the surface.
- Fasteners are made to wooden bases with screws (6x70 mm, 6x80 mm).
- For fixing the metal elements of the frame (direct suspensions to ceiling profiles or rack-mount to guides) it is better to use self-tapping screws with a sharp end of 3.5x11 mm.
- The installation of drywall on a metal profile is carried out using self-tapping screws with frequent threads made of galvanized steel 3.5x25 mm.
How to make a frame for drywall on the wall?
The entire process of manufacturing the crate consists of the following steps:
- Preparatory.
- Fabrication of the frame.
- Installation of construction.
Let's consider each stage in more detail.
Preparatory stage
Before you make a frame for drywall on the wall, you need to prepare all the necessary supplies:
- Profile of two types.
- Fasteners. These include connectors (end and cross), extension cords, suspensions, brackets.
- Hardware (self-tapping screws, couplers, dowels, screws).
- Drywall sheets.
- Tape sealing. It serves as the insulation of the partition from walls, floor and ceiling.
- Mineral wool plate. Mineral wool fills the cavity of the septum.
- A metal corner for the design of slopes of window doorways.
- Putty.
- The primer is deep universal.
- Wooden beam for reinforcing the frame.
The set of tools designed for the manufacture of crates includes:
- Building level 120 cm and 80 cm long.
- Plumb and construction cord.
- Roulette.
- Scissors for metal.
- Hammer drill.
- Pliers.
- Screwdriver.
- Pencil.
Before mounting the frame under the drywall on the wall from the profile, it is necessary to carry out all the preparatory work:
- To conduct wires to sockets, switches, points of placement of household appliances.
- Wall plaster.
- Cover the floor with a leveling screed.
- Mark the structure on the wall.
Important! The technology for making a wall frame differs from the ceiling in that first one wall is completely finished from the guide profiles before installing drywall on a wall with a frame, and only then is the transition to another wall carried out.
Layout Instructions:
- Step away from the wall 5-6 cm (depends on the thickness of the insulation that you plan to lay in the crate).
- Draw a line parallel to the surface. The drawn line will indicate the thickness of the entire wall, including the thickness of the drywall.
- From the plotted line, back off a distance equal to the thickness of the GCR. These will be the edges of the base. The initial line will become a marking element, from which all other calculations will be carried out.
- Using a plumb line, transfer the markings to the ceiling. If the distance is long, then use a building cord.
Important! Incorrectly applied markings can lead to negative consequences, as a result - you will have to disassemble the structure and redo the frame.
Frame manufacturing
After marking, the assembly of the frame begins:
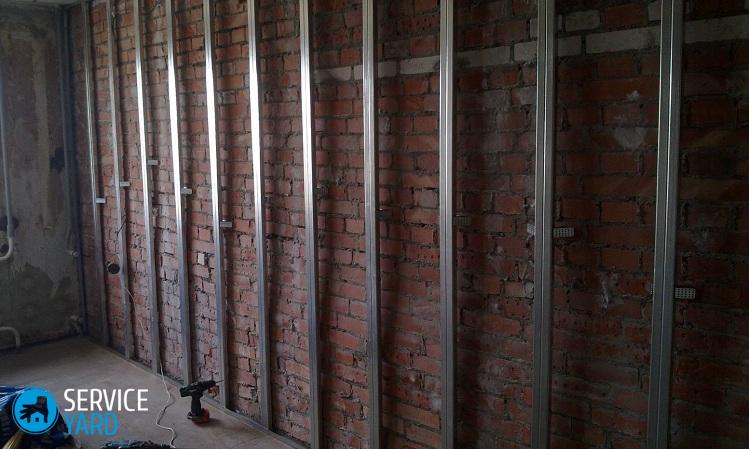
- Take the guide profiles and attach them along the contour lines first to the floor, and then to the ceiling. Install using sealing tape (laid between the profile and the base surface). Fasten profiles at the edges with dowels and impact screws in increments of 50 cm.
- After installing the rails, attach the suspensions over the entire working surface. They will be needed in the future for the installation of rack profiles.
- Fix the rack profiles with pre-prepared suspensions. The most optimal interval for fastening the rack profile is 60 cm. If you want to strengthen the structure, then add additional rack profiles perpendicular to the racks - 2-3 racks will be enough.
Design Tips
Installation of the profile under drywall can be carried out using various technologies. It all depends on the complexity of the frame:
- The first profile installation technology is American. In it, the rack profile is directed by the trough into the interior of the structure.
- The second known technology - German, consists in the location of this gutter during the mounting of the frame.
Important! Basically, the type of orientation of the profiles depends on the features of the design itself and on the current situation.
If the frame is made on the wall, then proceed as follows:
- Fix the rack profile with suspensions.
- Install in the guide trays and secure the side posts. Level them with a level and a plumb line.
- Tighten the cord, which will be the reference point and touch border of the middle posts of the structure.
- Put each rack in place and secure it using self-tapping screws on both sides.
Finishing complex room elements
When installing the frame, technologically complex objects are considered rooms with windows, since the slopes require special attention. Here are just a few tips for installing a battens on a wall with windows:
- If walls are supposed to be insulated, install vertical profiles at a distance of 5 cm from old slopes.
- When marking the location of the structure, pay attention to the width of the windowsill (if the walls are finished after installation). When marking, take into account the thickness of the GCR. Attach the square to the frame and set aside the necessary distance, not forgetting the additional 5 cm. Perform the same manipulation on the other side of the window opening. These marks will indicate the edge of the frame.
- Expose the first substations on the sides of the window, and the rest in increments of 60 cm from these profiles. Be sure to install one rail in the corner of the room.
- Install the crossbars using the “crab”. Pay particular attention to their installation in the window area. Install horizontal jumpers above the opening.
- After the installation of the frame is completed, sketch the location of the longitudinal and transverse profiles. In the future, this scheme will help you determine the location of the picture or another shelf on the wall.
Frame for room corner
In addition to walls and ceilings, the frame is mounted for rounded elements and corners. Use the following tips to properly manufacture the frame for complex places:
- If the metal frame for one wall is already ready, then it will be difficult to install the PS on an adjacent wall. Therefore, the basis for the new design should be the PS profile mounted on the wall. Attach the PS stand to it with screws.
Important! To make the structure strong and rigid, use self-tapping screws with a length of 9.5 mm. They should be installed every 30 cm. Please note that two profiles should be fixed only in a straight plane. Both elements should be interconnected: on the one hand - the front part, on the other - the side.
- The design for the outer corner does not need to connect two profiles. Just from each side of the corner, install PSs that are fixed to the wall and profiles installed on the floor and ceiling. In this case, the design is quite durable.
to contents ↑Important! The semicircular frame, which is used in the construction of arches, rounding the corners of a room and when creating design elements, can be made in two ways:
- Use a ready-made item. Select the exact length and fold the element along the required radius.
- Make an element from the PN profile with your own hands. Using metal scissors, carefully cut the profile edge every 1-2 cm. Give the necessary shape to the metal element.
Installation of a wooden frame under drywall
To make a wooden frame, you will need the following tools:
- Hacksaw or saw.
- Metal corners.
- Drill.
- Wood screws.
- Level.
- Screwdriver.
- Mounting dowels.
Important! Installation of a wooden frame under drywall is advisable if the height of the walls exceeds 3 m, or if the walls have a poor-quality plaster layer.
The installation process of the frame is as follows:
- Identify all the defective places on the walls and make markings for the future crate.
- Install the horizontal beam on the floor.
- Attach the vertical rails to the horizontal beam, 10 mm from the edges of the frame. The pitch between the slats should be 60 cm.
- Check the vertical position of the rails using the building level.
- Fix the second horizontal beam on the ceiling.
- Attach the free ends of the uprights to the horizontal beam.
Advice:
- To avoid making cuts in drywall sheets near window and door openings when mounting the frame, slide the vertical posts to the desired distance.
- If the floor in the room is uneven, then for the correct laying of the horizontal beam, place under it chipboard cuttings or pieces of rails.
- A wooden frame can be assembled easier if you perform the procedure on the floor. Assemble a frame of horizontal and vertical bars, the size of which will correspond to the size of the wall. In the frame, install auxiliary rails and crossbars in increments of 60 cm. Fix the insulation on the wall and close it with the frame. Fix the crate with screws and dowels.
Stock footage
Drywall frame mount allows you to hide communications and align the walls, but at the same time reduces the size of the room. All this should be taken into account by owners of small-sized apartments. Whether or not to install drywall on a wall with a frame is up to you, and we just tried to introduce you to this process closer.
- How to choose a vacuum cleaner taking into account the characteristics of the house and coatings?
- What to look for when choosing a water delivery
- How to quickly create comfort at home - tips for housewives
- How to choose the perfect TV - useful tips
- What to look for when choosing blinds
- What should be running shoes?
- What useful things can you buy in a hardware store
- Iphone 11 pro max review
- Than iPhone is better than Android smartphones
 (No ratings yet)