

Mortise sink
Sinks in the kitchen sometimes give way to dishwashers, but only in terms of washing dishes, and in other cases they occupy a worthy place of honor in the kitchen space. And those housewives who spend a lot of time in the kitchen know that two-thirds of all kitchen affairs, one way or another, involve a sink. Therefore, it is so important to choose a comfortable, stylish, durable, and most importantly - functional sink in the kitchen. Perhaps the sink is mortise and will become the attribute that will please the hostess and create a unique interior in the kitchen. Moreover, the rich assortment of shapes and colors of such sinks is simply amazing. The most budget option - mortise kitchen sinks made of stainless steel, everyone can afford. About them and not only today will be discussed in our article.
to contents ↑What should be the sink in the kitchen?
To determine the option that will be the best choice, we will make a list of requirements for a kitchen sink:
- The sink in the kitchen should be very roomy, since not only cups, spoons and plates will be washed in it, but also larger dishes - pots, pans, baking trays and other utensils.
- A quality product must withstand:
- High temperatures.
- Exposure to household chemical products.
- Mechanical shock.
- It should be easy to maintain and maintain a beautiful appearance, without much effort.
- Must have a long service life.
- Fit harmoniously into the interior of the kitchen space and combine with a faucet.
- It should be comfortable in design and shape.
As you can see, there are a lot of requirements for household items. Many manufacturers of kitchen sets offer furniture sets with ready-made sinks. But demanding owners prefer to choose an interior item on their own, based on all the nuances and wishes of the household. And it is not surprising that the mortise sink for the kitchen has recently become so popular among consumers.
to contents ↑Types of kitchen sinks
All kitchen sinks by design features are divided into 3 large groups:
- Mortise.
- Overhead.
- Integrated.
Let us dwell in more detail on the advantages and disadvantages of each type of sinks in order to understand what exactly the housewives loved with the mortise sink.
Surface wash
The invoice sink is the most widespread option in our country. It is built into the furniture from above in the form of a cover. The product is installed on the floor stand.
Important! A similar version of the sink is suitable for headsets consisting of separate modules.
Of course, overhead sinks can have different sizes, but usually they are made by furniture manufacturers according to the template in order to ideally fit the dimensions of the floor cabinet.
Advantages of the overhead design:
- Easy to install. Installing such a sink is very easy on your own.
- Acceptable price.
- There is no need to buy a countertop to cut a hole for the sink.
- Reliability of operation.
Important! Cons of the device - Loose fit to the cabinet and the walls. As a result of this design flaw, water enters and spoils the furniture.
To fix the problem, many owners install silicone skirting boards (or plastic).
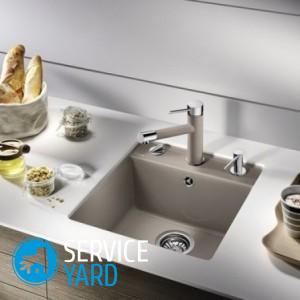
Mortise sink for the kitchen
This type of sink is in no less demand than the consignment note.Such a sink is installed in the headset worktop, combining several floor cabinets of the lower tier of furniture.
Important! This option is especially recommended if your kitchen is equipped with a long, solid countertop.
Mortise sinks can be installed both under the countertop and above it or on the same level as the headset. The installation option for the sink depends on your preference and the device model.
You can cut a hole in the countertop yourself, or you can entrust this work to a professional. Here everything is increasingly dependent on the material - both the cabinet itself and the sink.
Important! Mortise sink in the kitchen made of stone - natural, artificial, as a rule, is installed only by professional masters.
The only thing you need to remember is that between the sink and the worktop you must definitely lay a gasket with an adhesive surface that will solve two problems at once, related to: waterproofing and sound insulation
Design Advantages:
- High reliability.
- Ease of care.
- Durability.
- Aesthetics.
- A variety of shapes and colors.
- Acceptable price.
- Hygiene The design eliminates the possibility of dampness between the cabinets.
Important! The disadvantages of the product include the additional cost of time, money and effort to cut a hole in the countertop. But you always have to pay for beauty and convenience.
Integrated sinks
Integrated devices have an interesting type of design. The sink can go a little deeper into the countertop, the so-called table-top version, or slightly protrude upward from it.
Important! You can install this type of sink on stone, metal, wooden countertops, and the deeper the sink is recessed, the less spray will fly in different directions.
Cons of the design:
- Sophisticated installation. To install the sink, jewelry cutting of the countertops, the presence of special tools and equipment are necessary.
- Higher price compared to other options.
Materials for the manufacture of plumbing
We examined the classification based on the design features and the arrangement of the sinks. Sinks can also vary in shape: square, oval, arbitrary geometry and the number of bowls, and accordingly - mixers. In addition, all kitchen sinks are also divided according to the material of manufacture.
Important! When choosing the material for making a sink, consider some of the nuances:
- Design and style of the interior of the kitchen.
- Budget opportunity.
- Desired product features.
Consider the most popular materials for making sinks so that you can make your choice.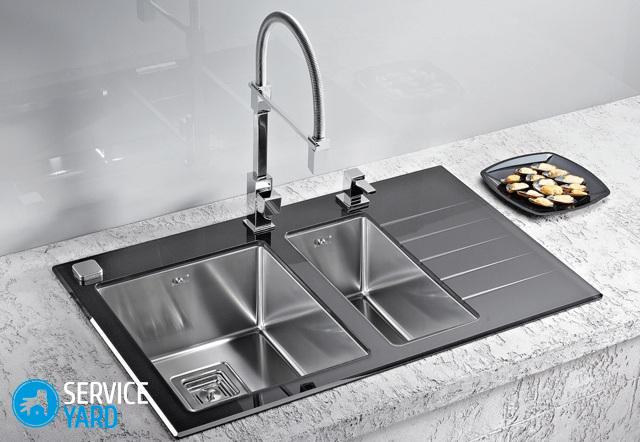
Stainless steel
Consumer love for stainless steel can be explained by a combination of excellent performance characteristics of the material:
- Resistance to mechanical influences.
- Immunity to rust.
- Resistance to high temperatures and aggressive chemicals.
- Hygiene
- Long service life.
- Spectacular shine.
The manufacturing technology of sinks allows them to be produced in two types:
- Stamped. Cost to the buyer cheaper, but the reliability level is higher than that of welded counterparts. One drawback - the depth of the sink does not exceed 15 cm, which is not very convenient when using.
- Welded. The bowl and base of the sink are made separately and welded to each other. This type of shell can have any depth. They are much more convenient than their stamped counterparts.
Stainless steel mortise sinks can have the following surface:
- Matt A bowl with a matte surface is obtained by rolling a steel sheet with a special machine. The advantage of such a coating is the visual absence of scratches.
Important! The shallow relief of the shell looks pretty good, but it needs special care. Although with the huge availability of cleaning products - this is not a problem.
- Glossy.Gloss looks great in any kitchen, but only until the first scratch. Modern masking agents will help get rid of defects, but if there is no time and desire to polish the sink, then choose another option initially.
Important! Advice:
- To be sure that the selected mortise sink is made of quality material, use a magnet. Real steel will make the magnet slide easily over the surface.
- If you are not satisfied with either gloss or a dull surface, then select a mortise kitchen sink with a textured pattern.
- When buying a welded sink, pay attention to the quality of the seams. If the quality of the weld was low, then over time there will be a chance of leakage.
- Many properties cannot be initially checked for quality, especially without special tools, knowledge and skills. Therefore, always give preference to manufacturers with a proven track record.
Ceramics
Ceramic sinks are made of porcelain and faience. These materials have many advantages:
- Great look.
- Abrasion resistance.
- The ability to tolerate temperature changes.
Important! Less material - a strong blow can lead to a split plumbing. This must always be remembered during operation of the device.
Ceramic mortise sink looks great, especially it suits the kitchen style of Country or Classic. However, it is very difficult to install such a sink on your own, since such work requires skill and certain experience.
Composite
Recently, a new material has appeared on the building materials market - composite. The mortise sink made of this material looks very stylish and can have any shape and size.
Important! Raw materials for the manufacture of shells are: rubber, quartz, stone chips, acrylic, fiberglass, resins and the composition of dyes.
Composite sinks organically fit into any kitchen space and have a lot of advantages:
- Resistance to deformation.
- Not afraid of high temperatures and chemicals.
- The color of the bowl does not change with time. In addition, no caustic drinks leave stains and traces of the composite shell surface.
- No sound of pouring water.
- Does not conduct electric current. In terms of safety, the composite compares favorably with other materials.
- Durability. You can use the sinks from the composite for 10 years, and with proper and careful care, the service life can be extended at times.
- A variety of shapes and sizes. Stamping and welding of the material do not limit the manufacturer to any framework. Therefore, composite sinks come in different sizes and shapes, even the most bizarre.
Self-installation of a mortise sink for the kitchen
If you purchased a mortise sink, then for its installation it is not necessary to invite a specialist, all the work can be done independently. However, for this it is necessary to follow the sequence of work.
Step 1. Preparatory phase
First of all, you need to prepare the following tools and supplies:
- Cement.
- Pliers.
- Clamps.
- Drill (screwdriver).
- Screwdrivers.
- Electric jigsaw.
- Adjustable wrench.
- Adhesive sealant.
- Masking tape.
- Safety glasses for eyes.
- A simple pencil.
- Ruler.
- Roulette.
- Rags.
- Knife.
Step 2. Marking and sawing holes
The countertop has already been bought - it's time to determine the place of the future sink. For this:
- Remove the countertop from the headset and lay it on a flat surface (base).
- Draw a contour along which the hole for the sink will be cut. Use the template supplied with the store sink.
- If the template is missing, then resize the sink by circling it with a pencil.
- Step 10-15 mm from the drawn contour and draw a working contour.
- Drill a hole in the corners with a jigsaw for a landmark.
- Cut out the wash seat. You need to drill from the front of the countertop.
- Remove fragments of the countertop from the hole.
- Insert the sink into the cutout and check if the result is correct. The sink should freely enter the hole, if not, then cut the edges with a jigsaw.
- Thoroughly clean the cuts from sawdust and burrs.
- Using a spatula or brush, apply sealant to the slices in a uniform layer. As a sealant, you can choose an epoxy resin, silicone or other composition.
- After the glue has set, put the countertop back in place.
- Fix the countertop.
Important! To improve the quality of your work, take note of these tips:
- If chips have formed on the countertop, then coat them with sealant.
- The material of the countertop affects the type of sealant: if the countertop is stone, then use silicone compounds, if wooden or plastic - glue on alcohol.
Step 3. Installing the sink
A special seal must be included with the sink. It is made of foamed polyethylene. Glue the sealant on the rim of the sink (around the entire perimeter).
Important! If, after gluing, the edges of the sealant are left sticking out, towering above the side, then carefully trim them with a knife. Otherwise, the mortise sink does not press firmly against the countertop.
The process of gluing the seal is as follows:
- Using a cloth moistened with gasoline (solvent), degrease the edges of the seal.
- Apply sealant to the seal. Do not make the glue strip wide, as the glue will creep out when squeezed.
- Glue the seal onto the side of the sink.
Mount the sink on the countertop as follows:
- Align the sink on the countertop according to the layout.
- Fix at an equal distance of attachment to the sink (included). Do not forget to constantly monitor the position of the sink, since when installing fixtures, plumbing can easily move out of place.
- Wait for the sink to stick.
- Cut off excess tape with a knife; remove the exposed silicone with a rag.
- Install the mixer and attach the drain.
- On the next day of installation, turn on the water to full and spray it a little along the edges of the sink to make sure that the installation is correct and quality. Even a small gap can lead to deformation of the countertops and cupboards under the sink.
to contents ↑Important! So that in the end you do not have leaks and other problems with the operation of the sink, consider the following nuances:
- If the hole for the mixer is not in the sink, then form it yourself.
- If you do not have the minimum plumbing skills, then invite a plumber to connect the drain to the pipeline, since an illiterate connection is fraught with leaks.
Stock footage
We hope that our information has helped you not only to choose a mortise sink for the kitchen, but also to install it. Now enjoy the convenience, comfort and beauty.
- How to choose a vacuum cleaner taking into account the characteristics of the house and coatings?
- What to look for when choosing a water delivery
- How to quickly create comfort at home - tips for housewives
- How to choose the perfect TV - useful tips
- What to look for when choosing blinds
- What should be running shoes?
- What useful things can you buy in a hardware store
- Iphone 11 pro max review
- Than iPhone is better than Android smartphones
 (No ratings yet)