

DIY leather sheath for a knife
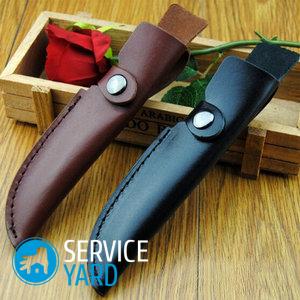
A good knife is necessary for every hunter, fisherman and tourist. It is very important that the sharp blade is reliably protected in the field. Each self-respecting hunter has several protective covers, and many hunters prefer to make leather sheath for a knife with their own hands. The ability to work with skin is always useful to a real man, so today in the article we decided to tell how to make leather sheaths with our own hands, so that they are comfortable, practical and beautiful.
to contents ↑How to sew a sheath of leather with your own hands?
Making a do-it-yourself knife case from leather is not difficult at all, the main thing is to understand the basic principles of work. When performing all the manipulations, show due diligence and accuracy so that the result will please you.
We divide the whole process into several stages:
- Preparatory, which includes the preparation of materials and tools, as well as the manufacture of a template.
- Making patterns from leather.
- Skin formation.
- Preparing for firmware.
- Fixing the sheath attachment.
- Product firmware.
Let's consider each stage in more detail.
to contents ↑Tools and materials for the manufacture of scabbard
If you have old boots, then their legs can be used to sew leather sheaths with your own hands.
Important! The piece of material should be sufficiently thick and durable.
In addition to leather, for work you will need the following materials and tools:
- A piece of thick felt impregnated with epoxy resin or a strip of plastic in the size of the blade (2 mm thick) for the manufacture of the liner.
- Two half rings: one is large, one is small (for attaching the scabbard to the belt).
- Thin cardboard or heavy paper for a pattern.
- Scissors.
- Scotch.
- A sharp knife (scalpel) for cutting patterns.
- An awl with a hook on the end or a thick needle for the skin.
- Strong thread.
- Metal ruler.
- A tool for piercing holes in the skin (you can use improvised tools).
- Office clips (clothespins).
- A simple pencil or marker.
- Sandpaper for cutting.
How to make a template?
To make a template, prepare a piece of thin cardboard (thick paper).
Step-by-step instruction:
- Fold a sheet of paper in half.
- Put a knife on the paper.
- Circle the contour of the knife, leaving a distance of 8-10 cm on the blade side (seam allowance).
- Cut the template so that only duplicates the outline of the blade. The contour of the handle should be one. In real life, this circuit will play the role of a loop for fastening with a half ring.
Important! The width of the template handle should match the cooked half ring.
- Try the template on the knife and make sure everything is done correctly. The knife should freely enter the template, while not falling out.
- If everything suits you, then fold the template in half, cut off all the excess. Bonding points should be even.
- Glue the template around the edges with tape. Place the knife inside the template, move it to make sure that the blade does not get stuck anywhere and nothing interferes with its movement.
Leather blank
The time has come to make a pattern of leather, so that the sheath for a knife of good quality will end up:
- Draw the pattern along the contour from the wrong side.If you are not limited in length by a piece of leather, then make a pattern with a margin to cut off all unnecessary in the future.
Important! Leave the “ears” at the edges of the scabbard, which will subsequently be the place for the buttons. The prepared area for the buttons should be such that around the button-baubles remained 1-2 mm more skin.
- At the inner corners (where the base of the sheath goes into the belt mount), make 2 holes. This is necessary so that during operation the skin does not tear in the corners.
Important! In order to make holes, use a special or improvised tool in the form of a hollow tube of the required diameter.
- Cut the pattern with a sharp knife. A straight line cut is best done with a cutter using a metal ruler. Before cutting out the pattern, secure it in the holder.
to contents ↑Important! You can cut the pattern with a special rotary knife for the skin, a razor or a surgical scalpel. Sharp and precise actions will save the workpiece from bumps, stretching and make the cut perfectly smooth.
Skin shaping
To cover took the form of a knife, it is necessary to give bulk to the workpiece. Use the same knife as a mold, proceeding as follows:
- Take a soft cling film, wrap it in several layers on the blade and handle of the knife. The cutter will become a little thicker, but the shape must be maintained.
- In a low bowl, heat the water, put into it that part of the workpiece, which, in essence, is a sheath. Part of the leather blank with a future clasp is not necessary to wet. After a few minutes, the skin dipped in water will begin to bubble. This air penetrates the pores of the skin.
- After 20 minutes, remove the workpiece from the water with tacks, place it on a kitchen towel.
- Blot excess water with a towel, place a knife wrapped in cling film in a wet blank.
- Fix the edges of the workpiece with clerical clips (clothespins) as close as possible to each other.
- Press wet skin with your hands against the blade and handle in such a way as to form a knife-shaped cover.
Important! While drying the workpiece, check several times how correctly the shape is maintained. If necessary, correct the form by wetting the skin and pressing with your fingers those places where the material does not lie according to your plan.
- Leave the workpiece in the clamps overnight.
- After the cover has completely dried, remove the clips.
Preparing for firmware
Before stitching the scabbard from the skin, it is necessary to carry out the final trim and prepare the groove for the seam. If you have a special rotary knife, then this will facilitate the task. If there is no such tool, then use the tool with which you cut the skin:
- Carefully cut two layers of the edges of the workpiece. It will take a lot of effort, because you need to cut off two layers of dried and puffed skin. Uneven skin cut with sandpaper.
- Carefully make a groove on the cover. It is best to use a special tool for this purpose, for example, a semicircular chisel for leather with a guide. A homemade chisel from a needle from a medical syringe is also suitable.
- Mark the groove with a special marking wheel or pencil line. Use a wheel or awl to manually draw a line. Choose the stitch step yourself - it is best to adhere to a stitch length of 0.5 cm.
- Put the knife cover on a wooden surface (board), punch holes with an awl. Use a hammer if necessary.
- After making holes on the top of the case, raise the top edge and make holes on the bottom. The holes must match.
Important! Do not pierce both aligned edges of the cover at once so that the holes are not too large.
- Make sure all stitch holes are straight.
Sheath fixing
The sheath can be attached to the belt in several ways:
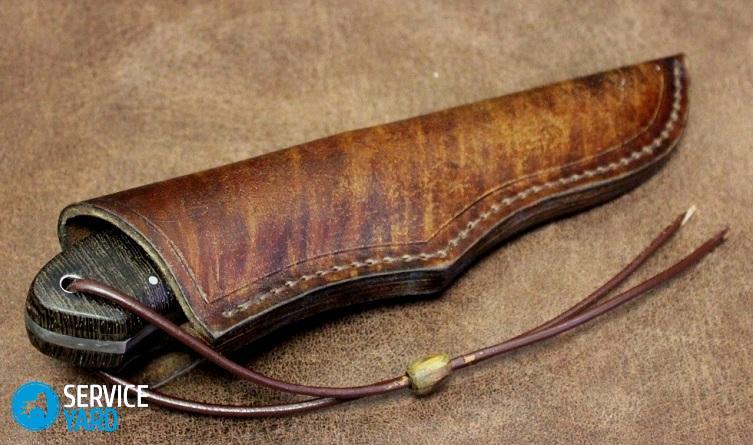
- Loops for a belt. Sewing a belt loop is best before you begin to sew the edges of the cover.Fold the strip for the loop of the required size (so that when carrying the knife does not cause inconvenience). Make 4-6 exactly matching holes in the upper part of the valve and on the case body itself. Take a strong thread and sew a loop.
- Half ring. Bend the fastener strip so that the belt fits and there is 1.5-2 cm remaining on the ring mount and 1.5 cm on the mount to the base. Place a half ring inside the loop. To fasten it, use the baubles and a special tool to clamp them. Buttons are suitable for fixing the mount at the base.
Seam knife cover
Prepare a needle and very durable, harsh threads. In order to flash a cover with a decorative stitch, use the single needle method in this way:
- Pull the thread from the bottom into one hole and make a stitch to the end of the seam.
- Go backwards with the exact same stitches. It should be a durable and beautiful finishing line.
- Firmly fasten the tip of the thread. To do this, skip it in the middle of the thread itself, tighten and fasten between the layers of skin. Cut the thread close to the skin, while making sure that the knot is not loose.
- Insert the knife into the sheath and admire the result.
- Treat the finished sheath with shoe wax or shoe polish to protect the skin from drying out and give it shine.
to contents ↑Important! Sew the edges of the scabbard using an awl with a hook.
Professional Tips
In order for the finished product to please you with the final result, listen to the following tips.
Tip 1
To give the sheath stiffness, you can insert a strip of plastic cut into the shape of a blade inside. To fold the plastic in half, heat the fold line. The plastic seal can be glued to the skin before you sew the knife cover with threads.
Tip 2
Leather scabbard can be complemented with a liner made of cotton fabric soaked in wax. For the manufacture of the liner, you can use a thick felt:
- Cut a piece of felt sufficient to form the liner and soak it with epoxy glue. To do this: place the liner in a plastic bag and wait until the epoxy begins to harden.
- Protect the blade with masking tape and electrical tape.
- Wrap the blade with a prepared bag of felt and press in a light press. You can squeeze the ends of the liner with clothespins.
- After the resin has hardened, remove the blade from the liner and remove the films from it.
- In order to give the liner the desired shape, use a file.
- Do not forget to drill a small hole at the tip of the blade to drain accidentally spilled water.
- Place the knife with the finished insert in the center of the wet workpiece and fix the structure with clamps on the side of the future seam.
- After the skin dries, sew the finished molded leather blank.
Important! Be sure to saturate the handle of the knife with a water-repellent compound to protect the tree from moisture.
Tip 3:
- To fit the sewn sheath to the specific handle of the knife, soak the case in warm water for several minutes and insert the knife into it.
- Use aluminum or thick copper wire to pull the skin at the edge of the sheath mouth.
- In order not to deform the skin edge in the area of the seam, put protective gaskets from improvised material along it.
- Leave the scabbard to dry completely.
When drying, the material will stretch and the inner surface of the sheath will exactly repeat the shape of the handle of the knife.
to contents ↑Stock footage
Every lover of fishing, hunting or a simple tourist should have his favorite knife. And if there was no magazine cover complete with the blade that meets all the requirements for it, then making the sheath with your own hands, as you see, is not difficult. Use our tips and recommendations of professionals to make a high-quality, practical and convenient knife cover, and you can figure out how to decorate it yourself.
- How to choose a vacuum cleaner taking into account the characteristics of the house and coatings?
- What to look for when choosing a water delivery
- How to quickly create comfort at home - tips for housewives
- How to choose the perfect TV - useful tips
- What to look for when choosing blinds
- What should be running shoes?
- What useful things can you buy in a hardware store
- Iphone 11 pro max review
- Than iPhone is better than Android smartphones
 (No ratings yet)