

Volumetric paintings do-it-yourself from putty
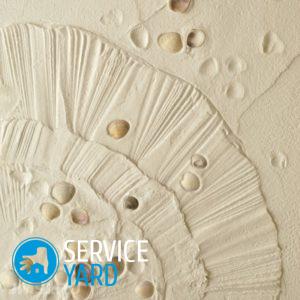
Handwork is always highly valued, as it is prestigious and sophisticated. Today, many interior designers began to create textured paintings on surfaces, using the simplest materials, for example, the familiar putty. If you want to design the interior in an extraordinary and interesting way, then voluminous paintings with your own hands from putty are just for you. Extremely interesting paintings cause pride among the creators and delight of the audience. Volumetric decoupage is considered a sign of good taste, because it has an elegant appearance and impress others with its novelty, originality and originality. Everyone can do such a creation, the main thing is to have imagination, a creative mindset and at least small drawing skills.
to contents ↑DIY putty paintings
Putty painting is a rather laborious and lengthy process that requires increased accuracy and creative abilities. But the result of such work will be so stunning and unique that you will not be sorry for the time and effort spent.
For decorating the walls, you can use the material on a different basis, and the choice of tools depends on the specific pattern.
Important! The novice master should not immediately take up the creation of a complex picture - it is better to choose a simple drawing, the elements of which can be done with a spatula or with your hands. This technique will allow you to quickly master the technique of designing a three-dimensional picture using putty.
Today we will analyze the simplest methods that will help you draw relief paintings with your own hands on the wall. After you fill your hand on simple options, you can move on to a more complex technique of drawing.
to contents ↑Option number 1. Create a picture with a spatula
This option is suitable for creating a variety of complexity paintings. For beginners, we recommend choosing simple compositions consisting of a tree branch, flower, or other simple element.
Material selection
For work you will need the following materials:
- Putty. This is the main working staff. You can use both the finished solution and the dry mixture. This is preferable for the home master, since it can be stored for a long time without losing its characteristics. The dry mix can always be kneaded in any quantity.
Important! The working composition must meet certain requirements: a long setting time, good adhesion, ductility, lightness and ease of grinding.
- Primer. The surface base before finishing is necessarily treated with soil, and the result of work is also fixed by it in order to give the picture strength and reliability.
Important! It is better to use deep penetration compounds on an acrylic basis. Such mixtures are sold in the form of a ready-made solution and in the form of a concentrate. The latter must be diluted before use.
- Paints. In order for the volumetric elements of the picture to look more impressive and expressive, use paints to highlight them. It is better to apply several shades, but it is up to you, because it all depends on the picture. You yourself must decide which paint to use and how to decorate the picture.
Important! The easiest way to use emulsion formulations.
Advice:
- Puton “Vetonit” meets all the necessary parameters. The composition is very elastic, dries for a long time and is perfectly polished. A long setting time will help you to correct the flaws if necessary.
- When choosing materials for decorating walls in a room with high humidity (kitchen, bathroom), give preference to solutions that protect the surface of the walls from mold.
Tool selection
In addition to the material, the necessary tools for work:
- High-quality spatulas with different shapes and sizes. One spatula - wide (30 cm), is necessary for applying the composition to the surface, the second - is used to put putty on the main tool and remove residues. Narrow spatulas (2 to 10 cm) will help shape the pattern.
Important! We recommend purchasing a set of car spatulas. They have a convenient configuration and small width. Therefore, it is convenient to work with them, especially if it is necessary to form small elements of the composition.
- Tassels. It’s better to buy tools at the art supplies store, because the finer the details of the composition, the thinner the brushes should be for painting them.
- A simple pencil. It is convenient to use a pencil to draw the outline of the picture on the surface. They can make a sketch on which all the work is done.
Important! If your drawing skills are not at a very high level, it is most convenient to use a carbon paper in order to transfer the finished drawing to the surface. With the help of a carbon copy, you can accurately and quickly mark up without worrying about the accuracy of the image proportions.
- Palette knife. This is a very small special tool of the artist, reminiscent of a trowel, which is very convenient to create a certain relief and form the final outline of the picture. You can buy a whole set of tools of different configurations. They can even be applied putty on the surface.
- Sandpaper with grit P180. To align and give the composition a complete ideal look, sandpaper is used. In addition, to smooth outlines, you may need a brush up to one and a half inches wide to work with very small elements.
Step-by-step instructions for creating a putty painting
The workflow is as follows:
- As with any other type of finish, the wall surface must be prepared. The wall needs to be plastered and made as even as possible so that the future composition is not distorted by various defects and damage.
- Treat the base for the picture with a primer. Prepare the primer as prescribed in the instructions on the package, apply with a brush (roller) to the surface where the painting is planned. This will strengthen the surface and improve the adhesion of the putty.
- After the primer has dried, create a background coating for the future picture.
- Apply the contours of the composition to the wall. Work with a pencil or using carbon paper (with tracing paper, apply the image onto the surface using carbon paper).
Important! It is very important at this stage to make clear guidelines for further work, otherwise - the final result will be very different from what was intended.
- Prepare the putty. Take a container and pour a certain amount of water into it, and then fill in the dry mixture. The proportions of water and mixtures are indicated on the packaging. Mix the composition thoroughly until a homogeneous pasty mass is formed. The best quality of mixing the composition is achieved through the use of a special power tool. The amount of composition should be such that you can use it in one go.
- Take a small amount of the composition on a spatula (spatula) and apply in the right places. If you make a simple stem, then a tubercle should turn out, if more complex pictures, then the mixture should fill all the contours.
Important! Do not worry that you apply too much mixture, in the future all small flaws will be eliminated.
- Let the composition dry a little (15-20 minutes).
- Using a palette knife or improvised tools, remove the excess composition, correct the contours and give the picture the final look. If somewhere too much composition has been removed, then apply a little more mixture to the damaged area.
Important! Take a wet brush over the uncured surface to smooth out the contours and make the picture smooth. A wet brush will help to remove small flaws and make all the transitions almost invisible.
- Allow the putty to dry completely and go over the surface with sandpaper. With a small piece of sandpaper, remove all sharp corners and flaws, making the composition more attractive.
- Process the finished composition with a primer to strengthen.
- Start painting the composition elements. In the creative process, you can unleash your imagination and highlight each element through a game of colors and shades. Do not be afraid to spoil something, because you can always tint a bad site.
- Apply a protective coating to the picture. You can use acrylic varnish, which protects the surface from contamination, abrasion and will make it possible to wipe the composition with a damp rag. A layer of varnish will protect the picture from burnout, preserve the expressiveness and brightness of colors for many years.
to contents ↑Important! If you need to fill your hand to create a picture, then a sheet of drywall can serve as an excellent canvas for rough work. You can use the old Chinese paintings, panels for drafts. Fill the old drawing with white acrylic paint, and then apply your drawing in pencil.
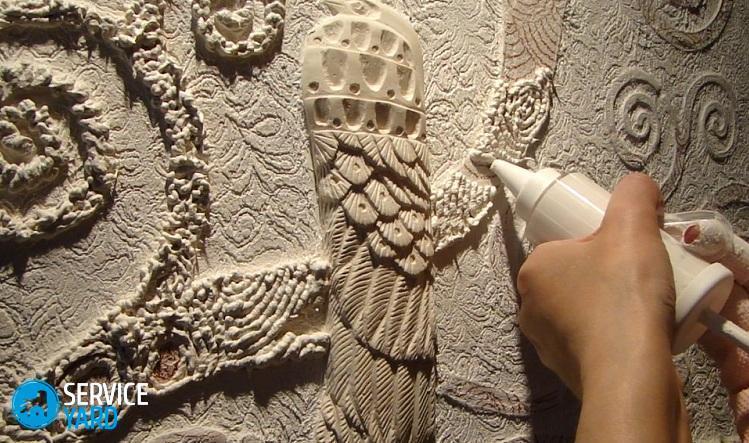
Option number 2. We draw a picture with a syringe
This is another way to create panels on the wall, the technique is quite simple and fast. Such voluminous do-it-yourself paintings from putty are a little easier, but they look very attractive and stylish.
Important! This method is still good in that the boundaries and outlines of the future composition can be performed quite simply and without bothering your hands.
Materials for work
For work you will need the following materials and tools:
- Putty. To work, you do not need a lot of composition, so purchase a small package of dry mix (Vetonit) or use the finished mass (Shitrok), which you just need to mix before use.
- Primer to strengthen the base and the finished picture.
- Paints. Choose colors so that the composition blends harmoniously into the interior.
- Paint brushes.
- Large syringe (50-60 ml). You can use the old pastry bag as an alternative.
Step-by-step instructions for creating a picture with a syringe
The technology of the work is as follows:
- Prepare the surface as in the first version. The base must be flat and strong.
- Primer the base and let it dry.
- Apply the contour of the future composition to the wall with a pencil or carbon paper.
- Prepare the putty. If you use a ready-made composition, then mix it. The consistency of the mass should not be thick, it is better - if it is liquid, as this will simplify the workflow.
- Remove the piston from the syringe and fill the container with putty. After filling the cavity with the solution, put the piston in place.
- Squeezing the putty slowly, apply it along the main lines. Just guide the syringe along the contours, constantly pressing the piston so that a uniform strip is extruded along the entire length.
- After the main lines are drawn, proceed to the small elements and details. Apply the composition in the order and sequence you require.
Important! It’s not scary if you put the excess compound somewhere, you can manage to remove the excess with a spatula or a palette knife, since the solution dries slowly.
- Give the composition time to dry (about a day) and adjust the picture with sandpaper.
- Apply a primer to a fully finished painting.Try to apply the composition to each area to strengthen the surface and make your masterpiece more durable.
- Color the finished version as you like. Some craftsmen apply several layers so that a different shade can be seen from under the finish.
- After the paint has dried, treat the surface with an acrylic-based protective varnish. The varnish will create a protective film on the surface that will repel moisture, dirt, prevent from abrasion and preserve the color of the painting. Apply varnish with a brush, pay special attention to the recesses in the relief areas.
to contents ↑Important! If you use a confectionery or regular bag instead of a syringe, the filling process is many times faster and easier. Just lay the mass in the bag and squeeze it along certain contours.
Option number 3. Create a composition using a stencil
This is another simple way with which you can create real bas-reliefs on the surface of the wall. With the help of a stencil, even a person without experience can create an interesting three-dimensional picture with putty on his own.
Materials
For work you need the following materials:
- Putty. In this case, it is necessary to use a rapidly hardening gypsum-based putty, for example, Knauf Fugen.
Important! Which composition to choose is not important, the main thing is that the mixture sets in 30-40 minutes. The amount of composition depends on the size of the picture.
- Primer for preparing the base and strengthening the finished composition.
- Paint for decorating. Most often, the surface is covered with several colors to make the composition more expressive and highlight individual fragments.
Important! Choose acrylic based formulations. You can buy individual colors, but you can do it easier: purchase only white paint and pigments of the desired shade. By mixing the ingredients right on the spot, you can get the right shade.
- Cardboard for the manufacture of stencil. The thicker the material, the more relief the pattern will turn out. For such purposes, basalt cardboard with a thickness of 5 mm is perfect.
Important! If you did not find thick cardboard, then glue two thin with PVA glue.
Instruments
The set of necessary tools is as follows:
- Construction knife. In order to cut a pattern or picture in cardboard, choose a knife with a blade width of 25 mm.
Important! We recommend purchasing a pack of replacement blades, as they may break or become dull during operation.
- Masking tape for fixing the stencil on the wall. If the stencil is heavy, then in addition it must be secured with a pair of screws. After finishing work, coat the holes from the self-tapping screws with putty.
- Brushes for painting and priming.
- Putty knife for the distribution of putty. A variant with a width of 8-10 cm is best suited for this purpose. It is very convenient to use it when filling the stencil with mass.
- Palette knife to make corrections to the composition.
- Sandpaper for grinding the finished composition and giving it the final look. We recommend using sandpaper with grit P180. Paper is sold with a meter, so you can buy as much as you need - usually half a meter is enough.
Step-by-step instruction for performing a three-dimensional drawing using a stencil
In this embodiment of creating a three-dimensional picture on the wall of putty with your own hands, special requirements are made to the preparation of the surface.
Important! The plane should be perfectly flat, because any differences and defects will not allow you to properly fix the stencil and apply the composition. Putty will be blurred by irregularities.
After the preparatory phase, you can proceed directly to work:
- Prepare the base for the composition. We talked about how to do this correctly in previous versions. Apply the primer to the base one day before starting work, so that the surface has time to dry.
- Apply the selected pattern to thick cardboard. Cut the composition along the lines with a construction knife.To make it easier to cut out the elements of the picture, lay the cardboard on a flat hard surface.
- Ready-made stencil (or stencils in case there are several of them) fasten to the wall using masking tape or other fasteners. Before fixing the stencil with fasteners, check its position with the building level.
- Prepare the putty. The preparation process and the proportions of the components are indicated on the package.
- Apply the prepared composition to the stencil using a spatula. Carefully align it and remove excess. Ensure that all recesses in the relief are filled as best as possible. Work quickly, as the composition freezes very quickly.
- After 10-15 minutes, carefully remove the stencil. The composition should only begin to harden, but not solidify completely.
Important! When removing the stencil, be careful to minimize damage to the composition. It is best to remove the stencil, taking one side and gradually peeling it off the wall.
- Close up all flaws with a spatula or palette knife. Take a little composition and fill in all the areas where the mixture departed when removing the stencil.
- Wet the brush and process the pattern, line the lines and make the surface smooth. A wet brush will help to simulate the composition so that it looks neat.
- Allow the painting to dry (a couple of hours). The room should be dry and warm.
- Treat the composition with sandpaper, trying to remove all the major flaws.
- Primer the composition.
- After the primer has dried, proceed to staining. First apply a base color that will serve as the background. Apply the paint in two layers to ensure the durability of the finish and the maximum color depth.
Important! Work with a wide brush, as the roller may not paint the relief and volume elements.
- Give the paint time to dry and start decorating the painting. Use compositions of a different shade or oil felt-tip pens (markers) to highlight volumetric details and give the desired effect to the pattern.
- Apply a protective compound to protect the paint from burnout and abrasion.
Stock footage
A painting from putty will transform the room and make it stylish and original. Your composition will be in a single copy, so no one you will not find such a repair and such an original wall decoration. Imagine with the choice of composition and bring your creative plans to life, using any option for creating a picture described in our article. Good luck
- How to choose a vacuum cleaner taking into account the characteristics of the house and coatings?
- What to look for when choosing a water delivery
- How to quickly create comfort at home - tips for housewives
- How to choose the perfect TV - useful tips
- What to look for when choosing blinds
- What should be running shoes?
- What useful things can you buy in a hardware store
- Iphone 11 pro max review
- Than iPhone is better than Android smartphones
 (No ratings yet)