

DIY shoe rack
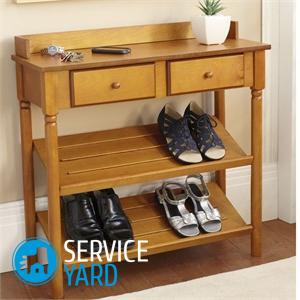
Probably many of us were faced with such a problem as randomly located shoes in the hallway. It's unpleasant enough to go and trip over shoes. And in general, the mess with the hallway, in which there is usually not enough space, is not impressive. Moreover, it is from the hallway that the whole impression of the house or apartment as a whole opens up. DIY shoe rack is a fairly simple device that is designed to store shoes. And there are a lot of ideas for implementing such systems. In this article we will offer you some simple and beautiful, convenient models.
to contents ↑Compounds and Materials
A shoe rack is best made from plywood or coniferous wood. For maximum shelf life, dried shoes must be stored at room temperature, and humidity should be approximately 60-65%. Porous wood will calmly absorb excess water vapor, and in the event of a lack of moisture in the air, it will return these vapors.
Important! But in no case should shoes be dried out, especially the one made of leatherette, because this often causes the upper to crack. And other shoes do not benefit from overdrying, if only because the top marked with shoes is not glued with nails and glue, but with glue. Therefore, storing shoes put somewhat damp.
Wooden shoe rack is the only reliable option for storing common shoes. Properly dried shoes in a carefully ventilated storage area can be stored immediately.
Useful tips for selecting components
- In this case, the shoe rack may well be made of chipboard with a thickness of 1.2 cm or more. On the front side you can order a more expensive and more spectacular MDF.
- For shoeboxes, take medium-grade chipboard (E1 or E2).
Important! The so-called children's chipboard of class E0 is fragile and quite expensive, and the cheaper lower classes E3 and E4 exude an excessively large amount of phenolic resin fumes. They are no less harmful to shoe leather, synthetics, as well as glue than to all of us. For the same reason, OSB is not suitable for the manufacture of shoes, which is a building structural material that exudes a large amount of phenol during construction.
- As for the connections of parts, they can be represented by any furniture - dowels, corners, confirmations, staples of a furniture stapler. In general, as you can, so combine.
Petal shoe
Shoe racks with trays that recline on the petals are the most perfect, so we'll start with them.
Device, materials:
- At first glance, the most complex details are the side lobes, but you can make them with your own hands from hard plastic, the thickness of which starts from 4 mm, or sheet metal.
- Each tray will be 2-tier - spring-autumn and summer-home.
- For tall shoes, you will have to add a cabinet, because shoes with berets and shafts will not fit in the trays. This is perhaps the first and last shortcoming of petal shoe racks.
- The height of one section N is taken from 300 mm.
- The lower and upper gaps between the front panel of the shoe rack and the lid of the tray need at least 6 mm for ventilation.
- For the same purpose, the pocket above the upper tray must also be ventilated. To achieve this, at the top of the back wall, which is made of fiberboard, make a series of holes from 40 mm or leave a gap.
- In the middle shelf, install ball clips or removable pins, so that you can adjust the position of the shelf according to the contents.
- A feature of this design are the nests of swivel joints made simply in the form of a hole in the brackets from a steel corner, fortified from the inside of the front niche. Folding latches are attached to them, if you do not reach a niche to the side walls.
Important! In this version, the front cover of your tray can be of any height, so a similar version of the petal shoe can be made for high shoes. The main condition is that the front skin of the niche must be strong enough and fragile. Drywall, for example, in this case is not cost-effective.
Catches and Hinges
In the petal, and other shoe racks with hinged doors, there is another catchy assembly - this is a swivel hinge. At first glance, there is nothing left but to purchase it, but still, you can make it with your own hands.
Required for work:
- pieces of thin-walled seamless pipe, best of brass;
- pieces of cases of ordinary ballpoint pens;
- knee connectors of an old spinning rod.
Important! Cases of certain types of Cuban cigars are great, but their prices bite.
Assembly order
And the actual procedure for manufacturing the hinge of the hinged tray is as follows:
- Cut pieces from the pipe that are equal in length to the depth of the hinge socket. As a rule, in ½-⅔ the thickness of the side wall of the shoe rack with their own hands, but not less than 10 mm. The walls behind the nest should remain at least 5-6 mm. This will be a kind of holder of nests, they need 2 for each of the hinges.
- With a scraper (scraper, rimer), which is used during installation, dismantling of pipelines of air conditioners, remove chamfers of 0.25-0.35 mm from the inside.
- Pick bolts that have a round head to the clips so that it fits into the clip with a gap of no more than 0.5 mm.
- Remove all burrs on the bolt heads with a file. By means of sandpaper, if necessary, you can adjust the head to the clip itself.
- With a Forstner drill, drill holes under the clips - take a drill of such a diameter that the clips fit tightly into the hole itself.
- We press in the holders in the holes. In the event that they enter freely, you can stick with any mounting adhesive for metal.
- Insert the bolts into the corresponding holes of the petals, tighten with nuts with the spring washers - the hinges are ready for assembly.
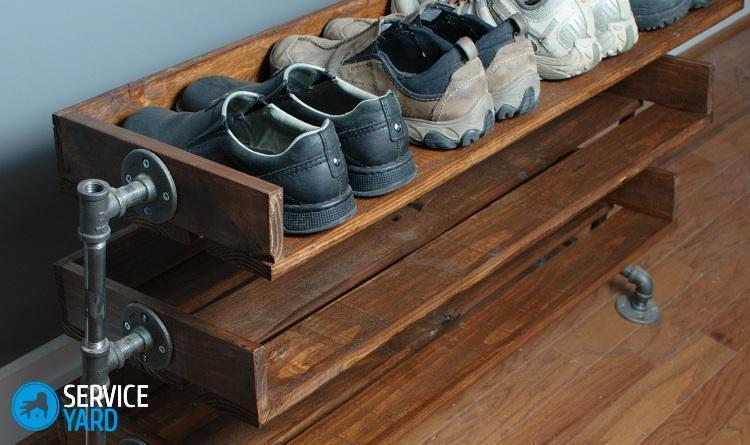
Storage facilities
Shoes that are not worn for a long time, it is most preferable to store in a stable favorable microclimate. Also, a cupboard or cabinet for shoes that are off-season in another room is necessary when there is not enough space in the hallway. In general, it is not recommended to keep shoes that have not been worn for a long time in the hallway, especially in a private house, where through the wide open front door it can be cold or damp.
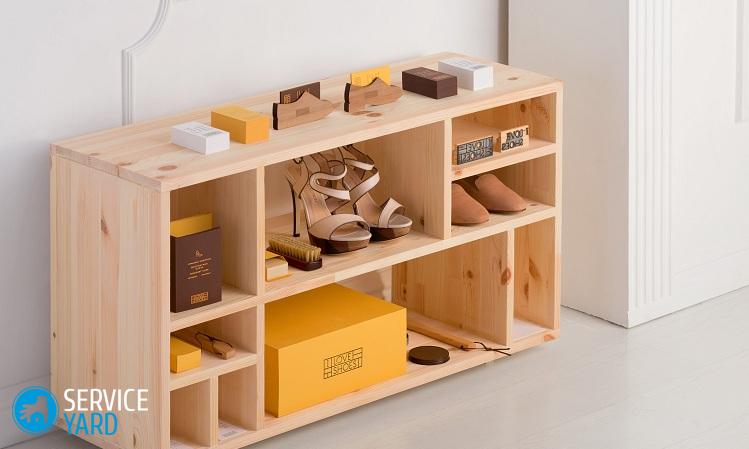
Cabinet and shelf
The rack is able to provide optimal conditions for long-term storage of about 30 or more pairs of shoes, but requires 0.6 square meters. m square. While maintaining minimal ergonomics for this rack requires a dressing room of 6 square meters. m
Materials for work
- The rear wall of the rack is missing - it is attached directly to the wall with 6x70 screws in plastic dowels and corners.
- Material for shelves and walls - chipboard or wood 20 mm and timber 30x30 mm.
- Shelves for better ventilation can be made of steel mesh with wooden frames.
Design features
- The do-it-yourself shoe rack is compact and can fit in the aisle, the width of which starts from 1.5 m. The length of the cabinet is up to 2 m.
- The shelves are of exactly the same construction as in the previous case - they are attached to the sidewalls with dowels, with the help of corners, in milled grooves or on ordinary shelf holders.
- The back wall is ventilated, like the petal shoe.The ventilation option is almost the same as that of the shelving - a pedestal with no rear wall with a small gap between the wall and the pedestal, the width of the baseboard.
- Lining on the back - made from the same board as the partitions with shelves.
Organizers
What to do when places under the shoe cabinet cannot be found at all? Here a shoe organizer will help out for storing currently not worn shoes.
Important! In furniture stores, as a rule, they can offer you a special cabinet-organizer for shoes, which will take about 2 square meters with the doors wide open. m. In clothing and haberdashery stores, you can find an incomparably more cost-effective shoe organizer-suitcase made of fabric that fits quietly under the bed. In addition, in such a suitcase shoes breathe freely.
As in previous cases, the organizer-suitcase can also be made with your own hands, if there is a sufficient number of shoe boxes. They just need to be glued together. Shoe in such an organizer is no harder to breathe, and it will be easier to shove it into the niche of the bedside drawer.
Cardboard shoe organizer can also be glued, for example, to the cottage. Decorated with fiction, it may well be in place and inside the apartment, if the hallway has a suitable niche.
to contents ↑Important! In this case, do-it-yourself cardboard shoe boxes in a beggar must be placed at the disposal - so that the sides of the niche add rigidity to the entire product. For the same purpose, they try to impregnate all cardboard blanks 2-3 times from all sides with water-polymer emulsion or diluted water with 2-3 times PVA.
Stock footage
In this article, we offered you a couple of ideas on how to make a simple shoe rack with your own hands. These are far from all possible options, so you can probably pick out the ones that fit the hallway or storage location, as well as the number of pairs of shoes that fit the model.
- How to choose a vacuum cleaner taking into account the characteristics of the house and coatings?
- What to look for when choosing a water delivery
- How to quickly create comfort at home - tips for housewives
- How to choose the perfect TV - useful tips
- What to look for when choosing blinds
- What should be running shoes?
- What useful things can you buy in a hardware store
- Iphone 11 pro max review
- Than iPhone is better than Android smartphones
 (No ratings yet)