DIY garage lighting

A purchased or built garage will only be comfortable when it is equipped with high-quality lighting. Many motorists stay in the garage for a long time: some - repair other people's cars, others - improve their transport. In order to find any tools without problems and it was convenient to carry out repair work, such a workshop requires enough light. In this article we will look at how to properly equip the lighting in the garage with your own hands.
to contents ↑Choosing Lighting Zones
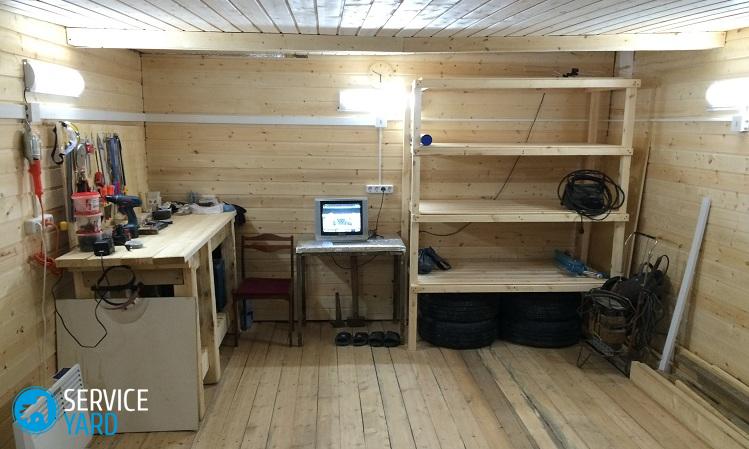
The light in the workshop should always be pleasing to the eyes and functional. You can independently install lighting in the garage. To store the car and carry out repair work in the garage, the following zones can be distinguished that need high-quality lighting:
- table with tools or shelves;
- a viewing hole or other section of the garage where repairs will be carried out;
- the territory of the entire workshop, which requires general lighting.
to contents ↑Important! It is recommended to purchase a small portable lamp for main lighting, which is useful in many situations. It can be used to illuminate hard-to-reach areas or to illuminate the car itself if, for example, you need to climb under the hood.
Basic characteristics
To install lighting in the garage, you must adhere to three parameters, such as power, uniformity and economy. Their implementation contributes to the development and design of lighting.
Power
When installing bright lamps, the surfaces are exposed with the formation of glare on them, as a result - there are problems with vision. On the contrary, if you install too dim lamps, it will be very difficult to carry out repair work efficiently.
Important! Lighting power per square meter must be individually calculated for each room.

Uniformity
It is not enough to hang only one ceiling lamp in the garage. It is necessary to install several local lighting points that will be located above the main working surfaces, such as a table, hood compartment, car perimeter, if necessary, paint work.
Thrift
Basically, there is no natural light in the garage, since there are no windows, so you have to use artificial light regularly. In this case, it is preferable to use economical bulbs or LEDs, which have a low energy consumption.
to contents ↑Types of Lighting
Now we will consider different types of lamps from which you can choose the best option for yourself.
Halogen lamps
Halogen lamps are ideal for supplying light in the garage - the process of functioning is exactly the same as for incandescent lamps, only in this case the bulb is filled with boron vapor.
Important! The use of halogen lamps is characterized by a long service life, a working life of about 4 thousand hours. This kind of lamp is used very often.
Benefits:
- frugality;
- beautiful light;
- long term of operation.
Disadvantages:
- with voltage drops, the functioning process is insufficient, in this case, the additional use of a voltage stabilizer is required.
If you have no problems with stable voltage or you have purchased a stabilizer, then this option is quite suitable for you.
Important! When operating halogen lamps, the following recommendations must be adhered to:
- The product must be placed in a shade.
- It is necessary to additionally purchase a stabilizer, due to which the lamp has protection against power surges.
- You can not touch the lamp with your hands, otherwise it will reduce its resource capabilities.
Fluorescent lamps
Fluorescent lamps are glass bulbs that are filled with an inert gas. The inner surface of such lamps is covered with a special luminescent composition, the so-called phosphor, which under the influence of an arc discharge glows under ultraviolet radiation.
Important! The most preferred models are lamps of the IP65 class, which are protected against moisture and dust, in addition, they operate with low pressure. This kind of lamp can be a good alternative to halogen lamps, but there are some nuances.
Benefits:
- excellent light output;
- long life - much longer than halogen ones;
- good lighting.
Disadvantages:
- power surges should be avoided;
- luminaires can only function in a warm room - if there is a temperature below 5 degrees, then the lamps fail.
Important! If your garage is located in the house or you are constantly working in it, then this option is suitable for you. In all other cases, these lamps have many disadvantages.
Incandescent lamps
Very often incandescent lamps are installed in the garage, which have a low cost. If you do not often have to be indoors, then this option is quite suitable for you as a light source in the garage with your own hands.
Important! Such lamps have extremely low efficiency, as a result of which the bulk of the energy they generate is heat, not light. The remaining amount of light is not able to provide a comfortable state during repair work. In addition, this light has a yellow-red spectrum, which interferes with the repair.
Benefits:
- do not respond to voltage drops;
- have a low cost.
Disadvantages:
- fire hazard;
- consumption of large amounts of electricity;
- possession of poor light output;
- low efficiency;
- short term of operation;
- at the time of burnout, a large number of sparks are formed, which can cause a fire.
LED bulbs
LED lamps are new technology in the modern market, which has only one drawback - this is a high cost.
Benefits:
- high level of light output;
- high energy saving;
- fire safety;
- long term of operation;
- resistance to voltage drops.
Important! Experienced drivers understand that the money spent quickly pays off, since the working life of LED lamps is characterized by 50 thousand hours.
LED lamps are two times more economical than fluorescent lamps, in addition, they have no substances harmful to health. And compared with halogens, the emitted light is more saturated and alive even without the use of shades. That is why the LEDs are ideal for creating DIY lighting in the garage.
to contents ↑Important! LED lamps are ideal for any environment. Fluorescent lights are best used in heated garages, which reduces energy costs. Cold garages are preferable to fill out with halogens. According to safety precautions, rooms with a high level of humidity can only be equipped with portable lamps that operate on low-voltage.
Calculation of the number of bulbs in the garage
Choosing this or that type of lighting, you should adhere to the norms of SNiP. This document has all the requirements related to the manufacture of an optimal lighting system, which does not affect the vision of car owners - too strong or weak light can cause a doctor to go to the doctor.
To independently calculate the lighting, you must use one of the ready-made utilities, for example, the DIALux application. According to the predefined parameters, you can calculate or by a special formula to do everything yourself. The formula looks like this SxP / N, where:
- P corresponds to power density;
- S is the area;
- N displays the number of lamps.
Important! This formula can be used when calculating incandescent lamps, and for halogen lights or LEDs, calculations are carried out according to a different principle.
Knowledgeable drivers use a fairly simple way to determine the power of fixtures. The optimal parameter varies from 16 to 20 watts per square meter of area. To get a more specific value, you need to measure the height of the walls and adjust the calculation result:
- at a height not exceeding 2.5 m, no corrections are necessary;
- if the height corresponds to 3 m or more, the result is multiplied by 1.5.
to contents ↑Important! The interior decoration also plays a large role. To create optimal lighting, you should follow a simple rule: the darker the garage is designed, the more intensity you need to add. To increase efficiency, some advanced craftsmen use retro-reflective material, such as thick foil, to decorate garage walls.
DIY garage lighting
How to make lighting in the garage with your own hands? Since the garage is a technical room, it is necessary to pay special attention to the practicality and safety of the entire system when installing it independently in a lighting workshop. For this, it is necessary to rationally place the fixtures and choose the correct method of wiring.
When laying power supply cables, two methods are used - hidden and open:
- With hidden wiring, the cable is laid inside the walls of the garage. For installation works, grooves are used, which are laid along the perimeter of the wall surface and ceiling. After that, they are covered with a plaster layer.
Important! Concealed wiring is also used in metal rooms when they need to be sheathed with insulation. In this case, between the heat-insulating material sheathed by the facing layer, cables are laid in protective tubes.
- With the open method, the cable is laid along the surface of the walls, while it is located inside a plastic or metal protective tube or corrugated sleeve. With this method, subsequent redecoration of the premises is not required, while the amount of work is small.
Important! It is preferable to install the wiring in a closed way, since with this option, the power wires are protected as much as possible from adverse damage, mechanical stress and a humid environment.
You can light the room without electricity. If the garage does not provide artificial lighting, then you can use the following methods:
- To conduct light in the room from a gasoline generator, while power tools are an additional source of lighting. For this, it is necessary to use a unit with a capacity of 1-2 kW with the presence of air cooling, since water-cooled equipment has large dimensions.
- You can also use a battery device as a power source. When creating autonomous lighting from the battery in the garage, it is rational to use 12-volt LED lamps, which can be connected directly using crocodiles.
to contents ↑Important! The functioning of a single battery charge of 65 a / h corresponds to 5-6 hours of light. The disadvantage of this method is the need for frequent external battery charging.
Planning
When independently laying the lighting in the garage, first of all, you should create a plan for the placement of wiring, switches, sockets and lighting devices that will be located around the perimeter of the room.
To compile a garage lighting scheme, it is recommended that the following requirements be considered:
- Lighting lamps and switches should be connected together in series, while the lamp switch should be located after the outlet installed near it.
- From the distribution panel, wiring should be led out, which is laid in straight lines to the power supply elements, and a right angle is applied at the turning points.
- Between the ceiling and horizontal wires there must be a minimum permissible value corresponding to 10 cm, the distance between the outlets and the floor must correspond to 50 cm. A switch must be installed on the right side of the entrance door at a height of about 150 cm.
- When choosing lighting, it is most rational to install lamps on the ceiling.
- If the room is long, one more lamp can be added on each side of the workshop.
- With local lighting, lighting fixtures are installed on the walls, observing 30-40 cm from the ceiling.
to contents ↑Important! If it is necessary to additionally illuminate the desktop, then the lamp is installed directly above the workplace. It is protected by a box made of metal mesh.
Installation of electrical wiring
After designing a lighting plan, you can begin work on laying wiring. In order to independently lay the wiring in the garage, you need to prepare the following tools and materials in advance:
- insulated pliers;
- drill with a set of drills;
- hammer drill;
- hammer;
- chisel;
- fasteners, which include self-tapping screws, plastic clamps;
- insulation tape;
- indicator screwdriver.
Important! To carry out lighting in the garage, it is more rational to use a cable with copper conductors, for example, a two-core type of PPV or VVG with a section of 2 * 2. With an open version of the wiring, cables with double insulation are used, which are laid inside a corrugated pipe or protective box.
Here is a diagram of how to make lighting in the garage with your own hands:
- We determine and acquire the required cable length, switches, the number of distribution boxes, sockets and the required number for their installation.
- Using a perforator around the perimeter of the garage, we drill landing slots for the subsequent installation of outlets.
- Using the built-in metal legs or using a puttying compound, we install the boxes in the prepared nests.
- We install lighting devices, switches and junction boxes that are responsible for their power supply.
- From the electrical panel or machine according to a pre-designed scheme, we lay the wires.
- With a hidden mounting option with a perforating device in the wall, we make strobes having a depth of 1.5-2 cm, in which we lay cables that are temporarily fixed with nails.
- We unsolder the wires along the junction boxes, bring them to the power sources and connect to the shield.
- Check the operation of the system. With the normal functioning of the wiring, the strobes in the walls are sealed with plaster.
to contents ↑Important! When working with the lighting system, it is mandatory to observe electrical safety equipment. So, at the time of connection it is necessary to use protective rubber gloves. Pliers and screwdrivers must be insulated.
Inspection pit lighting
In any garage, a viewing hole is the most vulnerable spot due to the constantly high level of humidity, therefore, high-quality and protected lighting is necessary.
Important! For inspection pits, it is recommended to use shades that have a protection of at least IP 44.
On the sides of the inspection pit, installation of shades is required. To do this, create small recesses or think through special options for fixtures for fixtures.
Important! During installation, it is desirable to take into account the dimensions of the fixtures, otherwise - if it goes beyond the wall surface, then you can easily damage it.
If there is no desire to mount, then for the garage you can use ordinary portable lamps with which there is no hassle at all. But at the same time you will have to install a special mount for the fixtures.
to contents ↑Wiring Tips
At the design stage of the garage, it is advisable to provide a wiring diagram, which is preferably implemented at the construction stage. If you purchased an already built garage, then for the correct connection of the light in the garage with your own hands, use the following recommendations and tips:
- Use copper cable to lay the light, because it has less resistance compared to aluminum wires, and at the time of heating it does not lose mechanical strength.
- At the entrance to the room on the inner wall, place one outlet, thanks to which, if necessary, you can work in the open space, without using extension cords.
- When connecting general and local lighting devices, it is more advisable to use individual switches.
- When installing lighting in the basement of a garage in which there is high humidity, heated lamps increase the risk of condensation. Therefore, it is preferable to use a step-down transformer using low-voltage lamps having 12 V.
- To illuminate the inspection pit along its perimeter, you must first equip the niches. On the surface of the walls of the pit, fixtures can be installed only inside protective boxes made of metal.
Stock footage
In this article, we have described to you all the principles of DIY lighting in a garage. Take up the arrangement of lighting only if you have experience with wiring and electrical appliances, then everything will be done really competently and safely!
 (No ratings yet)