

DIY furniture remodeling
- Basic principles of restoration of old furniture
- How to prepare furniture for restoration?
- How to restore the old wall?
- How to update an old sideboard using varnish?
- How to transform an old cabinet through staining?
- How to restore furniture using decoupage technique?
- How to convert an old sofa into a bed?
- Stock footage
Soviet-made furniture, in particular chests of drawers, walls and cabinets, does not differ in particular beauty, but it is strong and reliable. It is unlikely that someone will raise a hand to send her to a landfill. And this is the right decision, because such interior items can be updated to give them a completely new, modern look and new sound. Remodeling furniture with your own hands takes very little time and is a simple process. There are many materials that allow you to change cabinet furniture beyond recognition. Today we will tell you how to change the color of furniture, accessories, update its outer coating through film and staining.
to contents ↑Basic principles of restoration of old furniture
The method chosen for restoration depends on what the Soviet sofa, wall, chest of drawers, table or cabinet is made of, the degree of wear of any of these items. Naturally, the easiest way is to use staining or updating through elegant fittings. Yes, it is the fittings that can give the product originality, a certain style, in addition, its choice in the market is huge.
Restoration of old furniture is carried out in the following ways:
- Staining. The use of acrylic paints of various colors allows you to provide any suitable style. In this case, imitation of silvering, gilding, bronze tint is available, giving the furniture the features of Baroque or Rococo.
- Varnishing. Today, varnishes produce a variety of shades that can emphasize and reveal the texture of tree species.
- Decoupage. This technique consists in decorating the surfaces of old furniture with napkins of different colors, which are varnished from above. This method has a lot of possibilities, allows you to express your own attitude to the decor.
- Craquelure. Simply put, this is an artificial aging technique for varnish or paint. Today, this method is incredibly popular. To provide imitation of cracks, use a special varnish for craquelure.
- Sticking wallpaper or a special film. This is a very simple and common way. As a rule, kitchen furniture is restored through the use of multi-colored self-adhesive film with drawings.
- Hanging decorative elements and fittings. This method is used for any furniture restoration technique.
How to prepare furniture for restoration?
Alteration of Soviet furniture with their own hands begins with preparatory work.
Important! Remember that this venture makes sense only if natural wood products are made. Restoring items from particleboard is simply useless, because this material is short-lived and quickly wears out.
Prepare for work:
- Chisel.
- Grinding machine.
- Screwdriver
- Hammer.
- Putty knife.
- Paint brush.
Perform preparatory work according to the scheme:
- First of all, remove the old decor and accessories, clean all surfaces of the furniture from dirt. Remove the old coat of varnish or paint. It is enough to first process the product with a grinding machine or emery cloth, then apply a solvent, for example, aqueous ammonia solution.
- If you find large old cracks, grout them using a special compound. Then sand the treated area thoroughly.
- Primer surface. On any old furniture, regardless of the quality of its surface, cracks and dents form over time, which can quickly disrupt the integrity of the new coating. To eliminate irregularities, it is enough to prime the front part of the product, and then polish it well.
How to restore the old wall?
If the Soviet wall no longer fits into the interior of your house due to scratches, too typical appearance, then you can help altering old furniture with your own hands. Previously, such furniture sets were made in a modest style, they had a discreet decor and color. That is why it is impossible to fit it into a single design style today.
The easiest way to update the wall is through wallpaper or a film of bright color, installation of decorative elements and original fittings. Use a film of three types, namely:
- for doors - creamy shade with a matte surface;
- for glass elements - opaque translucent film;
- Use a chrome film as a border.
You will need to perform several steps according to this instruction:
- Carry out all the necessary sanitary preparatory work, which we wrote about above.
- Treat the prepared surface of the furniture with any detergent, then rinse it with a weak vinegar solution, dry it.
- Cut the film, taking into account a margin of 5-8 mm.
- Spray the surface of the wall from the spray gun to make it easier to apply the film and it does not move.
- Glue the film carefully while smoothing the air bubbles.
- Take a cloth and a hot iron, gently pat the film through it.
- Stick chrome trim stripes.
- Set the fittings and decor elements corresponding to the style of the room where the wall will be.
to contents ↑Important! In a similar way, the restoration of the Soviet wall is carried out by pasting the front part with non-woven or wallpaper. In this case, it is better to use PVA glue for gluing the material.
How to update an old sideboard using varnish?
Now consider how to remake the old sideboard with your own hands, which for some reason has ceased to suit you. When choosing a suitable restoration method, consider the amount of free time, your own preferences and artistic skills. The most affordable and easiest option is varnish. The main thing is to carefully study the procedure and do not ignore the important steps.
Prepare for upgrade:
- Soft cloth.
- Sandpaper.
- Putty knife.
- Paint roller or brush.
- Lacquer.
Perform furniture restoration according to this scheme:
- Take a picture of the assembled sideboard in order to avoid confusion in the future and to easily assemble furniture after all the procedures.
- Disassemble the product, remove all fittings and doors. Thoroughly clean it, wipe the facades with a mild soapy solution, clean the joints with an old toothbrush or toothpick. It is very important that the varnish is evenly laid.
- Assess the condition of the facades. If the coating is still well preserved, then you can proceed to the next step. If mechanical damage is found, then you will have to remove the old layer with a spatula.
Important! You can also use special compounds to remove furniture varnish. Then process all chips and cracks, as we described above.
- Sand the facades with fine sandpaper. Remove all dust.
- Coat the surface with several layers of varnish. Make two to three thin layers to avoid sagging and sagging.
- Collect the sideboard after the varnish has dried, return the updated handles to their places.
- To enhance the update effect, replace the old hardware with a new one.
It's so simple to make new furniture out of old furniture with your own hands without spending a lot of effort and financial resources.
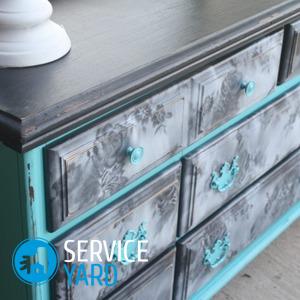
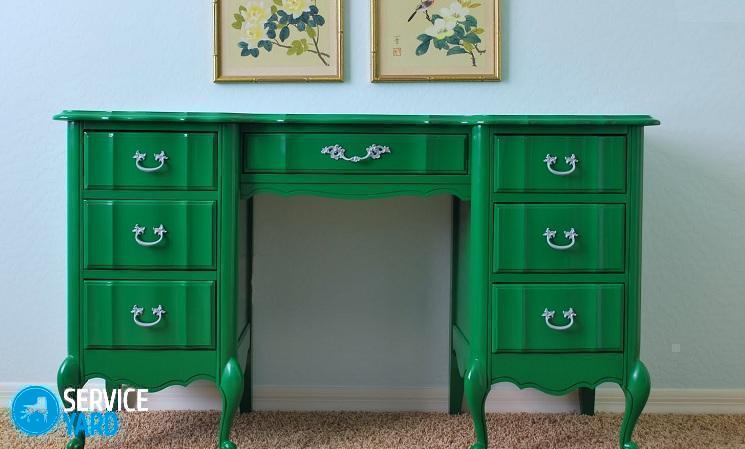
to contents ↑How to transform an old cabinet through staining?
Original coloring allows you to externally update the furniture beyond recognition, while preserving all its inherent charm and shape. Now you will learn how to remake a polished cabinet with your own hands, using a minimal set of tools.
Prepare for alteration:
- Putty knife.
- Wax.
- Sandpaper.
- Paint.
- Paint roller or brush.
- Lace and stencils.
You will need to follow these steps:
- First of all, prepare the cabinet, remove the accessories, disassemble it. These procedures, undoubtedly, slow down the restoration process, but it’s easier to paint the disassembled furniture, in addition, layering of the coating and sagging can be avoided.
- Clean all parts, remove the old coating completely or partially. Then evaluate the general condition of the cabinet, if necessary, process chips, scratches and delaminations.
- Sand the facades with sandpaper, then clean with a soft cloth. Only then can we move on to staining.
- Apply paint in several thin layers. Paint slowly, carefully making sure that no breaks occur. If a defect is immediately found, sand it and coat with a new coat of paint.
- Leave the cabinet to dry completely, return the hardware to its place.
to contents ↑Important! Do not take this method of furniture restoration as primitive and boring, because this technology allows you to get a unique result with a minimum of effort.
How to restore furniture using decoupage technique?
Today there is another interesting technique with which you can remodel your furniture yourself. The ideas recognized as the most successful and popular are based on the use of decoupage. This update option allows you to transform interior items, retaining their full shape.
Important! The main advantage of this method is complete freedom of action, the manifestation of creative abilities in order to decorate furniture sets to your taste. You can use for remaking special materials that are sold in stores or common analogues.
Prepare for work:
- Materials and tools for repainting.
- Napkins for decoupage or ordinary paper napkins.
- Decoupage glue or PVA glue.
- Furniture lacquer.
- Tassels.
Perform furniture restoration using these instructions:
- Prepare the furniture for work. You can completely repaint it or varnish it. An old coating can be left if it matches the basic concept of decoration. After preparation, you can begin to apply a drawing or ornament.
- Special wipes do not need to be pre-prepared, just follow the manufacturer's recommendations. If you use ordinary napkins, first divide them into layers, because you will need only the top layer with a picture.
- Lubricate the napkins with glue, gently stick them on the surface of the furniture. Do this in a horizontal position to make it more convenient. Lay the napkins on the surface of the facade, then apply glue to them with a brush. Straighten any creases and bumps right away. Leave the finished work for 6-8 hours to dry.
- Coat the finished drawing with a thin layer of varnish.
You see, what can be done from old furniture. Such home decoration is guaranteed to decorate your home, make it more modern and stylish.
to contents ↑How to convert an old sofa into a bed?
To ensure a full sleep, there must necessarily be such elements of furniture as legs, a base for a mattress, a headboard, a foot, a soft part. In this workshop, you will learn what you can do with an old sofa.
Important! Getting started, first of all, make sure that the soft, foam or spring part of the furniture is preserved, because they will be used as a mattress.Small surviving fragments can be used for decoration. Plywood and wood elements are useful for equipment frame, head and foot.
After disassembling the sofa, assessing its condition, make a list of the necessary materials that you need to buy. These include the following positions:
- Plywood or boards with a thickness of 1.5-2 cm for the frame, headboard lining, footboard.
- For the manufacture of plywood slats or boards with a thickness of 6 mm.
- For legs and the manufacture of supports under the mattress, a 4 by 4 beam.
- Foam rubber 3-5 cm thick.
- Textile or leather substitute for decoration.
- Joiner's or universal glue.
Also, for work, you may need:
- A circular saw.
- Pencil.
- Hammer.
- Scissors.
- Electric jigsaw.
- Screwdriver.
- Drill.
- Conductor.
- Furniture stapler.
- Clamps.
- Sandpaper.
- Screwdriver.
- Screws.
- Decorative nails.
You can perform the transformation of the old sofa into a bed according to this instruction:
- Remove the railing. Lay out the berth completely, check its stability and integrity by pressing on the outer corners of the furniture.
- Mark where you will install the extra legs. Use a tape measure to measure the desired size.
- Cut 2 or 4 additional legs from the timber. Sand them with sandpaper. Use screws and glue to attach the supports to the strongest points in the structure.
- Measure the length of the frame from the outside. According to these measurements, cut planks 30 cm wide from plywood or boards.
- On the outside of the base, mount the outer panels with glue and screws.
- Cut long strips from leatherette so that they are 5-7 cm wider than the outer panels. Cut the same strips from thin foam rubber, only they should be 2 cm wider than the boards.
- Use glue to attach the foam to the outer panels. Decorate it with a faux leather top. First attach the material on the back of the bottom of the panel, then pull it a little, fix with brackets in the upper part.
- Getting to the head. From plywood, cut a rectangle or part of any other shape.
- Attach thick foam to the plywood with carpentry tape.
- Cut a piece from the leatherette so that on the sides and in the upper part it is 4-5 cm larger than the parameters of plywood cut for the head.
- Attach decorative material to the back of the head with a furniture stapler.
- Use decorative nails to mark the attachment points.
- Using a rubber or fabric layer, hammer the nails at the designated points so as not to damage their heads.
- Attach the headboard of the berth to the body with the drill screws.
- Lay a new mattress on the base.
Stock footage
Now you know for sure how to make a new bed out of the old sofa, how to update cabinet furniture. Thus, you will not only save the old furniture, but also radically transform the interior of your bedroom and any other room!
- How to choose a vacuum cleaner taking into account the characteristics of the house and coatings?
- What to look for when choosing a water delivery
- How to quickly create comfort at home - tips for housewives
- How to choose the perfect TV - useful tips
- What to look for when choosing blinds
- What should be running shoes?
- What useful things can you buy in a hardware store
- Iphone 11 pro max review
- Than iPhone is better than Android smartphones
 (No ratings yet)