

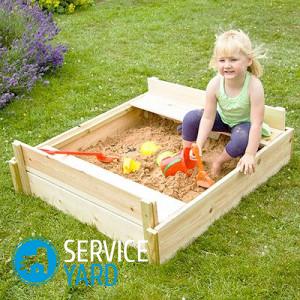
DIY sandbox with a lid
Games in the sand - this is an indispensable attribute of childhood happiness in the summer. And if, as a rule, there is no shortage of sandboxes in the courtyard areas in the city, then in the garden plots the child may be bored without the usual entertainment. If your child is growing up, it's time to start creating a sandbox in the country house. In this article, we will talk about the construction of such a convenient thing as a do-it-yourself sandbox with a lid.
to contents ↑Design features of the sandbox with a cover
Starting construction, it is necessary to think over the main details in advance, starting with the size:
- The sandbox should be roomy and deep enough so that a one-and-a-half-year-old child can get into it without problems, but so that a five-year-old baby is not crowded there. For this purpose, dimensions of 1.5 by 1.5 m are appropriate - such a sandbox will not take up much space, in it you can conveniently place 3-4 children.
- Calculate the height of the structure so that the sand layer is at least 15 cm.
- Also, do not forget to leave a space for seating above. With the width of the board 12 cm, you can make a sandbox into two boards, that is, its height will be 24 cm. This will be enough for the child to not only sculpt the Easter cakes on his "construction site", but also build sandcastles.

But does the construction need a cover? For those who care about children's health and love order, the answer is obvious, because the cover protects the sand from:
- Too wet during rain.
- Spreading throughout.
- The attacks of cats and dogs make a toilet there.
- Contact with leaves, twigs, rotten fruit and other debris.
The simplest lid for the sandbox is a board shot down from the boards, with which the sandbox closes after the game. It is not difficult to make it, however, such a cover is very bulky and heavy, it takes place on the site and it is very difficult to move it from place to place. Therefore, it is better to opt for a transformer lid: its production will take more time, but the result will pay off. By building a lid that, when opened, will turn into a bench or table, you will appreciate both the child and adults who will certainly want to join.
to contents ↑Where to begin?
First you need to stock up on tools and materials, without which you can not do without building your own sandbox with a lid. From building materials you will need the following:
- Boards: for a frame of 1.5 by 1.5 m you need 2 pieces in size 32 by 120 by 6000 mm. For cover 2 boards measuring 20 by 120 by 6000 mm.
- Bar for fastening the body and back of the lid: 2 pieces 50 by 15 by 1000 mm.
- Agrofibre for lining the bottom: 1600 x 1600 mm.
- Door hinges 6-8 pieces.
Important! To obtain a more reliable structure, it is better to use wicket loops.
- Staples.
- Self-tapping screws.
- Paint, stain, wood impregnation.
Also in the work you will need the following tools:
- Jigsaw (saw).
- Screwdriver.
- Stapler.
- Grinding tool (sandpaper, grinder + grinding wheel, plane).
- Roulette.
Walkthrough for building a sandbox
In order to build a children's sandbox with a lid with your own hands, you need to adhere to the following sequence of actions:
- Start with the construction of the frame, sawing the boards into the segments we need. For a standard length (6 m), divide each board into four equal sections.This way you ensure zero-waste production.
- Thoroughly plan and sand the boards so that you end up with a smooth surface.
Important! In order for the sandbox to last as long as possible, it is advisable to treat the boards with a special solution from decay and fungus. An antiseptic will protect the product from pests and extend the life of the sandbox.
- Assemble a two-tier case of eight boards and fasten the boards in the corners with a beam. Carefully drive the hats of the screws (screws, nails) so that they do not protrude beyond the surface of the timber and board.
Important! Between the boards it is advisable to glue a strip of self-adhesive sealant - so the sand will not wake up in the gap.
- Having measured the resulting frame with maximum accuracy, you can begin to manufacture a transformer cover. On one side of the sandbox you can make a bench, and on the other - a table, or you can place two benches opposite each other. Let's look at the first option.
- Attach the first board to the sandbox using self-tapping screws, and the second to the first with two door hinges. So you can adjust the size of the table, if necessary, make it wider.
- For a bench, you will need six boards of the same size, two of which will go to the back, two to the seat, and two to be attached to the frame.
- Screw the hinges to the outside of the lid so that the inner slats bend as they open. To fix and fasten the backrest, use a sanded beam. Its length must be calculated so that when the lid is opened, it can provide a stable stop for the back.
Important! With the active use of the design of self-tapping screws may not be enough for reliable fastening of loops. With frequent closing / opening, they begin to fall out quickly enough, therefore, for greater reliability, it is advisable to use bolts for fixing.
- To prevent the child from digging the earth too deep, make a bottom for the sandbox. It will not allow sand to penetrate not only the earth, but also unwanted plants and insects. For the bottom, you can use agrofibre, which has a high moisture permeability, which eliminates stagnation of water in the sandbox. Just pull the agrofibre along the bottom of the structure and secure it with brackets around the perimeter.
to contents ↑Important! Before installation, it is advisable to treat the wood with wood stain, as well as paint the finished structure with paint.
Installation and care:
- Choose a suitable place in the homestead.
Important! Do not place the sandbox in an open area to avoid sunburn and overheating while playing in the sand. It is better to install the product in partial shade - from a bush, fence or home. It is necessary to make sure in advance that at noon the place for the sandbox is protected from the scorching sun.
- At a site of your choice, dig an even pit with a depth of about 3-5 cm - a little more than the area of the sandbox structure so that it fits easily into it. Around you can make a gravel dump.
- If you want your sandbox to stand up thoroughly, it is better to use a longer beam for the box - this way, peculiar legs are formed at the corners of the structure, which can then be dug into the ground.
- Choosing between river, quarry and sea sand to fill the sandbox, we recommend that you choose the first one. It is clean, does not contain salts and impurities, but when rashing it is better to sift it so that it does not have pebbles, and it becomes soft, gentle, pleasant to work with.
to contents ↑Important! To make the “construction site” more comfortable for children, bring a path to it and surround it with lawn grass.
Stock footage
So the children's sandbox with a lid is ready, and you can run small builders into it to test the object. It remains only to fill it with bright shoulder blades, buckets and molds as the final touches. The design made according to this scheme is simply obliged to serve for many years.
- How to choose a vacuum cleaner taking into account the characteristics of the house and coatings?
- What to look for when choosing a water delivery
- How to quickly create comfort at home - tips for housewives
- How to choose the perfect TV - useful tips
- What to look for when choosing blinds
- What should be running shoes?
- What useful things can you buy in a hardware store
- Iphone 11 pro max review
- Than iPhone is better than Android smartphones
 (No ratings yet)