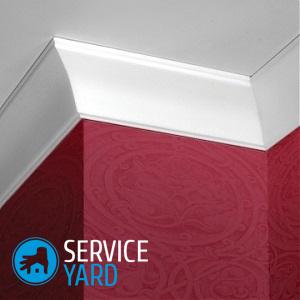
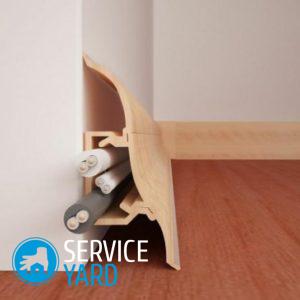
Skirting board with cable channel
More recently, apartment owners had to hide cables and wires in the walls from their eyes. Moreover, it took a lot of effort to qualitatively grind the surface, and then carefully close it. Those who were too lazy to do such things simply left the wires open. This clearly spoiled the appearance of any renovated premises. Now this problem has been solved with the help of such a simple device as a skirting board with a cable channel. It can be found in any hardware store. We will find out right now how to make the right choice and mount this device.
to contents ↑Obvious benefits
A simple but necessary device is now available in almost all apartments. No matter how many new devices appear in the room, all wiring can be easily hidden in it. Moreover, the installation of skirting boards with a cable channel is possible not only for a finisher with great experience, but also for each of you.
Other advantages of this building material are obvious:
- No special flooring requirements are required to install these moldings.
- Mounting skirting boards with a cable channel is reliable and simple.
- If you need to add another wire to the existing ones, then this is pretty easy. Open the baseboard, add the cable, re-fix the fasteners that do not lose their properties.
- These materials are very flexible. And even if your floor is uneven, then the skirting will smooth out this defect a little. And if the molding is additionally equipped with a rubber gasket, then the fit to the floor will be quite tight.
- Now manufacturers can offer you any color that is needed. A wide range of colors allows you to choose any shade for your interior.
- Such materials do not require special care. They are easy to wash and clean.
- Another plus - they are resistant to direct sunlight, will not fade and lose their color.
- Well, and perhaps the last but not least advantage is the price. Buying a plastic baseboard with a cable channel will be affordable for everyone.
to contents ↑Important! Performing the final touches in the repair, do not forget about the decor of the joints between the wall and the ceiling. Here our articles will help you:
Materials
Today, any hardware store will be able to offer you several types of skirting boards with cable channels. We will list the most popular.
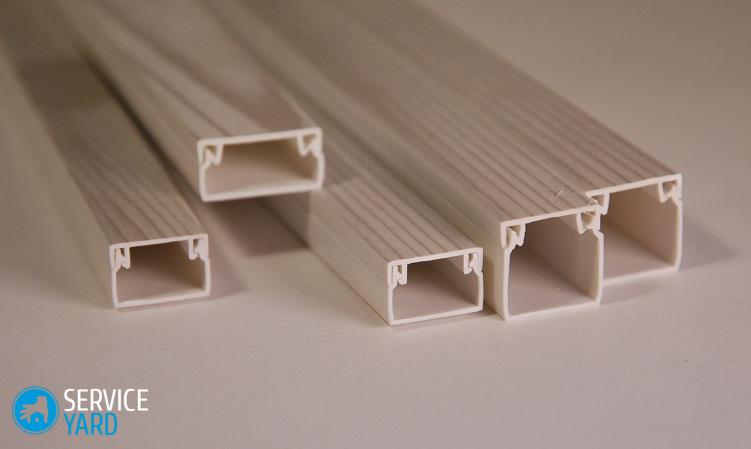
PVC baseboard
This skirting board, like any polymer elements, is in special demand. And explaining this is quite simple. PVC molding - reliable and durable, it protects the contents of the plinth from damage. Moreover, under such a housing, wires and cables are not afraid of either mechanical damage or moisture.
Important! Externally, such an element - with a glossy surface and a varied texture, is also an original way of decorative decoration of the joints of the floor and walls.
Baseboard MDF
When thinking about buying a skirting board from MDF, keep in mind that the cost of it will be higher than the previous option. This type of panel is made from pressed pulp, and this is a more expensive material. This skirting board is nothing more than a corner that closes the junction of the wall and floor.
On the upper part there may be a pattern or some kind of texture, on the bottom - protection in the form of a melamine film.
Important! There is no cable channel as such, the wires are laid under the bar or simply on the floor, or using special fasteners.
Skirting board
A skirting board with a cable channel made of natural wood looks more elegant, but is less common. More often it is made to order, for a lot of money. And there is a simple explanation for this:
- The cable channel is created by milling the finished product, which is quite difficult to do, because you need to observe a perfectly flat line throughout the entire baseboard.
- Another minus is that you can’t put anything here except for a television or Internet cable according to the rules of fire safety. This is because the content will be in direct contact with the tree.
Aluminum baseboard
This kind of skirting board with a cable channel perfectly copes with all its functions. Yes, it doesn’t look as beautiful as a wooden or plastic molding. But in terms of fire safety, he is a leader.
to contents ↑Important! Not all wiring can be hidden under the baseboard. Therefore, to create a harmonious and aesthetic interior, as well as for the safety of all members of your family, also use the following ideas:
Skirting board types
Between themselves, such decorative elements of the interior differ not only in the material, but also in the location of the cable channel itself:
- The most common option for everyone is a skirting board with a hidden cable channel, which is located in the center. 3-4 wires are quietly placed in it. Ideal for TV or Internet cable. Their design can be supplemented with special accessories to output the connector in the right place. We identified several such points, and brought out the cable where there is a TV or lamp.
- The second type of skirting board with cable channel is worth choosing if you need to hide a large number of wires in it. Especially for them, special dividers are made on the mounting rail of the molding.
- The third - the most complex form - skirting cable channels. This is a kind of plastic case, in the inner cavities of which wires with a huge amount are laid. Manufacturers produce a number of additional devices that allow you to assemble a design of any shape. These are external and internal corners, various shapes of bends, plugs, mounting and multimodular boxes on which you can install switches and sockets.
to contents ↑Important! There is also the option of installing outlets right at the baseboard level. For older people, this option is not the best, and for young people, low inclines are not a problem. But not so attracted attention.
Training
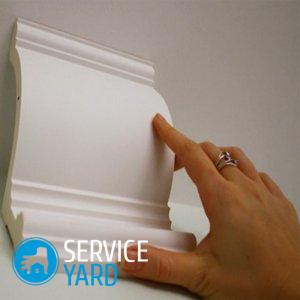
When purchasing a skirting board with a cable channel, remember that it consists of two parts:
- The main strip in which the channel for laying the cable is located. It is also a fastener for the entire baseboard.
- The upper part, which plays a decorative role.
Important! The technology for fixing skirting boards with a cable channel of any materials is exactly the same. It is possible to carry out installation as soon as possible without resorting to the help of specialists. It is important to follow all stages of work and take into account the material from which your walls are made, in order to choose the right tools and achieve the optimal result.
Material calculation
To begin with, it is worth measuring the length of the walls in your room around the perimeter:
- Do not forget to subtract the width of the doorways from this value.
- Then apply the following formula. We add 10 percent to the resulting value - this, as experienced experts have calculated, will leave for pruning and marriage.
Important! Before you go shopping at the store, be sure to calculate the external and internal angles. You will need special plugs for them.
Mounting method
Installation of plastic skirting boards with a cable channel is not to the floor, but to the wall. And the fixing method in this case will depend on what surface you are working with:
- Concrete or brick walls require special attention. Here you can not do without dowels, plugs and punch.
Important! It’s better to choose a tool with a stroke function - this will save your time.
- For wooden surfaces, experts recommend using the most common screws.
- If you have to work with a wall made of drywall, it is better to use special screws with plugs. Or purchase special fasteners that greatly facilitate the installation of skirting boards.
- The easiest option is “liquid nails” or glue. Only in this case, keep in mind that your walls should be perfectly even. If there are defects on them, then the molding may simply not stick, not cling to the surface, or stick with bumps and crevices.

Surface alignment
Before proceeding with the installation of plastic skirting boards with a cable channel, it is worth checking how smooth your walls are. So you get rid of cracks that may occur during operation. In addition, save yourself from frequent drilling:
- To begin, we place the plinth in place - to the junction between the floor and the wall.
- We look where cracks appear, mark these places.
- It is in these places during installation that you need to make additional fastenings so that the baseboard fits snugly against the wall. This will prevent gaps.
Important! If after the “fitting” of the molding it turned out that there are no lags of the baseboard from the wall, then you are in luck - there is less work. Then place the panel mounts at a distance of half a meter from each other.
Skirting Cutting
Before attaching plastic skirting boards with a cable channel, you will need to cut it:
- Take the length of your walls into account, not forgetting the size and size of the connecting and corner plugs. Otherwise, you risk cutting too small strips and spoiling the material.
- Do not try to cut the connected baseboard and cable channel. Better put them together, make tags and cut them separately.
Mounting
The golden rule - the installation of skirting boards with a cable channel starts from the farthest corner of the room and with the longest wall. Listen to the advice of experienced professionals, do not make exceptions:
- If you start with the shortest wall, then in the end - you may not have enough material for the longest and will have to make an ugly joint exactly in the middle or run to the store.
- By closing the longest wall first, you can more efficiently use the available material. Scraps will come in handy for mounting short walls or for recesses.
Important! All work associated with the installation is carried out on a previously disconnected baseboard. Mounts are installed only on the lower part of the molding. You can install the upper part using the latches only after all installation work in the room is completed.
Drilling places for fasteners
To correctly install the skirting board with the cable channel, you must step by step follow the following instructions:
- Press the lower bar to the floor. Then make the first hole with a punch. Do not make it too deep, exactly the size of your cork.
- Then set the bar aside. Insert the pre-prepared cork into the resulting hole.
- Again, pick up the bottom of the baseboard, attach it to the floor and screw in the screw.
- Make the following holes already with the strip laid on the floor, at a distance of 30-40 cm from each other.
- Constantly align your panel by pulling it against the wall. This will be very important if your walls are not completely smooth.
- Then attach the bar with self-tapping screws along the entire length.
Important! If necessary, in some places you can either tighten or loosen the mount so that the baseboard is more even.
- Now that the installation of the bottom of the baseboard around the perimeter is complete, pick up the top and attach it to the already installed base. This must be done carefully, without much effort, otherwise - you can break the latches.
- Having screwed the back, lay the wire and fix it.
- If the wires do not fit in the cable channel or you want to arrange them in a certain order, then it is allowed to use double-sided tape for fixing.
Important! After - you just have to put the end caps. So that they do not fly off, which often happens during operation, you can put them on a transparent sealant or glue.
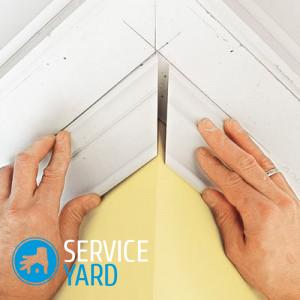
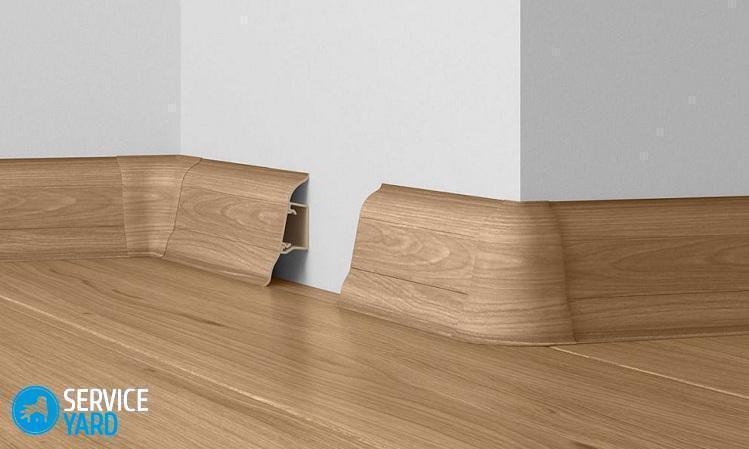
Angles
If the wall has internal corners, it is necessary to dock with the longitudinal skirting boards using special elements:
- The bar is applied to the adjacent wall and is joined with the persistent bar of the inner corner.
- One side of the “inner corner” must be inserted into the end of the baseboard, and the other side pressed down with the baseboard from the other wall.
If, when mounting baseboards with a cable channel, a transition to the outer part from the inner corner is required, then do this as follows:
- On the front side of the external and internal connections, the position of the internal stop is marked.
- Both elements are applied to each other, the approximate distance between the mark is determined.
- According to the intended dimensions, a part of the bar with the cable channel is cut, adding 2-3 mm on both sides to possible gaps. It will be a frame on which other parts will be fixed.
- After that, the inner and outer elements are installed on the cut part.
There are also situations when you need to connect the outer corners:
- Both skirting boards are trimmed so that 3 mm is not enough to the end connection.
- Then, an adjacent plank is attached to the wall as described above.
- Next, a cable is laid in the channel, fixed, a decorative part is applied.
- An angular connection is inserted into one side of the baseboard, and the other is inserted into the groove. After that, the bar snaps along its entire length.
to contents ↑Important! When installing plastic skirting boards with a cable channel at the corners, the main thing is to correctly calculate not only the number of strips, but also the connecting elements.
Stock footage
Now you have familiarized yourself with the technique of how to fix plastic skirting boards with a cable channel. If at least a little familiar with the construction work, then the installation of the molding will not cause much trouble. Carrying out the installation, it is enough to simply monitor the coincidence of sizes and the correct selection of corner overlays. But you can enjoy the result of your work, because the wires will be hidden and protected from damage.
 (No ratings yet)