

DIY do-it-yourself napkin crafts
DIY do-it-yourself napkin crafts - This is not only a wonderful way to have a good time, but also the opportunity to originally design a room for a particular holiday. And if you will do them together with children, then teach them to create beautiful things on their own. In addition, such creativity helps to relax, relieve nervous tension and calm down. Many child psychologists and teachers believe that the manufacture of handicrafts from napkins is an excellent tool for the development of perseverance and motor skills. Let’s look at a few options what can be done from napkins.
to contents ↑Napkin flower
A wonderful decoration of the festive table will be a beautiful lotus made do-it-yourself napkins. This flower can be not only an ornament, but also a napkin holder.
To make such a decoration, you need the following:
- Red napkins - 40 pieces.
- Red napkins - 4 pieces.
- Thin wire - 10 cm.
Production Sequence:
- To get started, make blanks. Take a green napkin and open it so that only one addition remains. Fold the resulting rectangle along and open again.
- You should get a rectangle with a fold in the middle. Bend the corners of all four sides to the center.
- The sides also bend toward the center, and again in half. Thus, you should get a narrow rectangle with corners on the sides.
- With the rest of the green napkins, do the same.
- Take the red napkin and, without opening it, fold it in half so that you get a triangle.
- Put it with the top away from you, fold the side corners to the center with the sides. And bend the corners below, from the back. Follow the same steps with all other red napkins.
- Start forming the base of the lotus. Take the green napkins and fold them together. Now, to outline the middle, add their total mass in half, but not pushing too much on the bend - we need it only for reference.
- Now in the center, fix the napkins with wire and put them on the table with the long side of the corners up - these will be the leaves of the flower. Spread them so that they lie in a circle evenly.
- Start collecting petals. Take the red napkin, fold it in half with the bent corners inward. Insert the resulting triangle into the green leaves of the water lily, and straighten the upper part so that a volumetric petal is obtained - it will be easier to insert the subsequent ones from above.
Important! Insert the corners of the petal so that one is in one sheet and the other in the other. So the composition will stay better and there will be no gaps. So do the first row.
- Follow the next four rows in the same way. You should get a beautiful and magnificent lotus.
Sweet heart
DIY paper napkin craft in the form of a heart you can make with a child. This will provide an opportunity to develop in the kid patience, perseverance, imagination and accuracy.
For work you will need:
- White and pink napkins.
- Red cardboard.
- Scissors.
- A simple pencil.
- PVA glue.
- A palm cut in advance of paper.
Sequencing: 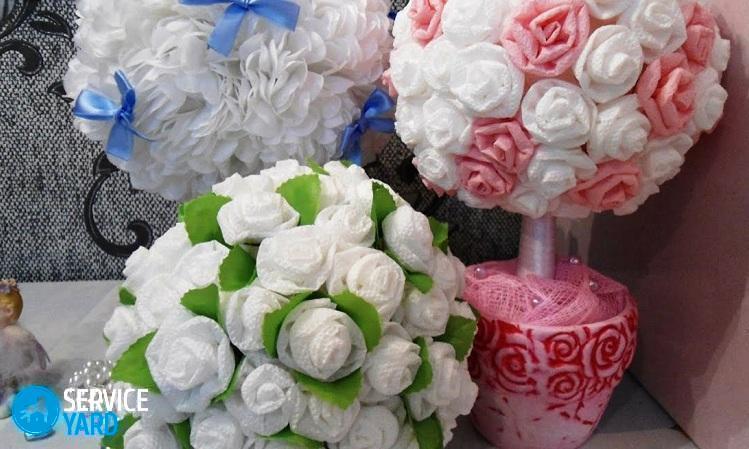
- In order to carefully cut out a heart from cardboard, use a template, or draw it yourself. On the back, circle a palm of paper.
- Take a few napkins and cut them into 4 strips, and then each strip into 3 more pieces. As a result, you should get small pink and white squares - make lumps out of them.
- Now proceed to the formation of the composition itself. From lumps of white color, make a palm, filling them with its inner region - for these purposes, use PVA. By the same principle, fill all the remaining space on the heart with pink lumps.
Important! The lumps should fit tightly to each other so that there are no gaps.
- If you want to hang the craft on the wall, then attach a loop of silk or satin ribbon on the back side.
Charming roses
Various flowers can be made of napkins. In this master class we will tell you how to make a beautiful rose. This craft can serve as a pleasant gift or an interesting decoration for any room.
To work, you will need the following:
- Red napkins.
- Green corrugated paper.
- Scotch.
- Pencil.
- Scissors.
- Skewers.
Production Sequence:
- Take a napkin and cut its sides so that you get separate squares.
- Put the square on the table, roll it into a tube with a pencil, but not until the end, but so that there is a free part of 2 cm.
- Collect the formed roller on the pencil from the edges to the center and remove from the pencil. Thus, you will get a fixed petal with a corrugated roller. So make about 7 petals.
- Now begin to form the bud by folding the petals with a spiral and laying several layers on top of each other.
- Insert a skewer into the bottom of the flower and secure with tape.
- Cut the top piece about 1 cm wide from a roll of corrugated paper - you get a ribbon. Wrap this ribbon on a skewer, including closing and scotch tape.
- Secure the tip with tape too. So you should get a beautiful and original rose.
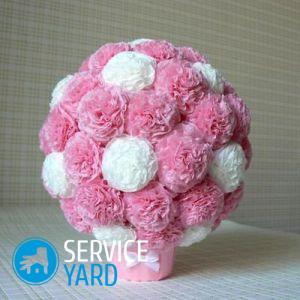
Topiary
To decorate the interior of the room, a topiary of napkins will be a very interesting option.
To make a VA you need the following:
- Multi-colored napkins.
- Stapler.
- Newspaper.
- Scissors.
- Glue.
- Cache-pot.
Production Sequence:
- Take a napkin and fold it 4 times, and then fasten it in the middle with a stapler. Now cut a circle from a napkin, start to form a flower.
Important! Please note that you should bend each of the layers of the napkin separately, otherwise you will not succeed in creating a beautiful flower.
- Make a lot of such flowers. They can be made from different colors, or from one - as you like best.
- After the decorative elements are ready, proceed to the formation of the base. To do this, take a newspaper, crush it as tightly as possible, so that the result is a ball, tie it up with the help of threads. Try it on the pots.
Important! It is necessary that it is not too small or too large, otherwise - your composition will look ugly.
- Tape the resulting ball with napkins - this is necessary so that the flowers hold on it better.
- When the glue is completely dry, you can begin to glue the ball with pre-prepared flowers.
Important! You can glue the ball in compliance with a certain order, creating a pattern or randomly - everything will depend on your imagination.
- Decorate the flowerpot in which the composition will stand with ribbons or bows - so the topiary will look even better.
Stock footage
Creating original DIY do-it-yourself paper towel crafts You will have a great time. And attracting children to this occupation, you can develop their imagination and creative abilities.
- How to choose a vacuum cleaner taking into account the characteristics of the house and coatings?
- What to look for when choosing a water delivery
- How to quickly create comfort at home - tips for housewives
- How to choose the perfect TV - useful tips
- What to look for when choosing blinds
- What should be running shoes?
- What useful things can you buy in a hardware store
- Iphone 11 pro max review
- Than iPhone is better than Android smartphones
 (No ratings yet)