

DIY crafts for the kitchen
DIY crafts for the kitchen - This is a popular trend in decor today. And many housewives, inspired by the objects of exhibitions and fairs of handicrafts, are in a hurry to repeat them with their own hands. Such things are a new way in needlework, and thanks to the modern Internet, the scope of the possible is expanding significantly. Thousands of different ideas will help create beautiful and original things that will give your kitchen a special atmosphere.
to contents ↑Decorative fabric birds
A funny chicken can become a symbol of the hearth and cosiness. For novice needlewomen, pendants will be the best option for decorating a window or a kitchen furniture handle. In addition, such a chicken can be a gift for someone close.
To make a bird you need the following:
- Several shreds of fabric in different colors.
- Threads for sewing.
- Woolen colored threads / floss.
- Template for pattern.
- Needle.
- Ruler.
Manufacturing process of this DIY crafts for the kitchen pretty simple:
- To get started, make a template close to the geometric shape. Make the bottom of the bird flat, outlining with a ruler - the double length of the bird is approximately 20 cm.
Important! Two symmetrical bodies (left and right side) should leave from this part. It should turn out so that then a piece of fabric cut out according to this template folds in half.
- In the middle there should be a tail area - sew there the collected thread to the floss. For scallop, red threads are suitable.
- From the other (contrasting) fabric, cut the wings and sew them on the sides.
Important! Wings can be trimmed with braid or some other decorative element.
- Sew a beak - for this, use a small piece of dense light fabric.
- Fill the bird with cotton or soft toy filler so that it becomes voluminous and sew the bottom.
- On the back of the chicken, make a pendant for more convenient placement in the kitchen.
Kitchen pot holder
Some textile accessories that are useful in every kitchen can be easily made independently. Such DIY handmade fabric for the kitchen, like a tack, is a very important thing.
To work, you will need the following:
- Shreds of multi-colored fabric: 2 for the inside, 2 for the outside, and 2 trim of the soft lining material.
Important! All of them must have dimensions of at least 20 by 35 cm.
- Fabric strip for finishing the bottom of the glove: 45 by 8 cm.
- Ironing board and iron.
- Pins
- Sewing machine.
- Needle with threads.
- Scissors.
Production Sequence:
- Prepare rectangular patterns and stack them one on top of the other in the following order: inner pattern, lining, outer pattern.
Important! Do not forget that after you sew the edges, the mitten will be twisted. This is only the first rug of the mitten, so you need to make the same blank for the second half, and then iron them with an iron.
- Staple all the layers with the pins in the center. Sew these layers on a typewriter in both directions to make squares. Do the same with the other side.
- To cut the mitten, use the finished template or your own hand, not forgetting to leave space for the stitch.
- Make the second half of the mitten, attaching the first finished half to the pattern.
- Sew both halves by sewing them around the edge. Then turn to the front side and iron with an iron.
- Prepare a fabric strip to trim the edge. Fold it four times.
- Using pins, secure the strip along the edge of the mitten.
- Using a sewing machine, sew a fabric strip to the edge of the mittens.
to contents ↑Important! To make it convenient to hang the tack on the hook, you can sew a loop on it.
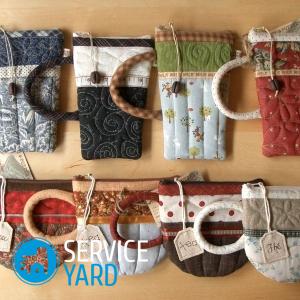
Cutlery Pockets
It is not necessary to store cutlery in a drawer or special stand. They can be placed in the original pockets, which will also act as design details.
To create such DIY crafts for the kitchen You will need the following:
- Shreds of fabric of one or several types, the sizes of which will depend on the size of the planks.
- Thin wooden planks.
- Stapler for wood.
- Ribbon for decoration.
- Sewing machine.
- Glue.
- Scissors.
Production Sequence:
- Cut out a pattern from the fabric, leaving it slightly with the edge for mounting on the board.
Important! Sew the edge that will be on top with a sewing machine.
- Attach the fabric to the plank with a stapler on three sides, bending the edges.
- Walk over the edges again with a stapler.
- To hide staples, glue a strip of matching-colored tape on top.
to contents ↑Important! If you make three such accessories, then the spoons, forks and knives in them can be stored separately.
Pillows for stools
Stools and small chairs in the kitchen take on a completely different look if you make soft seats for them. Such DIY crafts for the kitchen from improvised materials will be an excellent decoration of the kitchen, as well as make stools and chairs much more convenient.
To make it, you will need the following:
- A piece of large size thick felt.
- Scissors.
- Glue.
Production Sequence:
- Cut long strips of felt, the width of which will depend on what thickness you want to get the seats (on average about 2 cm).
- Start twisting a strip of felt into a tight roll, while lubricating the inside with glue.
- When the strip ends, take the next one, cutting the edge obliquely.
- So twist the strips until then, until you get a round saddle of the required diameter.
to contents ↑Important! You can combine felt of different colors, and at the end decorate the seat with interesting applications from the same material.
Fridge magnet
Fridge magnets can be purchased while traveling, but it’s much more interesting to do them yourself. Such a thing will become a real decoration of any kitchen. It is quite simple to make a magnet using a piece of plywood by placing a small photograph in the center.
To work, you will need the following:
- A small piece of board or plywood.
- Varnish for wood.
- The photo.
- Brush
- Glue.
- Flat magnet.
- Sandpaper.
Sequencing:
- Prepare a piece of wood or small plywood by sanding it.
- Use glue to fix the photo in the center.
- Top the craft with varnish for wood, leave to dry.
- When the varnish is completely dry, glue a flat magnet on its back.
Stock footage
As you can see, ideas for creating DIY crafts for the kitchen from improvised materials quite a bit of. We presented only a few, but using your imagination, you can create real masterpieces that will give your kitchen a special mood.
- How to choose a vacuum cleaner taking into account the characteristics of the house and coatings?
- What to look for when choosing a water delivery
- How to quickly create comfort at home - tips for housewives
- How to choose the perfect TV - useful tips
- What to look for when choosing blinds
- What should be running shoes?
- What useful things can you buy in a hardware store
- Iphone 11 pro max review
- Than iPhone is better than Android smartphones
 (No ratings yet)