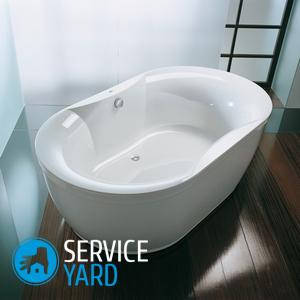
Acrylic bathtub painting
Replacing an old bath is considered quite expensive. Judging by the total costs, then, of course, it is more economical and more reasonable to combine this process with the repair of the entire bathroom. But it often happens that a bath needs to be replaced urgently, but there is no money for it. For example, all the money went to buy a good apartment or a child appeared in the house. In such situations, the only way out is to independently paint the bath with acrylic or enamel. In this article we will tell you how to perform restoration on your own, what means to use for this, what rules to follow.
to contents ↑What is necessary for coloring the bath?
Painting the bath with enamel or acrylic is a difficult business, as we have found out, but financially quite profitable. Let's determine what you need to work:
- Skills and knowledge. Of course, in order to paint with your own hands, you need painting skills and knowledge of basic safety techniques when working with aggressive volatile substances. If you painted such things before, then you will not have any problems with painting. The main thing is to stock up on tools, protective equipment, and special accessories. You will also need skills in plumbing.
- Protective equipment. The most basic remedy is the season of the year. You can paint the bath only with the windows fully open, so it’s best to send your household somewhere for a week. Also, you can not do without a respirator with a special cartridge for the absorption of organics. The ideal option is a gas mask. You will also need an oilcloth or rubberized apron and gloves. In principle, you can use household latex two-layer gloves, at least three sets.
- Tools, supplies, accessories. Be sure to stock up with bristles made of natural bristles, a grinding nozzle for a drill. Tweezers and a paint knife will be needed in order to carefully remove the bristles that have come out of the brush without touching it with your hands. Of the consumables, you will need a solvent or acetone, rags that do not leave lint. You can use the old flannel or calico.
What is better to paint the bath?
What to paint the bath with your own hands - you won’t have to choose for a long time, since there are only two options.
Types of coatings:
- Epoxy Enamel. Use this tool for a long time, more than 20 years. If you properly prepare the product, observe the application technology, then the coating will last for several decades. Most of the problems arise during the preparation of enamel and its application. But we will talk about this later.
- Acrylic. It is used for the restoration of plumbing recently. But in durability, it is in no way inferior to epoxy enamel. It is, of course, easier to apply, but ready-to-use acrylic is more difficult to apply. The fact is that acrylic itself is incredibly viscous, but the hardener is, on the contrary, too liquid, which, of course, complicates the process of preparing the composition. Acrylic is more expensive, in addition, it is necessary to maintain a clear proportion of hardener with resin.
In a word, if you are a beginner in this business, then you better paint the bath with enamel with your own hands so as not to spoil the coating completely.
to contents ↑Preparing the bath for staining
It is very important to understand how to prepare the bath for painting. This process consists in thoroughly degreasing the surface and creating a rough, one-piece base.
Important! The adhesion of the repair compound directly depends on the number of microroughnesses, and its durability in the future - on plasticity.
Helpful hints:
- For abrasive treatment of any bath it is necessary to use an emery cloth No. 1. Of course, you will have to work longer, but if you first remove the stains with a rough skin and then smooth them with fine emery paper until dull, then small gaps will hardly remain on the surface.
- If you choose epoxy enamel as a coating, in addition to diluent, be sure to add a plasticizer - dibutyl phthalate to the finished composition. It is used to repel mosquitoes.
Prepare the bath according to the instructions:
- Training. Since restoration will be carried out using aggressive volatile components, first remove all foreign objects from the bath. If there is a washing machine in the room, then wrap it securely with plastic film, seal all the cracks in the wrapper with masking tape or tape. Also take care to protect all nickel-plated taps.
- Surface cleaning. Before staining, clean the bath of all contaminants. Pour oxalic acid or another active detergent into the bottom of the bath. Moisten it a little with water to form a slurry, smear it with a sponge from the bottom to the top on all walls. Keep the pulp in the bath for 15 minutes, rinse, fill the bath with water to the brim. Wait another 20 minutes, drain the water.
Important! Perform all work with the door open, windows, in an apron, a respirator and gloves.
- Abrasive treatment. Remove the piping from the drain and overflow holes. Smooth the surface of the bathtub with a power drill with a nozzle until it dulls, so that all visible impurities disappear.
Important! Using a nail, check all the roughnesses - if you did everything correctly, then it will stretch along the surface, and not slip. Use a flashlight to check for glare spots.
- Dust removal and degreasing. With a vacuum cleaner, collect all the dust, wipe the places around the sinks with a rag dampened with solvent. Put the harnesses in place. Pour a liter of acid-based active detergent into the bath, then rub it with a sponge in an even layer from the bottom to the edges. In this condition, the bath should stand for several hours. Degrease the surface with acid-based products only. Take a bath of water, hold it for several hours. If it gets very hot, add as much acid detergent as possible. When the liquid has cooled, drain it. Fill the bath again, leave for an hour, drain the water again. Dry it with a household hairdryer. Remove the binding of the plums and you can start staining.
Epoxy staining
After you have completed all the preparatory work, you can proceed to the main stage. Let's look at how to paint the bath with enamel. First of all, according to the manufacturer's instructions, the compound is prepared. The fact is that enamels of different companies differ in composition, therefore there is no universal recipe for their preparation.
The following manipulations will be required:
- If the instructions indicate that the base must be heated before applying the hardener, then do this with a water bath.
- Measure the basis of 250 ml, you will also have to divide the hardener in advance in portions. After adding the hardener, each portion must be thoroughly mixed.
- Dampen a flute brush abundantly in enamel, draw a vertical line from bottom to edge, then rub it to the sides. Draw the next strip so that it overlaps 50% of the horizontal grind. After you apply the first coat, wait 20 minutes.
- Apply a second coat. It is necessary to start from the same point as the first layer, in the same direction.This will allow the coating layer to lie on the primer well, and the coating will be perfect in structure.
- Close the bath for a week after staining so that the enamel hardens properly before the first wash.
Acrylic Painting
Now we will consider in stages how to paint the bath with acrylic yourself. By the way, this process will take less time.
Important! You can use for painting a roller or brush.
Apply acrylic to the bath as follows:
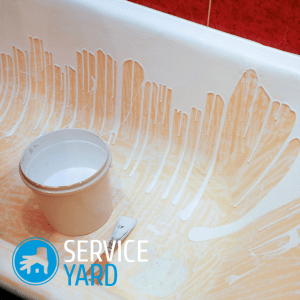
- Prepare the ink composition for work. Pour the hardener into a bucket of paint, mix for 10 minutes.
- By pouring on the surface, apply the prepared paint.
- If air bubbles suddenly appear, remove them with a brush. Just do not click hard on them.
- Take a brush over the entire bowl.
- If necessary, apply a second coat of acrylic.
to contents ↑Important! You can use the bathroom restored in this way after a day. It doesn’t matter which coloring method you choose, but in this and in another case, sagging and sagging may occur. It is recommended to control their formation after 10-15 minutes. They are removed with a brush stroke up to smearing. Sags near the drain holes are removed after the enamel has hardened with a mounting or painting knife.
Stock footage
Now you know how and with what you can paint the bath yourself at home, so do not rush to spend money on the purchase of new plumbing, but try to fix it yourself.
 (No ratings yet)