DIY bathroom floor
Repairing a bathroom is not that troublesome, but it takes time and strict adherence to technology. An improperly installed faucet, coupled with poor insulation, and the neighbors run to complain to the housing office, or even to the court. It is this consideration that stops many who would like to try to make repairs on their own. But if you strictly adhere to the technology and select high-quality materials, everything will be fine. Do-it-yourself bathroom flooring - is this possible? You will find the answer in our article.
to contents ↑Floor requirements
Having started a thorough repair in the bathroom, you will certainly ask yourself the question: what to do with the floor - leave it as it is, because the tile seems to be in good condition, or should I change everything? The assortment of flooring is rich and diverse, so the temptation to create something new is very great. But before you make the floor in the bathroom, you need to think about what are the requirements for coverage. For such premises they are quite strict:
- the floor should provide reliable insulation from moisture - water should not just not get to the neighbors, but also flow to building structures;
- protect from noise both other residents of the house and the owners;
- the bathroom should be warm - you absolutely do not need mold and other fungi;
- the wet floor should not slip, otherwise - instead of the pleasure of swimming, you will get injured;
- the coating should not emit harmful substances over time;
- it is desirable that the care of the coating does not present any particular difficulties.
In addition, you should choose a coating so that it does not deform when temperature fluctuates and does not collapse under the influence of aggressive substances. Pipe cleanser spilled on the floor is a fairly common occurrence and should not be allowed to cause harm to the interior. Is it possible to embrace the immensity? Of course. To make a quality repair of the floor in the bathroom with your own hands, you need only two things:
- The right choice of materials that meet your requirements and safety standards.
- Accurate and accurate adherence to instructions.
to contents ↑Important! Before deciding on technologies, materials, carefully think over the design of this room in general. Our ideas from the following publications come in handy here:
Choose materials
Repairing the floor in the bathroom, like any other, begins with a choice of finish. There are no strict design requirements right now. The bathroom can be decorated in any style, and for each in the store there is a suitable cover:
- marble tiles for Antiquity and Baroque;
- high-gloss metallic material;
- natural wood for Provence and Retro.
Important! Wood must be antifungal. And it’s much harder to take care of wood floors than ceramic ones.
As for color, it can be anything. Everything, again, depends on the preferences of the owners and their financial capabilities. It is possible to make the floor in the bathroom a light monophonic, colored or completely black floor, with or without a pattern, with all kinds of optical effects that can significantly change the geometry of space.However, it is desirable that the coating is slightly darker than the walls and ceiling, especially if the house has nervous and emotional people who need to feel the ground under their feet. And, of course, the floor in the bathroom should go well with everything that is in it:
- walls:
- the ceiling;
- fixtures;
- plumbing;
- household appliances;
- the furniture.
to contents ↑Important! If this is the first time you have started such a repair, make sure that all floor elements are easy to install. It’s better to perform a simple circuit efficiently than a poorly complex one. Do not forget what must be done bathroom threshold.
What floors are better to make in a bathroom?
Realizing that you can’t do without repairing the floor in the bathroom, you opened the catalog and do not know what to turn your eyes to? Well, let's see. The flooring may be:
- from stone;
- made of wear-resistant ceramic with a glazed coating;
- from the same ceramics, but without glaze;
- based on minerals - the so-called agglomerate;
- from metal sheets on a rubber substrate;
- from wood;
- from cork;
- from rubber;
- from a water-repellent laminate;
- from rolled linoleum;
- from linoleum tile;
- bulk floor.
Each material has its own advantages and disadvantages:
- The stone is beautiful and looks noble, but such repairs will cost a pretty penny.
- The cork provides excellent protection against noise, but it is difficult to care for, and it is expensive.
- Linoleum is cheap, it is easy to wash, but it looks very unpresentable.
- Laminate, even waterproof, is not the most suitable material for rooms that are too humid, and the bathroom, by definition, is just that.
- Metal tile is an expensive pleasure, and it is not suitable for all styles.
- Rubber is easy to wash, it is very disliked by fungi and mold, but it itself does not tolerate precise mechanical impacts.
- The now fashionable bulk floor has no seams, but it is made once and for all - it is almost impossible to dismantle such a coating. If you have to do the repair of the floor in the bathroom with your own hands again, you can lay the next layer on the existing one, that is, slightly reduce the height of the room. But such a coating, along with ceramic. Now they are most popular.
So you bought a tile
Having carefully considered everything and comparing the characteristics of parquet, laminate and everything else that construction and design companies offer in such cases, you still decided that the floor in the bathroom with your own hands is best made of tiles. That's the right decision:
- tile is easier to glue;
- it is strong enough;
- possesses necessary qualities for rooms with high humidity;
- tolerates cleaning and does not deteriorate from exposure to caustic substances;
- varied in color, quality and price.
We begin to repair the bathroom
Floor repair in the bathroom begins immediately after you have selected and installed plumbing. Of course, the tile is not laid on the overlap, but on several preparatory layers.
Important! Before you get started, be sure to do one more thing. You need to decide on the drain of the bathroom, that is, think about how the pipes will be located. To do this, you have to calculate the height - you need to form an angle so that the fluid can move freely through the pipes, and for this you need to raise the floor. The optimal angle is obtained if you make a high-quality screed.
Repair Steps
Regardless of which coating you have chosen for finishing, repairing the floor in the bathroom with your own hands is divided into several main stages. In general terms, the sequence looks like this:
- Preparation of the rough foundation.
- Gasket waterproofing.
- The device of the leveling screed.
- Laying the topcoat.
Important! A busy repair in the bathroom is accompanied by many problems associated with the installation of various equipment.We have prepared articles for you, the information of which will definitely come in handy during the repair of the bathroom:
Preparing the foundation
In the vast majority of apartments there is already a rough base, so you just have to check the tightness and prepare the surface for the following layers. Before you make the floor in the bathroom, it is enough to perform several types of work:
- Remove the old coating - if it is linoleum, it can be removed without problems, and the tile will have to be knocked down with a perforator.
- Remove all possible contamination.
- Remove old waterproofing.
- Treat the seams between the floor and walls - they need to be leveled and cleaned.
- Close cracks if they are found, and also cracks.
- Level the base as much as possible - for this you can buy ready-made mixtures.
- Apply in several layers of primer with antifungal components.
Not everyone covers the base with soil, but you need to do this. The primer allows for better adhesion of the subfloor with a waterproofing layer, respectively - the chance to flood the neighbors is sharply reduced. In addition, the soil allows you to increase the service life and screeds, and waterproofing, and this is an important component of successful repair of the floor in the bathroom.
Important! It is impossible to glue the tile on an unprepared base - it will lie unevenly, and the seams will be too large, in addition, damage to the waterproofing and screeds will become possible.

We make waterproofing
Waterproofing in the bathroom and toilet is perhaps the most important component. Different materials are used, they differ in a number of parameters, including the method of application to the surface. Waterproof coatings are:
- okleechnye;
- coloring;
- smear.
Okay
The glued material, as the name implies, is attached to the base with glue. This is convenient if you need, say, to insulate not only the floor, but also the seams between the floor and the walls. Such materials are cheap, easy to install and do not require special art from repairmen. If they are properly laid, they immediately give a flat surface.
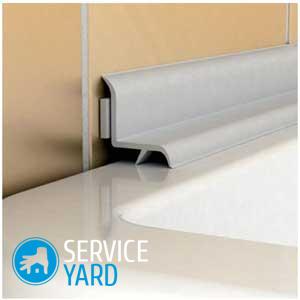
Important! Waterproofing should also be done at all seams between the wall and the bathroom. To do this, there are special baguettes on sale that can be selected in width, design, color. To design the perfect bathroom interior, read a separate article about these materials -"How to install a plastic corner on the bathtub?".
Painting waterproofing
These are various kinds of emulsions, the most popular of which is bitumen. The method is extremely simple, because the emulsion is applied in the same way as any paint, that is, with a brush or roller. Its main drawback is that the coating does not last long - problems may arise after five years.
Lubricants
They provide an almost perfect waterproofing that lasts remarkably long. It is a little more difficult to apply them than a bitumen emulsion. The store will offer you many options, they are divided into two types:
- finished compounds;
- dry mixes.
When using dry mixes, you must strictly follow the instructions that are on the package. Now it is the most popular waterproofing method. However, you need to consider several subtleties:
- Before applying the coating, the joints should be strengthened with waterproofing tape.
- The consistency of the finished composition resembles a thick sour cream.
- Apply the mixture with a roller or a conventional spatula and level.
- The lower parts of the walls also need to be covered with a waterproofing layer - to a height of 10 cm or a little more.
- After the composition is applied and dried, you need to wait about another day - the mixture should harden well.
- If the house is wooden, a layer of rolled linoleum is laid under the coating for safety.
Important! The instructions always indicate the recommended number of layers, as well as breaks between their application - this rule must be strictly followed.
Screed
There is no point in laying the tile directly on the waterproofing - it will fall off pretty quickly. To prevent this from happening, make another layer. The screed is needed so that the surface is smooth and impervious to moisture.
It is poured from special cement, which does not shrink over time:
- Mark where the floor surface will be located, onto which you will then stick the tile - this is done using the level, the surface should be strictly vertical.
- Put beacons on the marks.
- Pull the cord between them.
- Prepare a solution.
- Pour it evenly onto the surface.
- Fill the entire space to the marks.
- Level the surface with a rule or trowel.
- Roll the entire surface with a needle roller - this is necessary to remove air bubbles, which are almost always formed.
- Wait until the screed hardens - the time is indicated in the instructions for the mixture.
to contents ↑Important! If you are making a warm floor, there is a specificity - the screed is done in two stages, and thermal insulation is laid between its layers.
Laying tiles
The final step in the design of the floor in the bathroom with your own hands is tile laying. Before starting, the material should be unpacked and checked for cracks, chips and scratches. Several tiles with defects are almost everywhere, which is why it is recommended to buy it in an amount slightly higher than the calculated one. Then lay the tile on the floor, but do not stick anything yet - you need to determine its optimal location.
Instruments
For laying tiles, you need a regular set of construction tools - the same as for gluing walls. You already have a lot, because when using the screed, you used both the level and the trowel. In addition to them, you will need:
- plastic crosses;
- Master OK;
- spatula with teeth - their size depends on the size of the tile and how well the screed is made;
- container for glue;
- rubber trowel for grouting.
If you have everything and the tile is prepared, you can get to work:
- Select the direction of the rows.
- Select a starting point.
- Spread glue according to the instructions.
Tile glue is often diluted in two steps:
- Knead the composition according to the instructions.
- Let it brew for about 10 minutes.
- Shuffle again - you should get a homogeneous mass.
- Be sure to read what exactly the glue should be applied to - on the floor or on the tile.
- If glue is applied to the floor, select the starting area and apply the composition with a notched trowel to an area of no more than 1 square. m
Important! If the composition is too liquid and flows, you need to add a little dry mixture and stir again.

Cross squares
Crosses are used when finishing with tiles in order to make the rows smooth. Stick the first row, and then:
- Place crosses where vertical and horizontal seams intersect, 4 tiles should adjoin each cross.
- Paste the next row, aligning the seams with the marks.
- If there is too much glue somewhere, it must be removed immediately.
- Having laid the main array, fill in corners and strips where not whole tiles are required, but halves or even quarters - they should be glued where they will not be too clearly visible.
- Wait a day.
- Fill the joints with grout - a rubber spatula is used for this.
Bulk floor
Here are some features to consider when finishing a bathroom floor in this way:
- The preparatory steps are exactly the same as for the tiles, only the screed should be even more even.
- The surface is needed strictly horizontal - the slightest crack will be perfectly visible.
- To make the layer even, it is recommended to use a laser level or a normal building level, and make marks around the entire perimeter.
- It is better to start pouring from the farthest corner and run it parallel to the walls.
to contents ↑Important! It will be possible to use the bath in two weeks - this is exactly the time it takes for the composition to harden and stop decaying.
Stock footage
In a word, independent floor repair is quite affordable, and modern materials greatly simplify the life of a beginning repairman. With strict adherence to technology, you will get an impressive result, and a self-made floor will delight you for several decades.
- The threshold in the bathroom - how to do?
- Plastic bath corner - installation
- Gray bathroom design
- Bathroom design in beige colors
- Green bathroom design
- Bathroom design in red and white
- Mixer installation height above a bathtub
- Mounting the faucet in the bathroom to the wall
- Plumbing installation in the bathroom
- Do-it-yourself installation of doors to the bathroom and toilet
 (No ratings yet)