DIY doormat

Developing mats appeared recently, but immediately gained wide popularity, and not in vain: this useful thing is able to replace a whole set of toys at an early age, while not taking up useful floor space in the room. The stores have a huge selection of models for a variety of ages and tastes, but their prices sometimes just go wild. But making a do-it-yourself rug with your own hands is not so difficult. This does not require large financial expenses - you only need to invest your time in it, a little skill, a flight of imagination, a drop of magic and wisdom, as well as every little thing that is in every house - pieces of old materials, buttons lying around, beads, lightning, etc. Now we will teach you how easy it is to create such a toy for your beloved child.
to contents ↑What is a developmental mat for?
Before we talk about how to make a developmental mat for a child with our own hands, let's find out if it is needed. Maybe you should not waste your time on it, but is it better to do something more useful?
So, what is a developmental mat for?
- Such a soft playground for games develops coordination of movements in the baby. Young children are laid out on a rug and their favorite toys are hung over them. Your baby will learn to feel the space and grab the toys with pens.
- If you make such a product as diverse as possible, make a lot of interesting applications on it using multi-colored fabrics, then this will improve the perception of the world by your baby.
- A large number of convex elements, accompanied by, moreover, sound effects, will contribute to the development of sensory perception of the baby, and therefore - his memory, hearing and logical thinking.
- For older children, this will be a favorite place for games, it will help them learn numbers, score, alphabet, colors and other wisdom.
Games on the developmental mat
Psychiatrists and pediatricians unanimously advise all mothers not to leave their beloved child just to lie down, but to play educational games with him. What can you play with your child on such a rug? Of course, games are usually limited by the ability of the product itself, but you can always add something to your miracle rug, and it will grow and develop with your baby:
- While the child is very small, just stroke the rug first with your hand, then with the handle of the baby. This will allow him to feel the softness of the tissue and develop tactile sensations.
- When he grows up a little, show him the stripes - for sure they will interest him. Show him the noisy and sounding elements, let him touch them with a pen.
- Make secret places on the rug and hide the surprises that your baby should find. Such a game develops imagination, develops the ability to analyze.
- Sew patches of different sizes on the product. Find small and large applications with the baby, analyze which are more and which are less.
- Sew on the sun, clouds, flowers, learn what color they are.
Important! You can make a farm and study animals, or make a pond and put colored fish there. Repeat during class the names of each animal that it says. So the child will begin to speak faster.
- It is good if there are a lot of zippers on the mat, detachable elements that perfectly develop the motor skills of the hands. Offer your baby to independently fasten and unzip zippers, Velcro, lacing, move removable figures.
- When the child becomes older, it will be possible to study numbers and letters. You will be surprised how quickly your baby learns the ABCs and score with the help of such a wonderful assistant.
What materials are better to use for a rug?
Most developing children's rugs with their own hands are quilted blankets lined with a variety of applications, pockets, flaps, zippers and other elements interesting for the child.
Here are some things to keep in mind:
- It is best to make the foundation of natural hypoallergenic materials such as satin, felt, calico, bike or jeans.
Important! It is better to abstain from wool - it can cause allergic reactions. Silk for such purposes is also undesirable, as it is easily electrified and very shiny, which is very harmful to the eyes. It is better not to use synthetics.
- A synthetic winterizer is perfect for a filler. This material does not cause allergies and does not accumulate static electricity.
- Threads are best taken propylene, as they are resistant and durable.
- Buttons of different shapes and colors.
- Colored zippers, just make sure that the dog with the zipper is not sharp and the child will not get hurt when playing with it.
- Various ropes, elastic bands, Velcro.
- Musical elements and other objects that make a sound - rustling paper, bells and bells.
Common mistakes when sewing a baby rug
Often, inexperienced craftswomen make mistakes when sewing a rug for children with their own hands. Let's look at the most common ones:
- On such a product, do not stitch a mirror. Not because the baby can see its reflection and get scared. The reason is that light is reflected from the mirror, which is very harmful for the fragile eyes of your babies.
- Another common mistake - monotonous items to feel on the product. Tactile sense should develop comprehensively, so such elements must be made diverse.
- A uniform shiny background is also not a good idea. This is also harmful to the eyes of the child.
Stages of creating a do-it-yourself rug
So, how to make a developing mat for a child with your own hands, we will consider in stages the whole process:
- First you need to create a sketch. You need to do this on paper. Draw your final result as you imagine it.
- Now you need to make a foundation. Usually it is made of large sections of material, on which additional elements are sewn. Sew the fabric on all sides. For softness, the base is filled with foam rubber or synthetic winterizer. Bottom is better to use a material that does not slip.
Important! To create the background, use colored remnants of materials. For the sky - blue, for the sun - yellow, for the grass - green. The more color elements, the more interesting your baby will be.
- On the background you need to fasten, sew or glue game elements - rattles, toys, pockets, zippers, fasteners and more. This is the most difficult part of the work: to select, sew, assemble the necessary elements into a single picture. Here you have to show imagination or use the best practices from the Internet. Some toys can be fixed movably - on shoelaces or ribbons, on Velcro or buttons.
Important! In the manufacture of such a rug, you can’t do without the help of a sewing machine, but you will have to work with your hands - game elements will have to be sewn by hand. Check that small parts are firmly sewn and fastened so that the child does not accidentally tear them.
Let's look at an example of several workshops on making a children's rug with your own hands.
to contents ↑Children's rug for the boy
This children's rug will appeal to any young motorist:
- Pick up a dense fabric and draw a road map with a pencil.Tape the remaining fields with masking tape so as not to stain.
- Dilute the acrylic paint. We will paint the roads gray. If you don't have gray, just dilute black and white.
- Paint the roads with a brush or roller.
- When everything dries up, make markings on the roads.
- Paint the houses in different colors. You can cut them out of colorful felt.
- When the paint has dried, remove the tape.
to contents ↑Important! You can decorate your rug with cars, animals, lakes and other interesting elements to your taste.
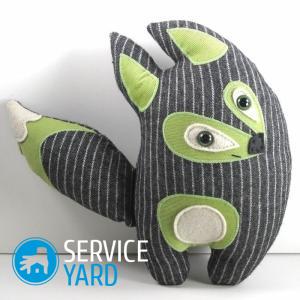
Developmental mat for children: “In the forest”
The main material for this product is felt. All toys are sewn from it. It can be made of any size - it all depends on your taste:
- We take the fabric for the base on which we sew the background, and then all the animals.
- For the sky you will need a blue felt. For grass - green. For chanterelles, you need red, white and gray material. For a tree you need white and brown felt.
- To make a picture on the birch trunk, we fold a white piece of felt in half and cut a thin piece, then bend a little more, then a little less, and cut 1-2 pieces each time. Lay a white strip of felt over brown and sew one to the other.
- Sew an owl to the top of the tree.
- We make animals from felt. Patterns can be found on the Internet. Each animal has several details - nose, eyes, ears, tail. We cut out all the parts separately, overcast and sew to the body.
- It’s best to start work from the top of the mat. We sew the sky and grass, then the fox and the trees. On top of all layers we sew birch and owl.
- Along the perimeter, let the slanting inlay.
to contents ↑Important! It is best to sew some rubberized fabric to the back side so that the product does not slip.
Stock footage
Believe me, a do-it-yourself developing mat will not only be an interesting toy for your child, so you can take a break from the hassle of caring for it, but it will also contribute to the faster development of the child. And the more he will be able, the more interesting it will be for you to communicate with him!
 (No ratings yet)