

Floor tile repair
Tile is one of the most common flooring solutions. Despite the fact that the main material is characterized by a long service life, sometimes it will require repair. This occurs if a chip, crack or deformation of one element has occurred. To restore the attractiveness and integrity of the floor base there is no need to remove the entire area - you can replace one part. Today we will tell you about how to repair tiles on the floor with your own hands quickly and easily.
to contents ↑Hard Coating Benefits
Manufacturers of ceramic products intended for repairs in the house, argue that such products will last at least 15 years. Due to the fact that this type of building material was invented a long time ago, it is safe to say that it is time-tested.
Advantages of ceramic flooring:
- durability;
- easy to care for;
- during installation does not require special efforts and knowledge;
- a large selection of models in different price categories;
- during prolonged use does not lose its original appearance.
Important! The most important disadvantage is fragility. If you drop a heavy load onto a hard and hard, at first glance, coating, a chip or crack may form.
In this case, it is necessary to replace one ceramic part. How to do this, we will describe below.
to contents ↑Replacing Tiles
Before starting a local tile repair on the floor, you need to evaluate the entire amount of work:
- Examine each tile carefully.
- If chips and cracks cover a surface that occupies more than ⅓ of the entire area, then you should think about a complete change in the floor decor in this part of the house.
to contents ↑Important! Repair and replacement of tiles in full takes not so much time. On average, you will need no more than two days to complete this procedure. However, in this case, you can come up with a new room design, choose modern colors and your room will “play” in a new way.
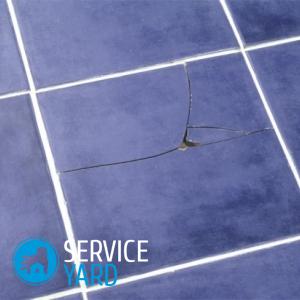
Causes of cracks and chips in tiles
There are several reasons why defects can occur on a ceramic coating:
- hits on tiles in one place;
- this type of decorative material was installed on wood, and it is rotten and no longer fulfills its role of a solid and strong base-support;
- damage to ceramic elements during construction work;
- a discounted tile with defects was originally purchased;
- poor quality ceramics.
to contents ↑Important! Depending on what caused the damage to a particular part of the coating, your decision regarding the repair of tiles on the floor may vary. For example:
- if it is a marriage or poor quality of ceramics, it is worth thinking about the complete replacement of the material with a more reliable one than changing 1 tile each week;
- if the reason is the damage to the rough foundation of the floor - capital repairs may also be required;
- if a break or a crack appeared due to the negligence of builders or your indiscretion during operation - from direct mechanical impact, then it is reasonable to repair one tile on the floor.
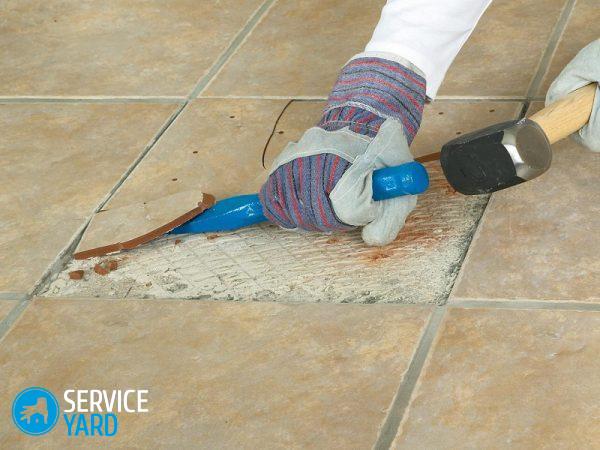
Removing one element from the entire floor
The main task when repairing tiles on the floor is accuracy. You need to remove one part so as not to hook and damage adjacent ones.
Important! It is easier and better to remove the tile, in which the distance between the seams is 1.5-2 cm.
 Several ways to replace old tiles with new ones:
- The first option is that you use a grinder to saw the seams between the decor elements around the damaged part. When performing this operation, constantly add water to the place where the power tool works.
- A drill and a thin drill can also help in removing the adhesive backing in the joints between the tiles.
- A punch with a thin cutting tool does an excellent job.
to contents ↑Important! In order to free the damaged decor element from the entire floor covering, you can use any tool that is at your fingertips. It is very important that your power tool has a thin cutting part.
Tile Removal Instructions
Repair of damaged items consists of the following steps:
- Cleaning the seams between the "tiles" around the damaged element.
- Removing the tiles. To do this, you will need a chisel or any other similar tool.
- Cleaning and removal of the old adhesive base.
- Inspection of adjacent parts. At this stage, you need to carefully look if you have damaged nearby elements.
- Styling a new decor element. For this purpose, it is best to use glue, which is applied when laying the entire tile.
- The final step is grouting. It is best to do this action throughout the area. This is due to the fact that no matter how you try, the shade on the newly installed tile will differ from the old grout.
Some nuances for removing old glue
At the stage of cleaning the surface from old glue, it is important to find out why the ceramic element is being replaced. If you did not drop anything on the floor, and are 100% sure of the tile itself, then there may be a disintegration and delamination of the concrete coating, which must be restored.
To replace the concrete base, you need a mixture of sand and cement or a self-leveling mortar.
Important! When replacing concrete hardened mortar, more deepening is necessary. It is worth considering that you will apply a special mixture, pour glue and install a new tile, which should be flush with the rest.
After the work done, it is necessary to wait 24 hours for the glue to dry and the solution to solidify under the tile. At the end of the day, we can assume that the replacement of one part of the flooring is completed.
to contents ↑Stock footage
Repairing tiles on the floor does not take as much time and effort as you might expect. We are sure that you will succeed in replacing the old decor element with a new one with minimal effort and the room will look attractive again.
- How to choose a vacuum cleaner taking into account the characteristics of the house and coatings?
- What to look for when choosing a water delivery
- How to quickly create comfort at home - tips for housewives
- How to choose the perfect TV - useful tips
- What to look for when choosing blinds
- What should be running shoes?
- What useful things can you buy in a hardware store
- Iphone 11 pro max review
- Than iPhone is better than Android smartphones
 (No ratings yet)