DIY cardboard shelving
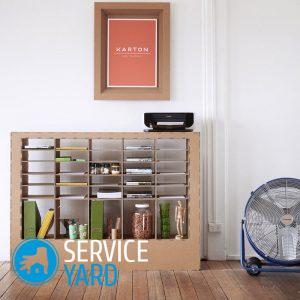
Furniture made of cardboard is a great way to turn an unnecessary thing into a useful one. The cost, for example, if you make a cardboard rack with your own hands, is extremely low, and outwardly it looks very decent. Of course, if you try. Let's consider how to make cardboard furniture on our own, where it can be used, what advantages it has.
to contents ↑pros
The main advantages of a do-it-yourself cardboard shelf are:
- Minimum cost. You will have to spend only on glue and dye.
- Mobility, lightness.
- The original appearance.
- Virtually unlimited creative possibilities.
Important! You can finish the product not with paint, but with textiles or old wallpaper. Moreover, choose a shade so as to fit your own product into any interior.
Separate elements of cardboard furniture are connected not with glue, but with plastic clips. This allows you to create different configurations of shelves and update the interior at no cost. Such furniture is perfect for the nursery:
- Due to the extreme cheapness, you do not need to be afraid of its damage.
- You can involve the child in the process of “furniture production”, which develops his taste, perception of shades and creative abilities.
Minuses
However, there are certain disadvantages. First of all, it is a low strength. Of course, heavy loads are not for cardboard shelves. However, they stand books, accessories or small souvenirs very successfully.
to contents ↑Important! A little trick will help make the shelves much stronger. Two boxes of corrugated cardboard, nested one in the other, allow you to get a fairly rigid structure that can withstand quite large loads.
Materials
Prepare such materials and tools to make a cardboard rack with your own hands:
- Cardboard. An important role is played by the thickness of the material. The thicker the cardboard, the stronger the furniture. Thinner material is useful for finishing joints. In addition, if thin sheets are glued together, a durable material can be obtained.
- Glue. It is advisable to use the “Moment” glue in this case, since the canvas will not get wet.
- Tool. It is most convenient to cut cardboard with a jigsaw or clerical knife. The sharper the tool, the better the quality of work, so do not be lazy to change the files more often. To harden the glue faster, prepare a building hair dryer.

To finish the shelf from cardboard boxes with your own hands, you can use a variety of materials:
- Textile.
- Wallpaper remaining from the repair.
- Self-adhesive.
- Paint.
- Kraft paper.
to contents ↑Important! Kraft paper looks especially beautiful. Shelves are obtained not only beautiful, but also pleasant to the touch.
DIY cardboard shelf - master class
A cardboard shelving is perfect for storing books and accessories. The order of its manufacture is as follows:
- Choose cardboard. The best option is a five-layer one. It is durable and easy to handle.
- Draw a sketch to scale, and then make a life-size pattern. At the same time, the design can be anything.
- Mark up the cardboard.
- Cut parts with a clerical knife. At the same time, each part consists of 2 blanks that are glued together. With three sections - 2, with two sections - 8, with one section - 2. To make the cuts even and accurate, use a ruler. Take care of covering the work surface.It must be so strong as not to be damaged during operation.
- Before assembling the rack, fasten the walls with stiffeners, which give the structure additional strength. These are cardboard strips with a width of 30-40 mm. Place them around the perimeter of the parts.
- Glue parts of the parts until the glue dries, put a load on top.
- Assemble the parts according to the sketch.
- Putty putty all irregularities, leave the structure until the composition completely dries. It will take about a day.
- Paste the shelves with the material prepared for the decor.
- Assemble the design completely.
DIY cardboard shelves - decor
There are no clear instructions and prohibitions here. Applications, decoupage, wallpaper, self-adhesive film, textiles - this is not a complete list of possible options. Self-adhesive film is a beautiful, simple and, at the same time, practical option. This furniture is easy to clean. It’s easy to replace the decor if the original is a little boring. The procedure in this case is as follows:
- Disassemble the structure and glue the side parts separately. Do not forget to leave about 1 cm on the hem for gluing the end parts.
- Cover the front of the structure with a single piece of material. Joints and seams should not be.
- Now connect the sections together.
Stock footage
Shelves of boxes with their own hands are quite ready, and you can start using them. With the help of such furniture you can add unusual design to any room and make it more functional with minimal investment.
 (No ratings yet)