

DIY epoxy table
One of the simplest but most effective ways to decorate your home creatively and brightly is to make a table of your own with epoxy. The unique properties of this material make it possible to realize the craziest design idea and make both a simple table and a real masterpiece of an unusual shape. And the possibility of using different fillers provides the opportunity to make a real work of art from a regular table.
to contents ↑Epoxy - advantages and nuances of work
Using epoxy for the manufacture of furniture (tables, bar counters) at home has a number of advantages, among which are the following:
- This material does not change in volume during the drying process. If other similar compositions shrink due to the volatilization of the liquid during solidification, the epoxy hardens due to certain chemical reactions and retains its original volume.
- The surface of the epoxy is not deformed and is not afraid of damage, chips and cracks do not appear on it when used.
- It is important for a novice master that working with epoxy is very simple. For this, it is not necessary to have any special skills - just follow the instructions clearly.
- Another important advantage is the availability of this material.
to contents ↑Important! All work is recommended to be carried out in a special painting suit, some kind of headdress and rubber gloves. These precautions must be observed because dust particles or hair that can get into the resin from the human body will be very difficult to eliminate.
Epoxy preparation and conditions of work
Typically, decorative epoxy resins are supplied in kits that include a resin and a special hardener, which is necessary to initiate a chemical reaction to harden the product.
Using this material, you need to know the following:
- Since this process is irreversible, the epoxy must be prepared strictly according to the attached instructions, observing the proportions of the ingredients specified by the manufacturer.
Important! It is worth remembering that the proportions of epoxy resin and hardener may vary significantly from one manufacturer to another.
- To mix the components you will need 2 measuring containers of the appropriate size and a stick for thorough mixing. First you need to measure the resin, and then pour the right amount of hardener into it, then mix the mixture well until a homogeneous mass is formed.
Important! If kneading is not thorough enough, then the finished mass may not solidify well.
- The workpiece made of epoxy resin with your own hands should be placed strictly horizontally, otherwise the countertop will turn out to be uneven and with influxes.
- The mold must be completely dry before work. In addition, water must not be allowed to enter the solution and the work surface.
- The manufacture of the structure must be carried out at temperatures above +22 degrees and low humidity.
Important! The higher the air temperature, the faster the mixture will solidify.
- Some craftsmen, wanting to speed up the hardening process of epoxy, use a building hair dryer or other heating appliances. However, this can contribute to the “boiling” of the mixture with the subsequent formation of air bubbles.
Important! If bubbles still form during the pouring process, they should be carefully removed. This can be done using a syringe or a cocktail tube.
- To prevent particles of debris or dust from getting into the hardening resin, it is advisable to use special racks with tarps or film material stretched over them, which will protect the table from foreign particles. In this case, it is necessary to ensure that the protective coating does not come into contact with the surface of the countertop.
- Since the cured epoxy is very difficult to remove from the surface, it is necessary to prevent it from falling onto the floor. To do this, close the floor around the table with plastic wrap, which after completion of work can simply be thrown away.
to contents ↑Important! If, nevertheless, the need arose to remove the frozen epoxide, then this can be done mechanically or using special solvents.
General manufacturing principles
In order for the epoxy resin table to turn out exactly the way you planned it, fill in its shape must be performed at a suitable stage of the mixture hardening:
- In the liquid stage, the mixture flows freely from the stirring stick. Such a material is perfect for filling molds and filling corners, troughs.
- When the epoxy becomes honey, it can be used as an adhesive.
- The mixture is at the rubber stage - various elements can be molded from it.
- When the resin reaches a solid stage - the product is ready for use for its intended purpose.
The countertop can be made plain, with various impregnations, with a combination of colors and materials, or completely made of epoxy. In the latter case, a template (formwork) should be made from aluminum corners and a glass base. Glass must be thoroughly washed, wiped and treated with a degreasing agent. Aluminum borders must be attached to the glass using window putty and rub with wax mastic.
to contents ↑Transparent or plain tabletop:
- Do-it-yourself one-color worktops made of epoxy resin begin with the cleaning and degreasing of the workpiece.
Important! If a material that can absorb liquid (for example, wood) is used as a base, then it must first be primed with resin. This will make it possible to avoid the occurrence of bubbles during operation.
- At the next stage, epoxy is prepared, after which it is poured into the mold.
Important! If the table will be made in one color, then the coloring pigment is added to the resin, while it is desirable that the paint is from the same manufacturer as the epoxy. If a combined coloring of the table is planned, then in the process of pouring, resin with dyes of several shades should be used.
- After pouring, the countertop is left for about 15 minutes, and then the bubbles (if any) are removed.
- After two days, grinding and polishing of the finished product is carried out.
- After another week, the table is completely ready for use as intended.
Manufacturing countertops with filler
The most original version of epoxy furniture with your own hands is a countertop with filler, which can be used in various stones, small figures, coins, bottle caps and other items:
- When making such a table, it is necessary to thoroughly clean and degrease the workpiece (if necessary, paint), as well as equip it with small sides.
- After that, filler is laid on the bottom of the base.
Important! Attachments must be thoroughly cleaned and completely dried, since the use of wet filler can cause whiteness.If the filler is light in weight, then it must be glued to the base, otherwise it may float.
- If the filler has a small height (up to 5 mm) and a simple shape, then the resin is poured in one layer. If the investments are large and have texture, then pouring is done in several stages with interruptions lasting up to a couple of days.
- It may take up to 3 hours for the epoxide to penetrate into the recesses of the curly filler, so experienced experts advise pre-immersing the textured parts in the resin, only then put them into the mold.
Luminous countertop
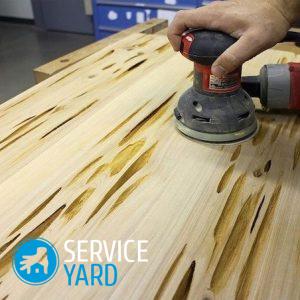
Another popular option is to combine epoxy with natural wood:
- First, caverns are made in a wooden countertop, after which the surface is carefully sanded.
- Next, the required amount of fluorescent pigment is added to the prepared resin, and then the caverns are poured with this mixture.
- After complete drying, the table is covered with several varnish layers with intermediate grinding.
- After completion of the work, the table is completely ready for use.
Stock footage
As you can see, making an epoxy resin table with your own hands is a very interesting and very simple task. However, when working, you must strictly follow the instructions - only in this way you can create a very beautiful and original piece of furniture that will delight your and your guests for many years.
- How to choose a vacuum cleaner taking into account the characteristics of the house and coatings?
- What to look for when choosing a water delivery
- How to quickly create comfort at home - tips for housewives
- How to choose the perfect TV - useful tips
- What to look for when choosing blinds
- What should be running shoes?
- What useful things can you buy in a hardware store
- Iphone 11 pro max review
- Than iPhone is better than Android smartphones
 (No ratings yet)