DIY table in the garage
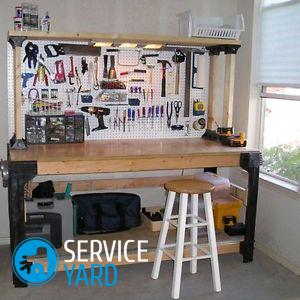
Many car owners spend quite a long time in the garage. This is due to repairs and scheduled maintenance of their car. Most of them in this room hold their tools and various small parts. And in order to work in the garage it was convenient and comfortable, there, of course, you need a good table, which is also called the technical term - workbench. Usually it is located along the wall and performs a number of useful functions, such as: installation and locksmithing, as well as the assembly and disassembly of machine components and assemblies. In addition, in this design very often there are various boxes and shelves used to store small parts and tools. It is almost impossible to buy a workbench made in an industrial environment, so the owners of garages try to make a table in the garage with their own hands.
to contents ↑Garage Workbench Types
According to their characteristics, workbenches are divided into two types:
- for locksmithing;
- for any work related to wood.
The difference between them is that they have different countertops. For example, for carpentry models it is made of wood, and for metalwork models, it is made of metal. This is done on purpose, as:
- When working with metal parts, it is often required to use motor oil, which is well absorbed into the tree and leaves visible marks on it. In addition, the repair of metal components often involves their assembly and disassembly, during which you can damage the countertop, so the best option is always a workbench made of metal.
- As for the joiner's table, in contrast to the joiner's table, it is mainly used for wood and does not differ in either increased strength or, moreover, wide functionality.
Getting ready to make a workbench
In the case when the workbench for the garage will be done independently, it is necessary to determine in advance what basic work you are going to do on it, and whether tool boxes will be included in its design. Having such a clear plan on hand, making a desktop in the garage with your own hands will not take much time.
What will be required to create a workbench?
Classic models of a workbench, as a rule, have several built-in drawers in their design for storing tools. It can also be supplemented with a separate shield on which mounted tools, for example, car keys, will be located.
Important! The main criteria for a table should be its reliability, strength and stability.
List of materials and tools for making a table
A sample list of everything that you will definitely need to work:
- square pipes measuring 60x40x2 mm and a total length of 24 meters;
- corners measuring 50x50x4 mm and a total length of 6.5 meters;
- a steel sheet having a thickness of 2 mm, which will be used for the manufacture of holders;
- guides for drawers;
- metal strip 40x4 mm and a total length of 8 meters;
- metal sheet for countertops 2200x750x2 mm;
- solid and powerful wood boards with a thickness of 50 mm, which can be used for carpentry worktops;
- self-tapping screws for metal structures;
- ordinary plywood with a thickness of 1.5 to 4 mm, which will be used to create the rear walls and sides of the drawers;
- anchor bolts;
- various screws for fixing the drawers;
- paint intended for metal and wooden surfaces.
Tools you need to make a workbench:
- apparatus for welding and about 1 kilogram of electrodes, as well as special protective clothing provided for these works;
- electric screwdriver;
- tape measure and construction level;
- grinder with disks for metal and grinding;
- electric jigsaw for cutting plywood;
- electric drill.
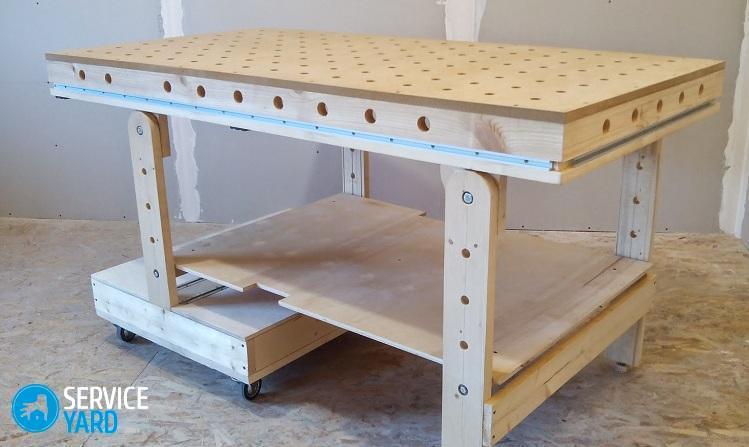
to contents ↑Important! A workbench made from these materials will turn out to be quite large. Its length will be 2 meters and 20 centimeters, and its width will be 75 centimeters. Large sizes make it possible to install a powerful vice on it, a drilling machine and many other useful tools.
How to make a table with drawers for tools?
The first step will be to cut the material into the constituent parts of the future product. A pipe from a profile will go to the frame, and a metal corner will be used for the so-called reinforcement or stiffening ribs. After the corner is cut into pieces, we proceed to the manufacture of the power frame from it. In addition, he will go to the edging of carpentry countertops, as it will become the basis for its front surface, consisting of boards. We will let the metal strip into the production of special guides for the side panels and to the brackets for fixing wooden plywood and drawers.
The next step is to assemble the table in the garage with your own hands by welding:
- First, we weld the worktop parts, consisting of two 2200 mm pipes and two 750 mm pipes.
Important! The design is cooked so that there is a place at the top for the next frame, consisting of corners, into which the boards of the countertop will lie.
- To fully reinforce the countertop, we weld a few more pieces of steel pipes, every 4 cm. They will become those stiffeners, which we already mentioned above.
- Now on all edges of the table we weld four side legs, the length of which is about 900 mm. And between them, metal strips are boiled, which will serve to strengthen the entire structure.
- Having finished making the frame, we proceed immediately to the next step - the welding work for drawers. We make square structures from the remaining steel pipes and weld them directly to the countertop on both sides. After that, we also give them additional rigidity with the help of ribs.
- Now we take a ready-made frame from a metal corner, put it on the lower frame, made previously of pipes, and weld the entire structure. Thus, we got a powerful countertop, with inserts for rigidity and a total height of about 8 centimeters.
- The metal frame for the table is completely finished, it remains only to make a fixture for the panel, on which you can then hang your tools. Take a metal corner of 2200 mm in the amount of one piece and four more of the same angle of 950 mm. Two corners are cooked right in the middle, and two are on the sides of the structure. This is done to strengthen it. After - the finished panel is already cooked on the countertop.
- Now we already have a fully finished frame, consisting of corners and pipes, and now we are starting work on strengthening the entire structure. Brackets cut from a metal strip are welded directly to the sides of the workbench. Their total number should be at least 24 pieces. In the middle of each of them we make a neat hole with a drill. We will need them to fix the rear and side plywood walls of our workbench.
- Having finished with the fixtures, we move on to the next stage - drawers for the workbench. We take the plywood and cut it into the details of the boxes, after which we collect them together using the screws we have.Their total number will depend on your plans, namely, what and how much you want to store in them.
Important! It is recommended to make three drawers for smaller parts, and two for larger ones. Here we leave the final decision only to you.
- Ready-made drawers can be installed on both sides of the workbench, or can be done differently: on one side we have only drawers, and on the other - completely open shelves. For drawers, we need a slide, which we do as follows - we cook steel strips into which holes were directly drilled directly between the sides of their departments. We fasten the guides for the boxes to them. Also on the front panel of the drawers you can place for convenience small handles that are best made from scraps of the remaining material, fortunately, no matter how carefully you calculate everything, a certain amount of them will definitely remain.
to contents ↑Important! Sometimes owners of small garages with very limited space try to save their small working area, so they think through various options for how to make a folding table in the garage with your own hands. However, to save space, you can offer a much simpler and inexpensive option - just make the table a little smaller in width, but longer.
Countertop Installation
So, all the main preparatory work related to the creation of the frame of our design and the manufacture of drawers has already been completed. It remains only to lay the boards in the countertop and, having previously treated the table with anti-corrosion compounds, paint it. We look further:
- We take boards and cut them to the required length.
Important! Before we put them in the frame, you will need a special antiseptic treatment that will protect the tree from bacteria and beetles.
- Now we open with paint the entire design of the table, which will also provide the metal with reliable protection.
Important! When painting, pay special attention to all welds, since they are the first to fall victim to dangerous corrosion.
- All remaining irregularities and droplets from welding are also cleaned or removed from the metal surface using a grinding disc.
Important! Do not forget to pre-grind the boards, as this will greatly simplify the subsequent placement of a protective steel sheet on them. Boards are attached to the frame with ordinary screws.
You can start laying boards on a metal frame immediately after it has thoroughly dried. Try to lay them on the countertop not very tightly, as the wood at temperature and humidity changes always changes its characteristics and may shrink or increase in size. Leaving a small gap for these vibrations, you will prevent possible cracks and swelling of the wooden table top. All these small but important secrets will be useful if you decide that a do-it-yourself tool table is your option.
to contents ↑Antiseptic Treatment
In this section, we dwell in more detail on the process of treating countertops with a special antiseptic. Many people prefer not to pay special attention to this procedure, but it's a pity, because if you do not do it as it should, then only a couple of years from the wooden parts of your table there will be one trash.
How to choose an antiseptic?
Today on the market there are a huge number of different antiseptic products, which vary greatly in their antibacterial actions, as well as in chemical composition. However, the main ones are:
- made on the basis of oils;
- made on a water basis;
- powerful combined mixtures using a whole group of different compounds.
to contents ↑Important! We recommend the use of water-based antiseptics.They are very popular due to the fact that they not only perfectly cope with the destruction of mold, fungus and beetles, but also serve to increase the resistance of wood in case of fire.
Steel sheet mount
In fact, the sheet could simply be welded on top of the countertop frame, however, the fact that there are already wooden boards inside will not allow us to do this. Therefore, we take ordinary screws and fasten it directly to the boards. And before that, do not forget to open this sheet with a special anti-rust compound.
to contents ↑Important! You can also then use the paint left over from painting the table and also cover the surface of the sheet with it. But we would not advise you to do this, due to the fact that in the process of work on the table, it will still all peel off and it will stop looking beautiful.
Final stage
We install drawers and shelves, as well as plywood on the table frame. This stage is the finish of our table. Having finished this work, we open the plywood with a protective compound and leave it to dry thoroughly. We attach various hooks and screws to the power panel, which will serve to accommodate hanging tools. On this, all work is completed and the table for the garage is completely ready.
to contents ↑Stock footage
In this article, we examined in detail one of the options how to make a table in the garage with your own hands. We hope that this information was enough for you to competently cope with the work and now be able to implement more complex technical tasks with this piece of furniture.
 (No ratings yet)