Do-it-yourself little table from old books
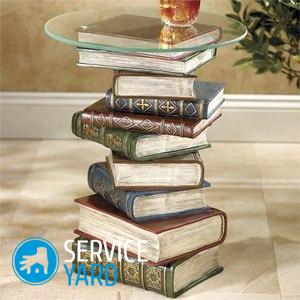
A coffee table is a convenient and useful piece of furniture that has a place in the whole apartment: living room, bedroom, hallway and even the kitchen. Do not want to buy standard furniture, which is a little tired of its routine? And how do you like the idea of making a table of old books with your own hands? Of course, we are not talking about expensive folios or sweet-hearted editions, which you scroll through. In the home library there are many volumes that are already unsuitable for reading, but for some reason it is a pity to throw it away. So why not give them a new life?
to contents ↑Book Use Options
A table of books with your own hands can be done, as they say, “from scratch”, or you can restore old furniture. The old countertop is restored and then painted. The shade of paint depends on the style in which the room is designed. For a classic interior, dark paint, as close as possible to a natural shade or varnish, is suitable. In a modern interior, 1-2 bright color accents are appropriate, so the table can be successfully used in this quality.
to contents ↑How to make a table out of books? Master Class
First of all, pick up about a dozen books that you absolutely do not need. It can be textbooks with outdated information or old reference books. The format should be approximately the same.
Important! Note that the books were strong enough, not torn.
What do you need for work?
Before making a table from old books, prepare such materials and devices:
- Metal rod with threaded thread. The diameter of the rod is about 6 mm and the length is approximately 0.6 m.
- 20 mm washers - 2 pcs.
- M6 nuts - 2 pcs.
- Clamps - 3 pcs. They can be replaced with any other goods.
- PVA glue.
- Cord made of durable material.
- Black acrylic primer - 400 g.
- Dye “bronze”.
- Plywood sheets of various thicknesses.
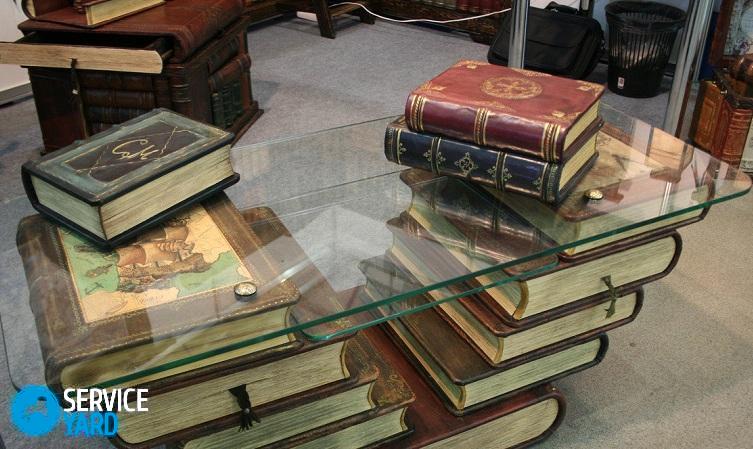
Operating procedure
The algorithm for making a coffee table is as follows:
- Fold the books in a column. Moreover, it is not necessary that their corners coincide. You will get a nice stack of columns with corners directed in different directions.
- Drill a hole in the center of the resulting column approximately 3 mm larger than the diameter of the rod.
Important! Make sure that the hole fits exactly in the center of the stack of books.
- Make the same holes in the center of the plywood sheets. Plywood will serve as a countertop.
- Pass the bar through the hole made.
Important! If you couldn’t find the same sized volumes, alternate the larger and smaller books. Do not forget to direct the corners in different directions.
- Squeeze the structure tightly, then carefully glue. It is important that the leg of the future table is strong and stable. Make the base from plywood, make the same holes in it as in the countertop.
- Use the nuts and washers to secure the countertop.
- Turn the structure upside down with plywood worktops, press down with a load or clamps.

Dressing
After a few hours, when the glue is completely dry, you can start painting the table:
- First cover it with a primer layer - it will acquire a chocolate brown shade. This can be achieved by gradually adding basic colors to the primer (in the black primer - blue, green, red, orange paint).
Important! Try to add in small doses to achieve the desired shade.
- When the primer is completely dry, paint the surface with bronze paint.
to contents ↑Important! Apply the paint with a brush or (even better) with a spray. Apply a layer of “bronze” so that the primer shines through it. This artificially aged product looks stylish and unusual.
Stock footage
As you can see, the work will not be so painstaking as creative. And as a result, you get an extraordinary piece of furniture that can become a bright accent and a real decoration of the room.
 (No ratings yet)