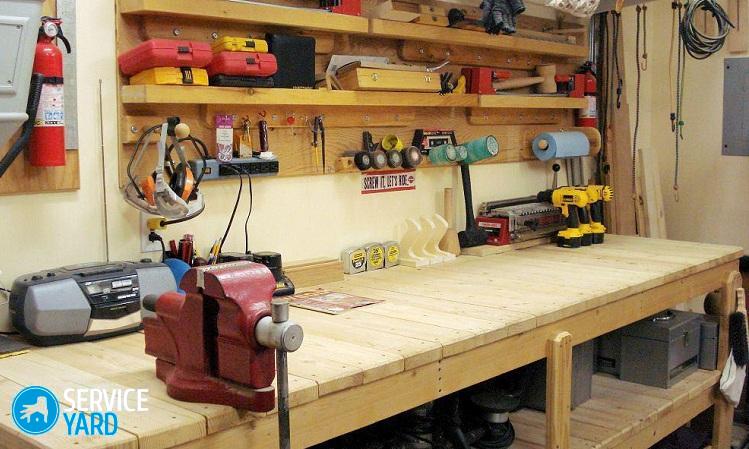
DIY joiner's table

Nowadays, a carpentry table is an indispensable attribute of most workshops, garages and various outbuildings, as the real owner will always find work in one way or another connected with wood. Although you could just buy it, however, to make a joiner's table with your own hands - perhaps the most preferred option. The fact is that any high-quality product costs good money, and it is not recommended to take cheaper options, for just one simple reason - they will last a very short time. In addition, one should not forget that no one will do this better than yourself, unless, of course, you have at least a little experience with the tool. Therefore, let's look at just the option for the independent manufacture of a joiner's workbench.
to contents ↑What is necessary for the construction of a joiner's table?
Let's first decide for ourselves that the carpentry workbench is one of many varieties of the well-known ordinary table, which was invented for working with wood. In height, such a table happens, as a rule, in the region of 70-90 cm.
For work, we will take the following materials:
- Pre-processed and well-planed timber, which must undergo training on the so-called planer. This is necessary to better match the size parameters and subsequent fitting.
- Then we will need to strengthen the stiffness of the special elements, consisting of wedges, which then clog into pre-prepared holes located on the screeds. This is necessary for those cases when you need to disassemble the table.
- One sheet of canvas size 1980x610x40 for the table top, as well as carpentry glue and screws.
Thinking through the drawings of the joiner's table with your own hands, you must remember that in the first place should be its functionality, and that working at a workbench should be simple and convenient.
to contents ↑Joiner table layout
The usual layout of a carpentry bench is as follows:
- Table supports are usually made from soft wood, such as pine, spruce or linden. To achieve acceptable stability, you need to connect these supports with each other using pre-prepared longitudinal bars.
- The surface of the carpentry table. Hardwood is already being used here. This is due to the possibility of longer operation of the workbench without repair and premature replacement of its worktop. A vise is installed on the working part of the countertop, in which the workpieces will be fixed, and if the table comes out long enough, then it makes sense to put two vices. Some - more powerful, will serve for large parts, and those that are smaller - for very small.
Important! It must be remembered that the permissible thickness of the wood material is usually recommended at least 80 millimeters.
- Some of the experienced craftsmen on the back of the countertop make several different recesses or just put a couple of small drawers made of ordinary rail. They can then be used to place accessories and some other useful things.
We are developing a table design
As you understand, a project will be required to work first.To develop it is not so difficult and now, we will show how it is done:
- joiner's workbench should be made in such a way that it is comfortable and looks good;
- its width, as well as the working length, will depend on the entire area of the place where the joiner's table is planned to be installed, but the following sizes are generally popular, when the width of the joiner's table is around 80 centimeters and the length is 2 meters;
- the height of the table is usually determined against the background of indicators such as the growth of its owner, and, given the fact that most operations are usually performed in a standing position, then in the case of a person of average height, the height of the joiner's table will be around 90 centimeters;
- the configuration of the countertop and the location of all the fasteners on it depends on the type and volume of operations performed by the master, as well as on his preferences;
- if you have a folding table, then you can reduce it, which can be done by reducing the thickness of the parts, removable tabletops and folding legs of the workbench;
- the project usually indicates the place where the carpentry table will be placed, the necessary lighting for work, and all electrical wiring, including outlets.
So, the project is completely ready. Now, on its basis, it will be possible to begin preparatory work, which we will discuss below.
to contents ↑Preparatory Activities
After calculating the actual dimensions and creating your own drawing, it becomes clear that any man can do this job. It remains only to decide on a specific project, since a carpentry table with their own hands is usually done for specific rooms. In addition, its purpose can also be very different from each other. For example, someone will need it only during the overhaul of a house or cottage, and others for everyday work with wooden parts. Therefore, there are several completely different options.
Mobile
An option that is perfect for garages and small home workshops, and its main purpose will be to work on small and medium-sized projects related to wood processing. The completely allowable weight of such a table will allow you to move it as necessary.
As for its configuration, given the small size, it will be possible to place on it only a medium vise and an electric whetstone. In the case of installing the latter using a workbench, it will be possible to carry out a certain number of locksmith work.
Stationary
Next we will consider the question of how to make a joiner's table in a stationary version. Here, the main distinguishing feature is its massiveness. It may be necessary for those who are often busy in the field of sawing logs, large timber or a large number of boards.
Important! Many lovers use it only during any small construction work, when it is necessary to process wooden elements for the roof or, for example, when building a bath. At the same time, if a person lives in his own house, then there will always be a place to place it, which can not be said about a small garage or an annex.
Of these two options, most amateur craftsmen choose the first, since it is much easier to manufacture, and, as already mentioned, it can always be easily moved if necessary.
to contents ↑We are building a carpentry bench
The whole process of making a joiner's table with your own hands will consist of several stages.
Base
This is usually done in two stages, which includes the direct assembly of the frame and the installation of countertops.
Important! From the very beginning of the work to its complete completion, it is necessary to strictly control the installation of parts and their fitting. It is best to use the construction level for this.
We begin the assembly from the base of the table:
- We knock down the structure, which should be extremely rigid.To achieve this, we install between the legs of the table a special jumper, which is located horizontally. Here, along the length of the base, it is necessary to fix the tsar.
- We mount all jumpers half a meter from the floor surface, except for their direct functions, they can be used as shelves for a large tool.
- During the next step, with the help of a thorn-groove lock, we connect the bars prepared for the base. The groove is pre-carefully glued with wood glue. Where it is not possible to apply glue, we do this with the help of self-tapping screws.
- If the workbench was conceived as a mobile option, then we assemble the frame parts using metal corners.
For assembly, you will need a lot of carpentry glue and clamps, which must be put in all places where the glue was used. This will help better join the joints. Many who have never worked with carpentry glue and clamps find this quite difficult, but it is not. It will be enough to look once, as the master performs this work, and you will do everything exactly the same.
Important! The design of the entire workbench will become even more reliable, and its strength can also be increased if wedge-shaped inserts are installed between all sides of the frame. You can make them from the scraps of the remaining beam and fix it with screws, and connect the opposite narrow ends with jumpers.
Countertop
There are several options for making countertops. We will look at one when it is made from thick boards.
Important! Before starting the direct assembly, it is necessary to carefully process the boards so that they later lie exactly without cracks. When different debris begins to enter and clog in the cavity of the countertop, this interferes with the work, and in general gives an unaesthetic appearance to the whole table.
Step-by-step instructions on how to make a joiner's table with your own hands:
- We fasten the boards to the bars that are on the inside. The grooves for them were already provided for in the base.
- After installing the boards, we carefully grind the countertop first, and then open it with a protective drying oil or special quick-drying oil, in order to avoid subsequent injuries and splintering from wood chips.
- Now we fasten the finished countertop to the base using metal corners.
Important! Do not forget to provide special notches in the end, which can be used to install a vise.
- At the bottom of the table we put a plywood gasket, and the upper part of the vice will be at the same level as the tabletop itself.
- Now we apply the vise and draw places for their fastening, after which we use bolts, washers and nuts for their fastening.
- All holes for fastenings are pre-milled and the bolt heads are recessed into them completely.
We finished making the joiner's table with our own hands, now we can begin to analyze what we can place on it.
to contents ↑What and how to fix on the table?
We place the vise away from the corner. This is done only for one purpose - so that in the presence of a huge load it was impossible to disrupt them. In addition to the vice itself, special emphasis will need to be installed on the countertop. They can be purchased or made independently. It is not recommended to use pins or bolts, as they can cause damage to workpieces. Typically, such damage is caused by bolt heads. Therefore, it will be much easier to make rectangular stops with convenient adjustment, which can reliably fix a wide variety of parts. To do this, drill several holes in the upper part of the countertop so that they would be approximately half the entire distance from the vice. After that we mount our stops in them. Performed in this way, they can reliably fix almost any workpiece.
to contents ↑Stock footage
It does not always make sense to make a huge construction of a carpentry bench.Very often, many simply do not have enough space to install it, so it will be so important at the preliminary stage to decide whether your table will move somewhere or not. If yes, then use a more mobile model, and if not, then you can safely use its most massive version and mount it firmly anywhere. In any case, the final choice will be yours.


