

DIY clothes dryer
If you live in an apartment, then you probably came across a question: how to dry clothes and which dryer to choose for this? The problem is especially relevant at the initial stage of arranging life. The most practical and popular option is a dryer attached to the ceiling. To learn how to make a clothes dryer with your own hands, we recommend reading this article.
to contents ↑Drying Options
The method of drying clothes in the yards and in the adjoining territories has long been outdated. High-rise buildings are growing up, sites are shrinking in size, often turning into parking lots, and this is simply uncomfortable.
Also, the following can be called cons:
- High risk of re-contamination of the laundry;
- The likelihood of damage to clothing.
One can only hope for square meters of their housing. But what if the area of the apartment does not allow drying clothes without compromising on convenience and comfort? The solution is simple: build a ceiling dryer for your own hands on the balcony.
to contents ↑Where to dry clothes?
As we already noted, there are several options for the location of dryers.
Balcony
The most popular and convenient place for drying clothes is the balcony.
Things in this case dry quickly, as there is good air circulation. In addition, the balcony helps a lot when there is simply no free space in the apartment where you could put a dryer.
Important! Clothes dried on the balcony are always fresh, which is also a significant advantage.
Bathroom
Another common place for drying is the bathroom.
If your apartment is located on the ground floor or for some other reason is not equipped with a loggia or balcony, you will have to dry things in the bathroom.
Here drying structures that come to the wall and do not take up much space can come to the rescue. We will talk about the types of dryers below.
Important! The main disadvantage of this drying is the increased humidity in the bathroom. This feature increases the drying time of clothes. As a result, the latter in the process can acquire an unpleasant odor.
Corridor
As a place for drying clothes, we will not discount the corridor.
Not the most convenient option. However, there are apartments without a balcony with a small bathroom. In such cases, the hallway becomes a real lifesaver.
Here, a floor-mounted mobile dryer is suitable, which can be easily folded and cleaned if unnecessary.
Despite the fact that the design choice for drying clothes is now very large, interest in how to make a clothes dryer with your own hands, not only does not fade, but also grows.
This is due to the simplicity of the manufacturing process: you can build a dryer to your taste and needs even without experience. It is enough to have the desire and the materials necessary for this.
to contents ↑What dryers are: types and principles of work
Dryers are classified as follows.
By the method and place of installation:
- Ceiling
- Wall mounted
- Floor standing.
According to the fixing option:
- Mobile
- Stationary
By type of construction:
- Retractable;
- Folding
- Outboard.
How to choose?
So how do you choose the right dryer from the wide variety of options? Let's consider them in more detail.
Ceiling Mount Dryers
Ceiling dryers can safely be called the most practical and convenient option.There are many reasons for this:
- Significant space savings;
- Invisibility: you can see them only by raising your head;
- Remote location of drying items that do not interfere with movement.
Dryers for the ceiling are of three types.
Capital
It is a familiar version of the dryer, consisting of ropes. It is attached to two parallel blocks located at the top. Doing such a ceiling clothes dryer on the balcony with your own hands is quite simple. The main job here is to install the mounts.
Important! When buying a dryer, evaluate to which surface it will be attached. This will help you find reliable mounting blocks.
Retractable
The design is very similar to the accordion, which becomes so if you pull it at the bottom. So it looks unfolded, ready for use. The dryer is also attached to the ceiling.
Important! This option loses to the former in that it holds fewer washed items.
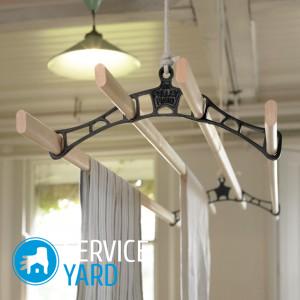
Dryer liana
Complex, and at the same time, the most ergonomic system. It is held on two fasteners, between which the ropes are stretched. The latter from one side stretch to the very corner of the wall.
This option is convenient in that each bar can be controlled, regardless of the entire structure. Despite the fact that the liana dryer does not always look aesthetically pleasing, residents of high-rise buildings increasingly prefer it.
Important! If you buy a ready-made dryer, pay attention to the mounts that come with the kit. There are designs that are not equipped with mounting blocks. In this case, you should consult with the seller which hooks are more suitable for the selected model.
If you decide to make a clothes dryer yourself, consider the ceiling trim of the loggia. Sandwich panels and vinyl siding require plastic linings. They must be purchased in advance.
Wall drying
Such systems are divided into two types.
Stationary or capital
It looks almost the same as the ceiling dryer of the same name, the only difference is in the location of the fixtures. In this case, the hooks are mounted on the walls. The option is considered reliable and simple.
Important! Suitable for small balconies. The height of the cables during operation cannot be adjusted, but such a dryer wins capacity in the next category of wall structures.
Folding
This option does not withstand heavy and dimensional things. The undoubted advantage is the saving of space. Drying is just two parts with cables that easily hide inside the structure. Easy to use, folds up and folds out in one go.
Floor dryers
Everything is simple here. This design does not require mounting. It can be put and carried anywhere. In case of uselessness, drying is folded, freeing up precious space.
to contents ↑Important! Floor options contain a large amount of linen. Equipped with additional wings on the sides. This allows you to dry even more clothes. However, in a fully unfolded form, such a dryer takes at least 1.5 square meters. m of apartment space, which is its main disadvantage.
Other selection criteria
The first thing you should focus on when buying a drying structure is the area of your apartment. Think about where your dryer will be located.
If there is a balcony, we recommend that you pay attention to the options for mounting on the ceiling. They are the most comfortable, practical and roomy.
How to make a clothes dryer on the street with your own hands - we will describe in detail below.
In the meantime, let's pay attention to another important factor when choosing a dryer - the materials from which it is made.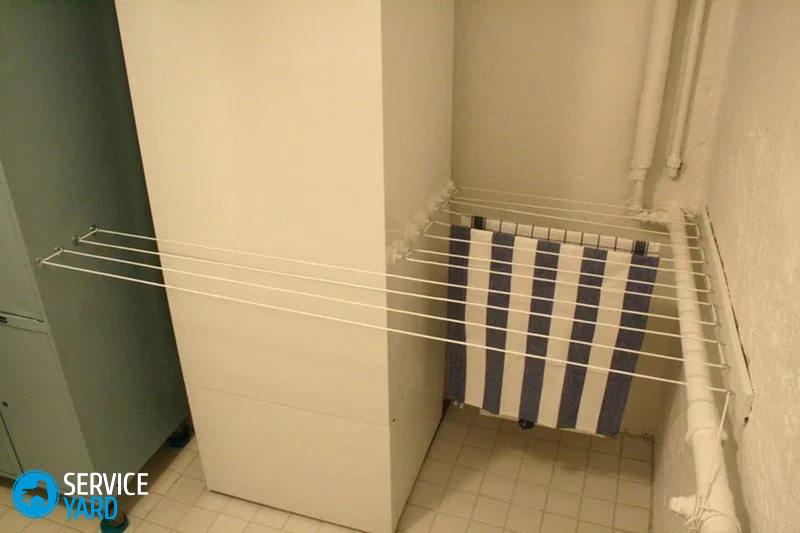
Materials: what to prefer?
The list of basic materials from which drying structures are made looks like this:
- Plastic;
- Stainless steel;
- Aluminum;
- Wood.
What is the difference:
- Plastic drying is easy, but this design will not last you long.Options made of plastic are short-lived, but they are much cheaper than others.
- Dryers made of stainless steel can be called the most durable and reliable. Thanks to the chrome coating, they look exquisite in the interior. Such designs do not bend even under the large weight of wet clothes.
Important! If you focus on quality and durability when choosing, stainless steel structures are your option.
- Dryers made of aluminum are relatively durable and resemble plastic ones in lightness. The main disadvantage here is the oxidation of the metal during operation. Over time, rust appears on the rods, which can ruin your clothes.
- Wood drying also has a place to be. They look very cute and comfortable. Wood options are not subject to deformation. On these dryers you can safely place the most difficult things: large sets of bed linen, towels, outerwear.
Important! If you decide to make such a dryer for your own hands, you need to take care of the fixtures. They must be particularly durable.
In order for wood drying to serve you for a long time, it is necessary to treat it with a special solution from pests and excessive moisture. After that, coat the structure with varnish. This will extend its service life and increase strength.
to contents ↑DIY dryer
Consider a few simple drying structures that can easily be built independently.
If you are wondering how to make a tumble dryer on your own with your own hands, pay attention to this inexpensive and compact option:
Folding clothes dryer
For its manufacture you will need:
- rope;
- quality scissors;
- drill;
- drill 16 mm;
- two round wooden sticks, 4 cm in diameter and approximately 70 cm long;
- 5 meter clothesline;
- clamps.
Instruction:
- Take the wooden blocks and make notes where the holes for the ropes will be drilled. The distance between them should be about 10 cm.
- Using a drill, make holes in both workpieces.
- Pull the rope through the first hole of the wooden workpiece and secure it with the knot. Then - through the last, also securing with a knot. This will help relieve pressure on the rope when operating the dryer.
- Thread the clothesline through the remaining holes in the blanks and also tie the knots.
- Using twine, fix the structure to a balcony or a tree, if you were faced with the task of how to make a clothes dryer on the street with your own hands.
- The ends of the bars should be connected with a rope in the form of a triangle.
Important! To avoid distortion, the triangles on both sides should be approximately the same.
Well, now you can admire the result. The advantage of this dryer is its ease of use. It easily twists and does not take up storage space at all.
Clothesline dryer
If you are interested in how to make a clothes dryer on the balcony with your own hands, then this option will be of interest for its reliability and spaciousness.
You will need:
- Fasteners;
- Self-tapping rings;
- Timber;
- Furniture corner;
- Rope;
- Drill;
- Rings for the ropes.
Instruction:
- The manufacturing process should begin with the installation of the mount.
- We install a furniture corner on the wall.
Important! Pay attention to the dimensions of the furniture corner. It should be large enough to go through the embedded part of the board and the panel.
- Attach the beam to the corner.
- Screw the self-tapping rings into the timber at regular intervals.
- The same rings must be placed on the top of the beam and on the wall where the corner is located.
- On the opposite side, place the rope rings.
Important! Thanks to self-tapping rings, in the process of using the dryer it is possible to adjust the degree of tension of the clothesline.
As you can see, such a reliable and practical clothes dryer with your own hands can be made without much effort and knowledge.
Ceiling rope dryer: do it yourself
It is a popular and easy-to-use option.
To make the structure you need:
- Screws having rings on the back of the fasteners - 2 for each rope;
- Drill;
- Clothesline;
- Hole-fastening material.
Instruction:
- Drill holes for the screws in the walls.
Important! The latter in diameter should be larger than the holes in the wall. Only in this way can the design hold firmly.
- Pour bond material into all holes.
- Screw in the screws with your hands.
- Pull the rope through the rings, securing on both sides.
Important! We advise you to pull the rope in a checkerboard pattern without cutting it into separate pieces. This will extend the life of the dryer.
Wall-mounted fan
If you are thinking about how to make a clothes dryer on the balcony with your own hands, but at the same time you want originality, this option is for you.
You will need:
- Nuts and screws;
- Metal corner;
- Sandpaper;
- Varnish or paint;
- Board;
- Stair balusters.
Important! Choose straight balusters, as they will serve as clothing holders.
Instruction:
- Cut the square edge of the baluster, shorten the second.
- Step back from the edge with a square section a couple of centimeters and make a hole with a diameter of 1 cm.
- Attach a board to the wall of the balcony, which will act as a substrate for the holders.
Important! The substrate is needed when the walls of the balcony are finished with plasterboard. If you are dealing with a concrete wall, no foundation is required - mount the corners directly on it.
- Attach the baluster holder structure between the two corners.
Important! In order for the holders to rotate, but not to be loose, the washers are placed between them.
- Treat balusters with sandpaper and varnish them. If desired - can be painted.
Such a clothes dryer with your own hands can decorate your balcony without taking up much space.
Bath dryer
The simplest device for drying clothes in the bathroom, which is applied directly to the bath. Of course, it is impossible to place large things on it, but for drying small things it is an indispensable assistant.
For the construction you will need:
- Wooden bars - 2 short and 5-6 long, slightly larger than the width of the bath;
- Nails
- Sandpaper;
- Lacquer.
Instruction:
- Take 2 short beams - this is the basis for fastening the remaining wooden beams, which will serve as holders.
- Nail the last on the base;
- Coat the dryer with varnish, pre-treated with sandpaper.
Stock footage
We hope that our material will help you easily and quickly make a clothes dryer with your own hands. Have a nice process and a great result!
- How to choose a vacuum cleaner taking into account the characteristics of the house and coatings?
- What to look for when choosing a water delivery
- How to quickly create comfort at home - tips for housewives
- How to choose the perfect TV - useful tips
- What to look for when choosing blinds
- What should be running shoes?
- What useful things can you buy in a hardware store
- Iphone 11 pro max review
- Than iPhone is better than Android smartphones
 (No ratings yet)