

DIY leather flowers
- What can be decorated with flowers made of leather?
- DIY leather flowers. What materials and tools are needed?
- Flower made of leather with your own hands. Workshop on patterning petals
- How to make leather flowers with your own hands? Manufacturing technology
- How to make flowers from leather? Color examples
- Stock footage
Now “handmade” things are more popular than ever, and many people want to try to create something exclusive for themselves. You can start with small jewelry, for example, make flowers from leather with your own hands. Handmade rose on a hoop, daisies on sandals, a dahlia on a purse - this is so exquisite. When you see such things, you want to do such things yourself. If you know the secrets of this type of needlework, then everything will surely work out, because every woman somewhere in the bowels of the closet dusts an old leather handbag, unnecessary gloves or a jacket made of leather that is small, has gone out of fashion, has fallen into disrepair, and the hand does not rise to throw it away because the skin is the same. These things need to be given a second life, and such a hobby may well become a small business. Flowers for decoration are now made from satin ribbons, fabric, foamiran, beads, but those made of leather, suede and furs - they look elegant and expensive. How to make flowers from leather is described in detail in this article.
to contents ↑What can be decorated with flowers made of leather?
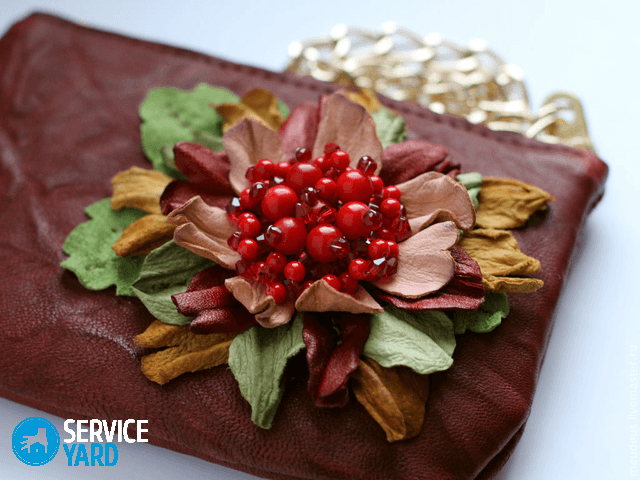
The scope of this decor is very wide: they can decorate hairpins, elastic bands, hair hoops, handbag, hat, suit or dress, shoes. From such a flower you can make an interesting brooch, jewelry, or you can create a topiary or interior composition - all that your fantasy tells you.
to contents ↑DIY leather flowers. What materials and tools are needed?
For this type of work you will need:
- Flaps of skin, preferably in different colors.
- Paint suitable for leather (shoe paint, nitro-paint spray, oil pastels, aniline dyes).
Important! Some craftsmen use decoctions of plants for such purposes: pomegranate, chamomile, walnut, oak bark and others.
- Glue “Moment”, PVA or PVA, you can use super-glue and a glue gun.
- Gelatin.
- Candle or teflon pan.
- Brush (preferably squirrel);
- Tweezers;
- A needle with thread, an awl.
- Thick paper for templates.
- Gel pen (it draws best on the skin).
- Ruler.
- Buns or some solid round object (perhaps the handle of some instrument) to shape the petals.
- Tailor's scissors, stationery knife.
- Wire if you will make a stalk.
- Beads, beads, rhinestones, buttons - to decorate the middle of the flower.
- A pin, if the flower is a brooch or just attached to something.
Important! If you like this type of needlework, and you want to make flowers of leather with your own hands often, then in specialized stores you can buy not only pieces of leather of different colors and thicknesses, but also special tools.
- silicone rugs of different density;
- bulks of different sizes to give a round shape to the petals;
- a special knife for thinning the edges of leaves and more.
The simplest flowers made of leather with your own hands for beginners can also be made using improvised means.
to contents ↑Flower made of leather with your own hands. Workshop on patterning petals
What flowers can be made of leather? Yes, almost any. The most popular are roses, daisies, carnations and dahlias. Details templates for these colors can be found on the Internet. Or you can go the other way:
- Usually 3-5 parts of different sizes are made, since the flower has different petals.It will be even better to draw them by hand, then each sheet will be individual, as in real life.
- But if your favorite flowers are different, then you can get the patterns as follows: take a living flower, disassemble it into “spare parts” and circle these petals and leaves with a pencil on paper. Thus, you will receive a pattern of your favorite flower in full size.
to contents ↑Important! Do not forget to carefully consider and sketch all the veins and other features of this miracle of nature.
How to make leather flowers with your own hands? Manufacturing technology
This process consists of several stages. Let's consider each of them in detail.
Procurement of parts:
- First, imagine what flower you would like, what size and for what purpose.
- Find the finished patterns on the Internet and print them, you can redraw manually.
Important! As we already said, you can take a real flower as a sample and circle its elements on paper.
- If you want to change the color of your skin, you can dye it with nitro paint, skin paint, aniline or universal dyes. It is best to paint with a squirrel brush. With oil pastel, you can give light skin shades and color transitions.
Important! For such crafts, leather with a thickness of 0.5-1.3 mm is suitable. It will be difficult to work with thicker material.
- If your future flower has a simple leaf shape, for example, slightly rounded, slightly curved edges, then you can immediately gelatine the entire surface of the skin so as not to fool with PVA glue processing of each leaf. Then the parts will be malleable when heated. For this:
- Dilute 3 teaspoons of gelatin in 1 cup of water. Allow to swell for 20-30 minutes, put on a small fire and stir until completely dissolved, without bringing to a boil.
- Allow the mixture to cool slightly, and then with a wide brush with quick strokes, apply gelatin to the inside of the skin, making sure that the solution does not get on the front part.
- Let it dry, after which you can start cutting parts.
- Approximately estimate how many petals you need to cut (the size of a piece of skin should correspond).
Important! There will be many petals in the lush flower, and do not forget that they will be different in size. Therefore, there should be 3-4 patterns, each of which is slightly smaller than the previous one. There are flowers where it is enough to have 1-2 kinds of sizes, for example, for chamomile.
- Attach the templates to the inside of the skin and circle the handle.
Important! It is necessary to trace the petals close to each other in order to economically spend a skin flap.
- Cut with tailor's scissors - they are easier to cut and they do not deform the edge of the part.
- In addition to the petals, you will also need a base circle, on which we will glue our blanks (it should not look out, but all the petals should fit).
- If your flower is supposed to be fastened to something (a bag, a suit, it will be a brooch), then you need one more circle smaller than the first to fix the pin on the base of the flower.
- Usually, for a more natural look, the flower head is supplemented with green leaves. If there is no green skin, they can be cut from a dense fabric of the desired shade, such as felt.
- If you didn’t soak the skin with gelatin in advance, then cut the blanks with grease with PVA glue.
- If your flower is on a stem, then take the wire of the required thickness and wrap it with a narrow long strip of leather, smeared with “Moment” glue.
Giving blanks the desired shape and relief
The petal, which according to the plan should be wavy and with veins, you should lubricate the PVA, fold along the accordion, twist with a flagellum and bend, for example, around a stick:
- Allow the workpieces to dry, but not completely.
- Now turn around, trying not to deform the bends and creases.
- Allow the parts to dry completely and then glue in tiers to the round base.
Lubricate the petal, which should be wavy, with PVA glue and leave to dry:
- Without letting it dry completely, pick it up and pull it in all directions.
- When you have reached the desired shape - leave to dry to the end, and then collect the flower.
You can achieve the convex shape of the petal like this:
- Cut the desired workpieces, heat a clean and dry Teflon pan over low heat.
- Now you need to put the petal with the wrong (suede) side on the pan and watch carefully - as soon as it is convex, you need to immediately remove it from the heat.
Important! In order to keep track of the condition of each workpiece, we recommend putting them in a pan no more than 2-3, otherwise the skin may burn.
The second method of heat treatment is to heat the petal above the candle flame. In this case, it is also necessary to lubricate the inside of the PVA and dry a little. It bends under the action of high temperature and slightly bends the tip.
Important! In order not to burn yourself, hold the part with tweezers.
If you have bullets (a tool with a steel ball at the end), then you can give them a domed shape. Balls on bullets can be of different sizes. Choose the right one, heat it on fire and apply it to the part.
Important! To do this, you must have either a special stand with recesses of the desired diameter or an elastic substrate into which you will press the petals.
If the leaf should have a noticeable streak in the middle, then:
- Using a ruler and pen, draw a strip in the right place.
- Then, with a match, apply “Moment” glue on this mark, wait a bit, fold the sheet in half, press down along the fold with a ruler and put the load on.
- Let the glue dry, and then gently straighten the leaf, but do not touch the resulting fold.
- Now lubricate with PVA glue, dry and mold over the candle.
Important! Small veins on the petals are convenient to make not with a sharp cutter. Carefully guide them in the right places, being careful not to cut the skin. If the petals are long and narrow, like a dahlia, then you can bend them by passing them with the tip of the soldering iron with effort.
Product assembly
Most flowers are collected according to a similar scheme: on a base circle, using the “Moment” glue, you begin to collect the flower head:
- First, glue the lower tier - the largest petals. Fix them so that there are no gaps between them.
- Then a little smaller - higher, and so on, until you reach the middle.
- To design the center of the flower from the skin with your own hands, you need to show imagination. It can be a button or a cotton ball covered in leather. To do this, lay a stitch with a strong thread along the edge of a leather mug, put a button or cotton in the center, pull the thread. A ball of cotton wool can be pulled on top of the threads to form lobes.
- Now fix this center in the right place with the glue gun.
- Stamens can be depicted from a piece of leather cut into thin strips almost to the end, so that a “fringe” is obtained, fold it into a tube and fix it in the center.
- In addition, the middle can be decorated with beads, rhinestones, beads and other beauty.
- When the main part is ready, do the fastening. Using a glue gun, you can fix the flower on a hoop, shoes, hairpin or elastic for hair.
Important! If you make leather brooches with your own hands - buy special pins, they are inexpensive. Unlike usual, it has a flat base with holes, thanks to which the flower on it holds well and does not spin.
Fix the pin on the base of the flower with a glue gun and on top stick a second circle of a smaller diameter, which will cover the pin and give additional fixation.
to contents ↑How to make flowers from leather? Color examples
Many are interested in specific examples of how to make a flower out of leather. The master class of the most popular products is further in our article.
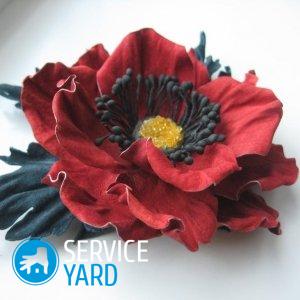
Poppy
To make a poppy you will need:
- red skin and green;
- some cotton;
- black thread;
- needle;
- scissors;
- semolina;
- black paint;
- PVA glue and “Moment”;
- pen and paper;
- if the flower is on the stem - wire.
Procedure:
- We print and cut out ready-made patterns of petals and green leaves or draw on paper ourselves.It can be 4-5 petals larger, with a rounded edge and 4-5 0.5 cm smaller, the edge can be made a little wavy (see the image of a living blooming poppy and try to repeat the shape).
- Cut 2 green leaves with a jagged edge, 2 circles for the base and 1 for the middle.
- Mix water with PVA in a ratio of 1: 1, apply this mixture to the petals with a brush or simply dip them into the solution (after dipping, squeeze and remove excess glue with a napkin).
- Use your fingers to stretch the petal in all directions.
- Then fold it with an accordion, twist it with a flagellum and bend it in an arc. Let it dry, but not completely.
- Now unfold the blanks, give the desired shape and let it dry completely.
- As long as they reach readiness, we will focus on the middle. To do this, wrap a ball of cotton wool with a circle of leather, along the edge of which a basting seam is laid with a strong thread. Now pull the thread and lock. The ball should be small.
- Make a string of 2-3 constrictions so that the segments come out.
- For stamens, wrap a black thread on your fingers or ruler, tie it from one end, and cut it from the other.
- Dip in glue and then dip in semolina.
- When this design dries, paint the semolina with black paint (gouache, for example).
- If desired, the stamens can be made from black beads.
- When everything is dry - collect the elements according to the well-known scheme: on the circle base, glue “First” the first row of large petals, then smaller ones, and then the middle. Glue the green leaves underneath so that they peek out from under the flower’s head.
- If this is a brooch, then fasten the pin (see above).
- If this is for an interior composition - wrap a strip of green leather on a wire, fix it with glue, add leaves, and then strengthen the flower head on this stem.
Chamomile
It’s not difficult to make a chamomile, for this you will need:
- the flap is not thick white skin;
- scissors;
- glue;
- button;
- semolina;
- yellow paint (yellow beads);
- a pen;
- green skin if you plan to add leaves;
- wire if you need a stalk.
Procedure:
- On paper, draw a layout of a corolla of 10-12 petals, apply to the skin, circle with a pen and cut.
Important! If the chamomile is magnificent, then 2 corollas can be cut.
- We smear the blank with PVA glue and let it dry a little.
- If you need green leaves, then cut them in a pattern of green leather.
- Now you need to give the petals a relief. To do this, you can use a spoke or a soldering iron. We put the whisk on an elastic substrate and hold it with force on the outside on the center, and on the wrong side along the edge.
- Now let's get into the middle. We take a button with two holes (1-1.5 cm in diameter).
- If the daisy is on the stem - we pass the wire through the button.
- If this is a piece of jewelry, thread a thread or a short wire to make it easier to manipulate the button.
- Dip it in glue, and then in semolina.
- When it dries, you need to paint the cereal in yellow.
- If your daisy is on the stem, then in the center of the nimbus, make a hole with an awl and pass through the wire with the center, wrap a green leather ribbon and stick to the wire, add leaves.
- If it is a hairpin or brooch - paste the yellow center in the center and the pin at the back.
How to make a rose from leather?
- Take the skin of the desired shade, glue, scissors, bulb or candle.
- Prepare 3 templates of different sizes and cut 5-6 petals from them. You can remove the patterns from real rose petals.
Important! You can not adhere to the pattern much, the less the petals are the same, the more natural the rose will be.
- Then, as usual - lubricate their PVA, dry and give them a curved shape using a bouillon, frying pan or candle (see instructions above).
- Now it remains to collect the rose. There are two ways to do this:
- Twist one leaf into a tube and slightly bend the edge. Next, you take turns gluing the “Moment” petal by petal (each one finds the previous one) from smaller to larger. Bend the edges slightly. Everything that interferes and protrudes from the back, cut off with an office knife.
- Glue the petals from large to smaller in tiers on the base circle, forming the flower head. Glue a twisted and bent piece of leather into the middle.
- Add green leaves at the end.
- Glue the pin on the back, decorate with rhinestones.
Stock footage
Now, knowing how to make a rose from leather with your own hands, as well as other flowers, you can make original and beautiful jewelry for any accessory, whether it be clothes or a brooch. Understanding the principles of creating jewelry from leather, you can make not only the products described in the article, but also any other flowers to your taste - orchids, violets, a sprig of jasmine and more. The main thing in this is your desire and imagination.
- How to choose a vacuum cleaner taking into account the characteristics of the house and coatings?
- What to look for when choosing a water delivery
- How to quickly create comfort at home - tips for housewives
- How to choose the perfect TV - useful tips
- What to look for when choosing blinds
- What should be running shoes?
- What useful things can you buy in a hardware store
- Iphone 11 pro max review
- Than iPhone is better than Android smartphones
 (No ratings yet)