

Installing the sink in the countertop

It has never been such that a kitchen dispensed with a sink, unless in modest country houses this is quite possible. Can you imagine a kitchen that doesn't have a sink? If not, then this proves its necessity in the kitchen. As a rule, the installation of the sink in the countertop is imperceptible, because professionals do it while you can watch TV. But if you want to know how to install a sink in the kitchen, then our article will help you very much in this.
to contents ↑Choosing a kitchen sink
Before deciding how to install a sink in the countertop, you must decide which product you choose.
Dimensions
The best option is to connect a deep sink (about 19 cm) and a not too high mixer. In this case, the amount of spray during washing the dishes will be minimal.
Important! The sink must necessarily be deep, so that it is convenient to wash voluminous pans or fold plates after the completion of a family dinner.
Materials
The material is of great importance:
- It is easiest to independently connect the traditional sink, which is made of stainless steel.
- Enamelled steel is a great solution.
Important! Sinks made of artificial, natural stone and other expensive materials still require a more scrupulous attitude. And their design usually predisposes to handing over to installers. They will do everything without compromising the appearance and integrity of the new plumbing.
Kitchen sinks - installation methods
Installing a sink in the kitchen with your own hands can be done using various methods. The installation method that is most suitable for the design of your sink is selected:
- Overhead - are considered budgetary and quite simple to install. The sink is put on the curbstone allocated for it. The disadvantage of this option is that there are still gaps between the sink and the cabinet.
- Mortise - are installed directly in the countertop itself, for this it is necessary to cut out the corresponding hole.
- Table-type sinks - belong to the more expensive segment, are mounted below the level of the countertop, so they provide excellent sealing, as well as a beautiful appearance.
Rules to be followed when installing the sink
There are several rules that must be considered during the installation of a kitchen sink:
- A rule called the Golden Triangle. In no case should a cabinet with a sink be placed near a refrigerator or an oven, because water, electricity and fire are completely incompatible.
- The sink must be located close to the working area where the main preparation of the products takes place - cleaning and cutting.
- The sink divides the entire working area into two parts:
- one is for dirty work;
- the second is clean, designed to serve ready-made food.
- In everyday life, sinks are tied to a sewage system and water supply. They are installed, as a rule, to a wall adjacent to the bathroom or in a corner. But modern technology, as well as building materials allow you to install it in absolutely anywhere in the kitchen.
Getting to the installation of the sink
Installing the sink in the countertop will occur according to a certain algorithm.It can be simpler or more complex, depending on your practical skills and the chosen installation method.
Instruments
In order to install a sink in the kitchen with your own hands, you must have the following materials and tools:
- Sealant;
- Screws and screwdrivers;
- Jigsaw;
- Fasteners - as a rule, they should be included with the product.
Important! Before attaching the kitchen sink, you must carefully treat the entire landing area with sealant. This should provide high-quality waterproofing, as well as protecting the chipboard from various damage due to high moisture.
How to fix the overhead wash yourself:
- Attach the L-shaped fasteners to the cabinet itself from the inside, then make notes.
- Screw on the self-tapping screw in the places you marked.
Important! You should choose short self-tapping screws with a length of no more than 15 mm and twist them so that 5 mm remains at least above the mark, not less.
- Cover the end of your drawer with sealant - this is done in order to protect the furniture from water and additionally glue the sink.
- After that, install the sink on the screws already screwed into the cabinet and move to the final fit.
- Fix the fasteners, remove excess sealant - you can already begin the process of connecting the sink to the sewer and water supply.
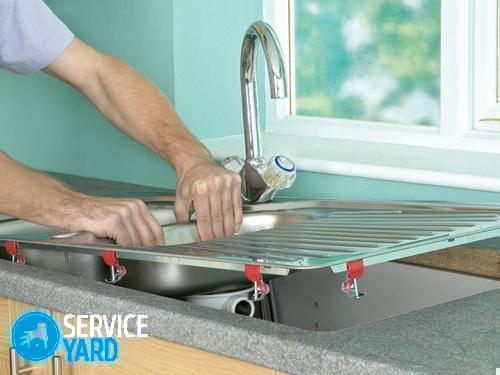
Step-by-step installation of mortise type sink
Of course, it is much easier to install the overhead sink with your own hands, however, the mortise model will provide a higher level of tightness, and on the pedestal along with the common countertop it looks quite neat.
The question of installing a sink in the countertop is solved quite easily - you just have to make the right hole, which in parameters will match the parameters of your sink.
Installing the sink in the countertop is carried out according to the following algorithm:
- On the countertop, indicate the installation location of the sink, determine the shape of the future hole.
Important! To determine the shape, turn the sink over and circle it along the contour directly on the countertop or on cardboard. If the product. which you have chosen - of complex shape, then the finished template should be included. This pattern will help you cut the hole you need.
- Attach the finished template to the countertop at an approximate distance of 7 cm from the edge and start cutting. Step back from the edge 1.5-2.0 cm deep - to leave support for the sides of your sink.
- For a start, make a hole along the cut line with a drill, and after that cut the contour with a jigsaw.
Important! Fix the lower part of the countertop so that it does not suddenly fall out during cutting and does not cause damage - neither to you, nor to the edge of the remaining surface.
- Apply sealant along the saw cut. Cover the lower places of the wash joint with it.
- You can begin to mount the sink - press it with the included clamps.
- After all excess sealant is eliminated, you can start connecting the sewer and water supply.
Mounting a sink below or flush with a countertop
The mortise sink can be fixed flush with the countertop, but this is a rather time-consuming process. It requires a certain experience, since it implies the removal of a certain layer of countertops under the side.
Important! The depth to be removed is equal to the height of the rim of the sink along with a layer of sealant.
In the event that you decide to connect and install a sink so that it is located below the table, then you will have to resort to the help of specialists. A similar installation method is chosen exclusively for expensive structures - those that are not made of steel, but of some natural or artificial stone.
Important! For fixing in this case, special tools are required, for example, a jigsaw, saws with diamond spraying, because in such sinks a drain hole may not be found - a complete sawing of the product under industrial conditions does not occur.
Sinks that are made from natural materials are fixed using special mounting glue.
to contents ↑Stock footage
Now you have step-by-step instructions on how the sink should be installed in the countertop, and if you prefer simplicity to insane frills, then you could cope with the task. Lightweight and practical sink in the kitchen will make your life easier and more convenient, as you will see every day.
- How to choose a vacuum cleaner taking into account the characteristics of the house and coatings?
- What to look for when choosing a water delivery
- How to quickly create comfort at home - tips for housewives
- How to choose the perfect TV - useful tips
- What to look for when choosing blinds
- What should be running shoes?
- What useful things can you buy in a hardware store
- Iphone 11 pro max review
- Than iPhone is better than Android smartphones
 (No ratings yet)